Are you all getting the impression that I like this stamp??? LOL Talk about get your money's worth!
I made quite a few cards using different coloured inks, some are CAS like this one, others (like the one below) are a bit more fussy!
This was stamped onto bright white pearly card and then embossed using WOW Super Fine Black Puff Ultra High embossing powder. It dried to a real raised high glossy shine and I just added a few sparkly crystals here and there on the flourish branches.
Black satin ribbon and suitably blingy buckle from Imagine DIY.
Matted onto black pearl card and then onto the white pearl base card.
Sentiment is a Papermania stamp also embossed in black.
Challenges -
Crafty Pad - Add some Glitter
Magic in the Air - Sparkle
Glitter n Sparkle - Ribbon
Crafty Bloggers - Anything Goes Christmas
Red Carpet Studio - Black and white
Allsorts - Bring on the Bling
The rain has finally stopped here and we're having a beautiful day - blue skies and only a few white fluffy clouds! makes such a change from grey and damp!
It's a bit cold though - so it's a good excuse to sit here in the warm craft room and enjoy the sunshine ------ through the windows!!!!!
Wednesday, 28 November 2012
Monday, 26 November 2012
Pearly tree
Made a mess on my nice tidy desk! And boy did I enjoy it!!!
But I have earned several brownie points from 'he who put up the shelves and organised' as I HAVE put most of the stuff I've finished with away!
Finished my wedding commission (thank goodness) - took me ages as I couldn't get out of Christmas mode at all and I also have a couple of other projects which I want to finish so the brain cells were wandering thinking of other things instead of the task in hand!
Still, made a couple of Christmas cards and this one I managed to get a decent pic of before what little light we had disappeared altogether.
Papers are Foundations Spots and Stripes, Kanban Christmas tree stamp inked with Aqua pigment ink and clear embossed then matted onto some matching card stock from my stash. Punched out a couple of snowflakes and added some aqua ribbon then finished off the tree with these scrummy pearls which were a challenge win.
Challenges -
Crafty Cardmakers - Photo Inspiration
Sparkles Christmas - Contemporary Colour Combo
52 Christmas throwdown - Pearls
Crazy 4 Challenges - Put a Bow on it
OLLCB - Spots and Dots
MAWTT - Dotty
The rain has not abated here all day but we're a lot better off than a lot of the UK - no floods thank goodness - hope your feet are dry wherever they rest tonight! x
But I have earned several brownie points from 'he who put up the shelves and organised' as I HAVE put most of the stuff I've finished with away!
Finished my wedding commission (thank goodness) - took me ages as I couldn't get out of Christmas mode at all and I also have a couple of other projects which I want to finish so the brain cells were wandering thinking of other things instead of the task in hand!
Still, made a couple of Christmas cards and this one I managed to get a decent pic of before what little light we had disappeared altogether.
Papers are Foundations Spots and Stripes, Kanban Christmas tree stamp inked with Aqua pigment ink and clear embossed then matted onto some matching card stock from my stash. Punched out a couple of snowflakes and added some aqua ribbon then finished off the tree with these scrummy pearls which were a challenge win.
Challenges -
Crafty Cardmakers - Photo Inspiration
Sparkles Christmas - Contemporary Colour Combo
52 Christmas throwdown - Pearls
Crazy 4 Challenges - Put a Bow on it
OLLCB - Spots and Dots
MAWTT - Dotty
The rain has not abated here all day but we're a lot better off than a lot of the UK - no floods thank goodness - hope your feet are dry wherever they rest tonight! x
Sunday, 25 November 2012
Almost there!
Have finally sat at my (very) tidy desk! The shelves on top of the desk are done and my storage spaces are almost finished. There's still a little bit to do underneath the work surface - couple of shelves to separate 12" papers from other sizes etc needing fixing into the framework but overall 98% completed and my dearly beloved has worked his socks off!!
And I am one happy bunny!!!!
Have been very good and stored all my stamps into folders - I took off most of the wood backs and the few that were left with the wooden backs fit neatly now into two drawers. I have longed for some ink rack storage for a while so treated myself to these two - one for distress ink pads and one for Adirondack/Versamark etc. -
got all my promarkers into cases, my nesties also onto magnetic sheets and into cases, bought a case for all my embossing folders and so it went on!
Here's a pic now of the top of the craftie space (thought I'd take it now before I started making messy!!! LOL)
OH built me two shelves with removable 'drawers' to keep the embossing powders, mica powders and alco inks tidy and accesibile (they'd been stuffed in a jumble in drawers) and am thinking about what's the best storage for the Dewdrop and Versacolor ink pads... perhaps a small metal rack on the wall as I don't own lots will do the trick?
Still got the 'fabric bags' and the large wicker basket on the top shelf to sort and there's a couple of other boxes tucked away out of sight with lace and other bits in that I need to organise into the wicker baskets that are read and waiting underneath the work top -
but .... I am seriously suffering withdrawal symptoms after being unable to craft for several days so without further ado am going to make a couple of CAS Christmas cards for my own stash... and I have a Wedding Card order to do too..
Hope you're all warm and DRY wherever you are - particularly if you're in our country which is suffering some terrible flooding - thanks for dropping in and am sure dearly beloved would love to hear your comments on his handiwork! xx
And I am one happy bunny!!!!
Have been very good and stored all my stamps into folders - I took off most of the wood backs and the few that were left with the wooden backs fit neatly now into two drawers. I have longed for some ink rack storage for a while so treated myself to these two - one for distress ink pads and one for Adirondack/Versamark etc. -
got all my promarkers into cases, my nesties also onto magnetic sheets and into cases, bought a case for all my embossing folders and so it went on!
Here's a pic now of the top of the craftie space (thought I'd take it now before I started making messy!!! LOL)
OH built me two shelves with removable 'drawers' to keep the embossing powders, mica powders and alco inks tidy and accesibile (they'd been stuffed in a jumble in drawers) and am thinking about what's the best storage for the Dewdrop and Versacolor ink pads... perhaps a small metal rack on the wall as I don't own lots will do the trick?
Still got the 'fabric bags' and the large wicker basket on the top shelf to sort and there's a couple of other boxes tucked away out of sight with lace and other bits in that I need to organise into the wicker baskets that are read and waiting underneath the work top -
but .... I am seriously suffering withdrawal symptoms after being unable to craft for several days so without further ado am going to make a couple of CAS Christmas cards for my own stash... and I have a Wedding Card order to do too..
Hope you're all warm and DRY wherever you are - particularly if you're in our country which is suffering some terrible flooding - thanks for dropping in and am sure dearly beloved would love to hear your comments on his handiwork! xx
Wednesday, 21 November 2012
Brrrrrr!!!
Another 'Blue Peter' card because the craft desk has construction work going on on top of it!
After embossing a piece of pearlised card with a 'snowflake' folder, it was layered onto pink then layered onto the card base.
The 'trees' were just triangles cut from some pink paper which I think was free in a mag about 3 years ago!
I gave the trees liberal helpings of Stickles to give them a bit of sparkle, then layered the paper (cos it was quite thin) onto the scraps of pearlised card.
The rest of the card was torn and layered onto the bottom and the little foam snowman slipped in between the two layers. More stickles liberally applied to make the snow on the ground sparkle!
I tied some pink and white twine round his neck for a scarf! (Won't keep him very warm will it???? LOL)
The sentiment was PC generated and secured with a sparkly snowflake button.
Challenges -
Craft Your Passion - Use your Scraps
Joanna Sheen - Cold and frosty
Crafty Catz - Let's Have Sparkle
TIOT - Christmas Sparkle
Am off to do some 'labouring' for the 'builder'.... OH assures me I'll be putting stuff back onto shelves in the next day or two... hope so- as I'm beginning to get 'Crafter's Withdrawal' symptoms.......
have a great day and will visit you all later. x
After embossing a piece of pearlised card with a 'snowflake' folder, it was layered onto pink then layered onto the card base.
The 'trees' were just triangles cut from some pink paper which I think was free in a mag about 3 years ago!
I gave the trees liberal helpings of Stickles to give them a bit of sparkle, then layered the paper (cos it was quite thin) onto the scraps of pearlised card.
The rest of the card was torn and layered onto the bottom and the little foam snowman slipped in between the two layers. More stickles liberally applied to make the snow on the ground sparkle!
I tied some pink and white twine round his neck for a scarf! (Won't keep him very warm will it???? LOL)
The sentiment was PC generated and secured with a sparkly snowflake button.
Challenges -
Craft Your Passion - Use your Scraps
Joanna Sheen - Cold and frosty
Crafty Catz - Let's Have Sparkle
TIOT - Christmas Sparkle
Am off to do some 'labouring' for the 'builder'.... OH assures me I'll be putting stuff back onto shelves in the next day or two... hope so- as I'm beginning to get 'Crafter's Withdrawal' symptoms.......
have a great day and will visit you all later. x
Tuesday, 20 November 2012
Clearing still......
Still sorting - some stamps for sale on the other blog HERE
will be adding more in the next few days... if you're from overseas and are interested please contact me and I will check postage costs !
Off out to buy some storage units. Catch up with everyone later. x
will be adding more in the next few days... if you're from overseas and are interested please contact me and I will check postage costs !
Off out to buy some storage units. Catch up with everyone later. x
Friday, 16 November 2012
Thank you Blue Peter
I made a momentous decision three days ago - I decided to have a mass clear out and clean up of the craft room/office.
This seemed like a really good idea at the time - I have containers full of stuff that I have never used, baskets crammed with everything you can think off from fabric to metal pieces, canvases waiting for paint, shoe boxes containing embossing folders that are so full the lids have to be tied up with string - oh and a complete mess of rubber stamps, embossing powders, inks etc etc etc dumped in drawers that are stacked 8 high on either end of the craft desk.
I am worn out and nowhere near finished! But - I CAN SEE THE TOP OF MY DESK - Yay!!!!!!! (Can't see the floor tho' - cos it's full of bin liners and carrier bags marked - 'sell?', 'charity bag', 'bin'.)
I have bought a variety of new things to house all my collections of
Thought though I would post a 'Blue Peter' effort - made last week for my own stash -
Quick and simple - white linen cardstock ran through an embossing folder then matted onto blue card then white, scrap of blue card trimmed to fit the centre of the embossed area matted onto silver mirri card, a (very old) Christmas stamp, silver embossing powder and a couple of silver bells - and yes they do 'jingle'!!!!!
Challenges -
CASual Fridays- Winer Blues
Clearly Inspired - CAS
Crafts for Eternity - Marvellous Music
Thanks for looking - I am a bit behind catching up on your blogs this week - promised myself a day off from clearing and sorting tomorrow so will be visiting you soon. xx
This seemed like a really good idea at the time - I have containers full of stuff that I have never used, baskets crammed with everything you can think off from fabric to metal pieces, canvases waiting for paint, shoe boxes containing embossing folders that are so full the lids have to be tied up with string - oh and a complete mess of rubber stamps, embossing powders, inks etc etc etc dumped in drawers that are stacked 8 high on either end of the craft desk.
I am worn out and nowhere near finished! But - I CAN SEE THE TOP OF MY DESK - Yay!!!!!!! (Can't see the floor tho' - cos it's full of bin liners and carrier bags marked - 'sell?', 'charity bag', 'bin'.)
I have bought a variety of new things to house all my collections of
'very important and can't live without '
stash and I promise I will post a couple of pics once I am finished - this mightn't be for a while yet................... but I am absolutely determined to sort out this room!!! (Or at least my half of it - HIS half is exceptionally tidy... how sickening.....LOL)Thought though I would post a 'Blue Peter' effort - made last week for my own stash -
Quick and simple - white linen cardstock ran through an embossing folder then matted onto blue card then white, scrap of blue card trimmed to fit the centre of the embossed area matted onto silver mirri card, a (very old) Christmas stamp, silver embossing powder and a couple of silver bells - and yes they do 'jingle'!!!!!
Challenges -
CASual Fridays- Winer Blues
Clearly Inspired - CAS
Crafts for Eternity - Marvellous Music
Thanks for looking - I am a bit behind catching up on your blogs this week - promised myself a day off from clearing and sorting tomorrow so will be visiting you soon. xx
Tuesday, 13 November 2012
I had cut out some shapes and stuff a while ago from some ivory linen textured card and I made a card earlier this year using some of them - the left overs have been 'resting' in an envelope! Truth? I'd forgotten all about them and found them when I was looking for something else.............
So because I am always so whacked out and stiff as a board after driving for any distance the old brain cells won't cope with being too creative - hence the pieces were 'rescued' from the envelope.
First I embossed the front of the card with a trellis pattern embossing folder, then took another piece of card and cut out the centre using a Fleur De Lis nestie. After lightly dusting the edges with DI and embossing some lines I used 3d pads to place it on top of the card base.
The cut out rectangle was then put diagonally across the square 'window'.
A Marianne die was used for the flourishes and the leaves and the centre 'rose was made with a blossom nestie.
Two punched butterflies and a tiny pearl popped in the centre of the 'rose', a bit more dusting with DI and a sentiment stamped then cut out with the smallest of the Fleur De Lis rectangles.It was a nice change to make something using ivory card instead of white!
I think this design would also look good as a box and maybe will have a go at making one! (When the brain cells pick up a bit!)
Challenges -
Glitter n Sparkle - Things with Wings
Pan Pastel - Make an Embellishment
One Stop Craft - Anything Goes
Craft Room Challenge- Punches and Dies
Card Mania - Embossing
Crafty Cardmakers - More than 1 die cut/punch
Papertake Weekly - Flowers
Come and Get It - Flourishes/swirls
Just away to grab a coffee then settle down for a good old blog trawl! Thanks for calling in. x
Saturday, 10 November 2012
Time for Tea
Has been a bright day here all day but in the last hour the rain has arrived! It's gone a bit cold too..... tomorrow is supposed to be a reasonably dry day so hopefully will be able to get outside and clear up some of the leaves. Fast as you clear they drop more but really need to keep on top of it!
Isn't this LOTV image yummy?! Love these 'big hats' girlies and so after all the recent CAS cards I decided to go a bit more fussy!
The backing papers are from TLC and I printed them onto linen textured card. they're a vibrant blue in real life!
Stitched and distressed all the edges and added some white lace from my stash.
I cut out a flower from some more lace and secured the blue paper flower onto it with a pearl brad, then popped it all onto a large white satin bow. Decorated it with a die cut flourish, some crystal leaf stems and two pearls in the top right.
The flower at the top is again pieced together using a pearl brad and to finish the whole thing I put on the pretty glass and silver metal teapot charm.
The inside is also decorated with the same papers.
Challenges -
Lil's Little Fairies - Bright and Beautiful
Crafty Ann's - Lace/Pearls/Charm
Crafty Catz - Anything Goes
Fussy and Fancy - Pearls and Flowers
Totally Papercrafts - Cute and Girly
Charisma Cardz- Felling Blue
Thanks for visiting - hope you've all had a great day. x
Isn't this LOTV image yummy?! Love these 'big hats' girlies and so after all the recent CAS cards I decided to go a bit more fussy!
The backing papers are from TLC and I printed them onto linen textured card. they're a vibrant blue in real life!
Stitched and distressed all the edges and added some white lace from my stash.
I cut out a flower from some more lace and secured the blue paper flower onto it with a pearl brad, then popped it all onto a large white satin bow. Decorated it with a die cut flourish, some crystal leaf stems and two pearls in the top right.
The flower at the top is again pieced together using a pearl brad and to finish the whole thing I put on the pretty glass and silver metal teapot charm.
The inside is also decorated with the same papers.
Challenges -
Lil's Little Fairies - Bright and Beautiful
Crafty Ann's - Lace/Pearls/Charm
Crafty Catz - Anything Goes
Fussy and Fancy - Pearls and Flowers
Totally Papercrafts - Cute and Girly
Charisma Cardz- Felling Blue
Thanks for visiting - hope you've all had a great day. x
Thursday, 8 November 2012
White Space
Found a piece of white hammered cardstock which was an odd size in the 'ends of paper' drawer.
The drawer is crammed full of odd bits so have chucked a lot of it out - I keep the odd bits thinking I will use them up but never do so have been ruthless and emptied it - I bet now I'll be looking for little bits of paper and card!
I used up three additional bits of card in addition to the white piece to make this - yet another CAS Christmas card.
The red was put through the 'crimping' machine - (another little tool that I've had for ever and used rarely!) and after punching out a border along one edge of the white, put the crimped red piece under it so that it made a more reasonable sized card.
I punched out lots of green ferny leaves and made them into a wreath/nest.
A scrap of gingham ribbon was stitched onto a button with some twine and stuck into the centre of the wreath/nest.
The red birdie got himself a sparkly black gem for an eye and he's popped onto the ferny leaves with a sticky dot.
Used up the rest of the gingham ribbon which just managed to make it across the front (lucky girl I am!) and stamped a greeting in Crimson Red Versamark.
Challenges -
That Craft Place - Ribbon, Punches and Buttons
Ruby's Rainbow - Birds
Clear it Out - Anything goes - Use red stash
Papercraft Junkies - Things with Wings
Nutcrafters - Ribbon/Twine
Thanks to everyone who has sent get well wishes - am still coughing and going through the tissue boxes, sinus are still blocked but I am MILES better than I was!
Thanks too if you've been and voted for me and if you haven't why not???? LOL
Tuesday, 6 November 2012
Vintage Bling and please VOTE!
Thanks to everyone for all your get well wishes - am feeling much better than I was - just need to eject Mr Hackin Coff from the house (he has definitely overstayed his welcome) and then can REALLY start to feel good!
Before I share todays make, please would you go here and vote for me?
I've been selected in the top 10 for the people's choice winner again (with my Wedding Card which you can see properly here ) - and I keep coming close but never quite make it!!! There's some strong competition again though so I am not expecting the outcome of this vote to be any different from the last - but if you could pop across and vote that would be great (oh and ask all your mates to vote too.. I have no shame!!!!!!!!!)
Right - on to today.
Another Christmas offering - this time a bit more fussy than the previous CAS ones. The image is printed onto Cotton Fabric. I used to use this a lot for printing vintage images as it gives a lovely textured 'soft' feel, and when you cut it, the edges take on a 'distressed' look without any effort! Found a small piece left in the drawer so used it!
The backing card has sparkly dots on it but it doesn't show up very well in the pic. Lots of bling on this one, white satin ribbon with blingy oval buckle, crystal flourishes and some crystal gems in the middle of the snowflakes.
The sentiment was PC generated.
Challenges -
Try It On Tuesday - Memories
Use Your Stuff - Christmas Theme
Really Reasonable Ribbon - Winter Holiday
That Craft Place - Bingo and I chose Gems, Sentiment and Ribbon
Whoopsi Daisy - Christmas Card
Thanks for stopping by - and if you've voted for me - an extra special THANK YOU!! x
Before I share todays make, please would you go here and vote for me?
I've been selected in the top 10 for the people's choice winner again (with my Wedding Card which you can see properly here ) - and I keep coming close but never quite make it!!! There's some strong competition again though so I am not expecting the outcome of this vote to be any different from the last - but if you could pop across and vote that would be great (oh and ask all your mates to vote too.. I have no shame!!!!!!!!!)
Right - on to today.
Another Christmas offering - this time a bit more fussy than the previous CAS ones. The image is printed onto Cotton Fabric. I used to use this a lot for printing vintage images as it gives a lovely textured 'soft' feel, and when you cut it, the edges take on a 'distressed' look without any effort! Found a small piece left in the drawer so used it!
The backing card has sparkly dots on it but it doesn't show up very well in the pic. Lots of bling on this one, white satin ribbon with blingy oval buckle, crystal flourishes and some crystal gems in the middle of the snowflakes.
The sentiment was PC generated.
Challenges -
Try It On Tuesday - Memories
Use Your Stuff - Christmas Theme
Really Reasonable Ribbon - Winter Holiday
That Craft Place - Bingo and I chose Gems, Sentiment and Ribbon
Whoopsi Daisy - Christmas Card
Thanks for stopping by - and if you've voted for me - an extra special THANK YOU!! x
Saturday, 3 November 2012
Strike whilst the iron is hot!!! Or at least while the coughing has subsided a little...........
Camped out in the craftie space today 'cos it's one of the warmest places in the house!
Started on a couple of cards for my stash but sadly only managed to finish one as the marching band decided to leave the drummer boy on his own in my head - I wanted to shoot him at one stage but there again the noise from the gun would probably only have made the banging head worse.....
Subsided a little now - maybe his drumsticks have worn out (or someone has happily broken them down into matchsticks), and so am making the most of the respite and uploading the completed card - just in case drummer boy comes back and brings his annoying mates, Mr A.Choo and Mr Hackin Coff, with him.
Pearlised white card embossed with the snowflakes folder and layered onto dark blue card. Before mounting onto the base cardstock, cut out a large circle with a nestie, stamped the snowflake image and embossed with WOW Bright White Super Fine embossing powder.
I then cut out a scalloped edged frame and used two smaller circles to form a 'rim', layering them on top of both cut out circle and the frame so the snowflake is in the recess.
Some navy blue ribbon threaded through a die cut with a greeting stamped with Versafine Majestic Blue ink and then all mounted onto white cardstock.
I added some 'Star Dust' stickles to the snowflake and put a large crystal gem in the centre.
Quite pleased with this considering I was battling with the box of kleenex during the assembly process................. so maybe a CAS Christmas is the way to go this year!
Challenges-
Alota Rubber Stamps - Blue and White
Ladybug Crafts - Mono/Tonal
WOW - Christmas
Crafty Catz - Texture
Delicious Doodles - Embossing
Stamp Man - Emboss It
Camped out in the craftie space today 'cos it's one of the warmest places in the house!
Started on a couple of cards for my stash but sadly only managed to finish one as the marching band decided to leave the drummer boy on his own in my head - I wanted to shoot him at one stage but there again the noise from the gun would probably only have made the banging head worse.....
Subsided a little now - maybe his drumsticks have worn out (or someone has happily broken them down into matchsticks), and so am making the most of the respite and uploading the completed card - just in case drummer boy comes back and brings his annoying mates, Mr A.Choo and Mr Hackin Coff, with him.
Pearlised white card embossed with the snowflakes folder and layered onto dark blue card. Before mounting onto the base cardstock, cut out a large circle with a nestie, stamped the snowflake image and embossed with WOW Bright White Super Fine embossing powder.
I then cut out a scalloped edged frame and used two smaller circles to form a 'rim', layering them on top of both cut out circle and the frame so the snowflake is in the recess.
Some navy blue ribbon threaded through a die cut with a greeting stamped with Versafine Majestic Blue ink and then all mounted onto white cardstock.
I added some 'Star Dust' stickles to the snowflake and put a large crystal gem in the centre.
Quite pleased with this considering I was battling with the box of kleenex during the assembly process................. so maybe a CAS Christmas is the way to go this year!
Challenges-
Alota Rubber Stamps - Blue and White
Ladybug Crafts - Mono/Tonal
WOW - Christmas
Crafty Catz - Texture
Delicious Doodles - Embossing
Stamp Man - Emboss It
Fuzzy head equals fuzzy stamping
Am beginning to get rather bored feeling sorry for myself! Have spent quite a lot of time in bed this week - actually this week appears to have passed by in a bit of a haze with a couple of lucid and alert moments dropped in between the headaches, coughs and sneezes.....
I feel better than I did on Tuesday (could I have felt any worse I ask myself - LOL) but am still not 100% back on my feet - I must be ill 'cos I'm currently laying in second position in our Winter Frostbite league and couldn't raise any energy to go to the green today - so I have sat here and wished bad games today on everyone around me in the league table.......!!!!!!!!!!!!!!! It's a bit of a novelty me being anywhere near the top and sadly it's going to be short lived!

The other thing you should not do whilst your head is fuzzy is stamp directly onto an almost finished card and expect it to be straight and unsmudged....................
Which is why there is a sentiment attached to this card with a spellbinders tag.
I was so mad! But then being mad made my head ache even more so I settled in hiding the mistake instead of consigning the card to the bin!
The image is a peony from Beccy's, coloured with watercolours and framed with another piece of card which has had most of a circle removed from the bottom corner with a nestie.
I embossed two lines down the right hand side and glued on a couple of pink pearls to finish.
Am dipping this into the Less Is More waters this week, which has a challenge of Pink, hoping that it has enough of the colour on it to stop it from sinking!
Updated - Just noticed that Beccy's Blog has a challenge where you can enter any project using a Beccy's image this month so have submitted my pink peony!
Quick question - is anyone else having bother uploading their pics to Blogger? Have had this problem for a while - they load eventually after lots of 'Server returned invalid response' attempts - but if anyone knows why this keeps happening would appreciate knowing how to fix?
I feel better than I did on Tuesday (could I have felt any worse I ask myself - LOL) but am still not 100% back on my feet - I must be ill 'cos I'm currently laying in second position in our Winter Frostbite league and couldn't raise any energy to go to the green today - so I have sat here and wished bad games today on everyone around me in the league table.......!!!!!!!!!!!!!!! It's a bit of a novelty me being anywhere near the top and sadly it's going to be short lived!

The other thing you should not do whilst your head is fuzzy is stamp directly onto an almost finished card and expect it to be straight and unsmudged....................
Which is why there is a sentiment attached to this card with a spellbinders tag.
I was so mad! But then being mad made my head ache even more so I settled in hiding the mistake instead of consigning the card to the bin!
The image is a peony from Beccy's, coloured with watercolours and framed with another piece of card which has had most of a circle removed from the bottom corner with a nestie.
I embossed two lines down the right hand side and glued on a couple of pink pearls to finish.
Am dipping this into the Less Is More waters this week, which has a challenge of Pink, hoping that it has enough of the colour on it to stop it from sinking!
Updated - Just noticed that Beccy's Blog has a challenge where you can enter any project using a Beccy's image this month so have submitted my pink peony!
Quick question - is anyone else having bother uploading their pics to Blogger? Have had this problem for a while - they load eventually after lots of 'Server returned invalid response' attempts - but if anyone knows why this keeps happening would appreciate knowing how to fix?
Wednesday, 31 October 2012
Game On!
Quickie post this morning - spent a couple of hours yesterday making some CAS cards for myself to send at Christmas but then had to give in and go back to bed - humungus headache, sneezing past myself, coughing fits making my throat feel like someone was pulling barbed wire through it and then to top it all off, had a couple of hours of being violently sick!
No idea what THAT was all about - still have a bit of a queasy tum, the sneezes, a cough and a teeny headache this morning but don't feel anywhere near as bad as yesterday - am hoping that as the day goes on I start to feel a bit better - or at least don't relapse back to the way I felt yesterday!
But it may be a day snuggled on the sofa with the duvet I think.
That's the medical report finished.......... LOL
On to the card
Made for a boy who is as footie mad as me! Stepper card, covered with spotty paper from my stash, LOTV image matted and layered onto black and white card, PC generated sentiment with some black and white twine, all finished off with a couple of 3d football stickers and a pair of football boots!
Challenges -
Crafty Catz - Male Card
Tuesday Throwdown - Team Spirit
Creative Card Crew - Fancy Folds
Deep Ocean - Sporty and Outdoors
Paper Playtime - Anything Goes
Thanks for calling - am off to feel sorry for myself!x
Sunday, 28 October 2012
Girly Girl!
My goodness hasn't it gone COLD??? Have got the heaters on high out here - the house is not a bit warm either as we've been out all day at a meeting then a presentation lunch - it takes a while for the rooms to heat up so my excuse for being out here is - it's warmer!!!
Been a few days since I last posted but have made half a dozen very quick Christmas cards for my own stash over the last couple of days......... (I am starting to get sick of myself being so smug and organised....LOL)
This card though was part of a very large commission which I happily deposited with the lady today. Sorry the photo is a bit iffy - light here has been dreadful the last couple of days!
The recipient, Molly is a little over 2 years old and loves her teddy bear! So thought one of 'Lil's little fairies' complete with Ted guarding an exciting sparkly parcel fitted perfectly!
She's cute isn't she? Love her pom pom head band and her 'wand' - do you think she's trying to turn Ted into something more exciting?!
Highlighted with promarkers and liberal doses of glittery stickles, I put a metal Christmas tree charm across the top on some pinky/lilac thread and then mounted onto silver matt card.
I added a silver die cut in the top corner and threaded some sparkly gems and beads onto silver twine. The white gauzey stuff with 'snow' on it I've had in my stash for eons as I have the lilac and silver foiled backing paper.
The sentiment was PC generated and the inside co-ordinated to match.
Challenges -
Hooked on Crafts - Christmas - no red or green
One Stitch at a Time - One for Christmas
That Craft Place - Recipe - Gems/Charms/Diecuts
The Crafty Pad- Christmas is Coming
Crafty Ann's - Christmas
Lil's Little Fairies - Christmas Card for the Girls
Thanks for looking - the last couple of weeks of meetings, typing minutes and attending Presentations combined with all the travelling is starting to catch up with me now! Am beginning to wilt a bit - so will have a quick trawl through blogland and then I think my duvet is calling! x
Been a few days since I last posted but have made half a dozen very quick Christmas cards for my own stash over the last couple of days......... (I am starting to get sick of myself being so smug and organised....LOL)
This card though was part of a very large commission which I happily deposited with the lady today. Sorry the photo is a bit iffy - light here has been dreadful the last couple of days!
The recipient, Molly is a little over 2 years old and loves her teddy bear! So thought one of 'Lil's little fairies' complete with Ted guarding an exciting sparkly parcel fitted perfectly!
She's cute isn't she? Love her pom pom head band and her 'wand' - do you think she's trying to turn Ted into something more exciting?!
Highlighted with promarkers and liberal doses of glittery stickles, I put a metal Christmas tree charm across the top on some pinky/lilac thread and then mounted onto silver matt card.
I added a silver die cut in the top corner and threaded some sparkly gems and beads onto silver twine. The white gauzey stuff with 'snow' on it I've had in my stash for eons as I have the lilac and silver foiled backing paper.
The sentiment was PC generated and the inside co-ordinated to match.
Challenges -
Hooked on Crafts - Christmas - no red or green
One Stitch at a Time - One for Christmas
That Craft Place - Recipe - Gems/Charms/Diecuts
The Crafty Pad- Christmas is Coming
Crafty Ann's - Christmas
Lil's Little Fairies - Christmas Card for the Girls
Thanks for looking - the last couple of weeks of meetings, typing minutes and attending Presentations combined with all the travelling is starting to catch up with me now! Am beginning to wilt a bit - so will have a quick trawl through blogland and then I think my duvet is calling! x
Wednesday, 24 October 2012
Pink Snow!
As promised I spent yesterday making Christmas cards. I finished off all the commissioned ones and whilst the desk was still full of christmas stuff thought I'd better at least make a start on doing some for myself.
This is an absolute FIRST for me - Christmas Cards in October? Unheard of... and after me moaning about all the christmas stuff in the supermarkets a little while ago too!!!
Normally I'm like a mad woman (well madder than usual LOL) at the beginning of December when I realise that unless I get my skates on it'll be shop bought ones to send! I know it would be far less expensive to buy a pack of cards to send but if I did that, what excuse would I have for buying all those scrummy Christmas papers and lovely stamps????????
Back to the cards -
For a change I thought I may do some CAS cards this year and experiment with what some would call 'non traditional colours'.
Here is the first to share
I stamped a variety of snowflakes onto a piece of white Linen textured card using a pigment ink stamp pad called 'Really Raspberry'. It was a cheap stamp pad and I love the colour! The stamps are all freebies from Christmas sets given away with magazines over the last couple of years.
The sentiment is also an old foam backed stamp but it's one of may favourite christmas greeting ones as I think it shouts 'happy'!
I punched a border out of some dark pink cardstock and stuck it underneath some fuschia pink polka dot paper, then added white ribbon. The polka dot piece was then glued onto the stamped card and layered onto more of the dark pink.
Then matted onto the card base using 3d foam pads.
I finished it all off by adding some crystal gems to the centre of the snowflakes for the traditional bit of Christmas 'bling'!
Challenges
Sassy Cheryl Show Me Thursday Challenge
Ooh La La- Christmas Sentiment
Stamptacular Sunday - No Rules
ABC Christmas Challenge - U for Up to you
Shopping Our Stash - Out of a Jar (my gems)
Totally Papercrafts - Christmas
Have a nice day whatever you're doing! x
This is an absolute FIRST for me - Christmas Cards in October? Unheard of... and after me moaning about all the christmas stuff in the supermarkets a little while ago too!!!
Normally I'm like a mad woman (well madder than usual LOL) at the beginning of December when I realise that unless I get my skates on it'll be shop bought ones to send! I know it would be far less expensive to buy a pack of cards to send but if I did that, what excuse would I have for buying all those scrummy Christmas papers and lovely stamps????????
Back to the cards -
For a change I thought I may do some CAS cards this year and experiment with what some would call 'non traditional colours'.
Here is the first to share
I stamped a variety of snowflakes onto a piece of white Linen textured card using a pigment ink stamp pad called 'Really Raspberry'. It was a cheap stamp pad and I love the colour! The stamps are all freebies from Christmas sets given away with magazines over the last couple of years.
The sentiment is also an old foam backed stamp but it's one of may favourite christmas greeting ones as I think it shouts 'happy'!
I punched a border out of some dark pink cardstock and stuck it underneath some fuschia pink polka dot paper, then added white ribbon. The polka dot piece was then glued onto the stamped card and layered onto more of the dark pink.
Then matted onto the card base using 3d foam pads.
I finished it all off by adding some crystal gems to the centre of the snowflakes for the traditional bit of Christmas 'bling'!
Challenges
Sassy Cheryl Show Me Thursday Challenge
Ooh La La- Christmas Sentiment
Stamptacular Sunday - No Rules
ABC Christmas Challenge - U for Up to you
Shopping Our Stash - Out of a Jar (my gems)
Totally Papercrafts - Christmas
Have a nice day whatever you're doing! x
Tuesday, 23 October 2012
Paper Piecing
Quickie post this morning as I'm planning on spending the day making a start on my Christmas cards... ok ok stop pretending to faint - I can be organised SOMETIMES!!!
I LOVE blogland! Mostly because I've made so many 'friends' but also because I see something someone else has done and think -'Ooooh I wouldn't have thought of doing that' - or - 'I've never tried that'.
So here's one which combines a bit of both thoughts! Made it a wee while ago after visiting the lovely Jules.
I am not adventurous at all when it comes to stamping on patterned paper but Jules manages it to perfection.
Armed with several stamps (as I didn't have one complete flower and stem stamps that would have been suitable!) and some leftovers from my Ella paper pad (and yes I have still got some of it left despite my best efforts....) I set about imitating one of Jules' lovely creations.
I am pleased with myself at the result and am now wondering why I never did this before! I stitched all the papers and managed the paper piecing OK too- popped a couple pf pearls in the centre of the flower heads.
I thought the stamped flowers looked a bit plain on their own so added some grasses and a tiny bee... and of course HAD to add a teeny bit of stickles to the bee's wings! Finshed off with a cream organza bow.
Challenges -
Gem of a Challenge - Flowers
One Stop Craft - Anything Goes
Cupcake crafts - Paper Piecing
Charisma - CAS
Poodles Parlour - Anything Goes
Off to get out the Christmas stamps - and do a little trawl through blogland with my coffee! Have a lovely day! x
I LOVE blogland! Mostly because I've made so many 'friends' but also because I see something someone else has done and think -'Ooooh I wouldn't have thought of doing that' - or - 'I've never tried that'.
So here's one which combines a bit of both thoughts! Made it a wee while ago after visiting the lovely Jules.I am not adventurous at all when it comes to stamping on patterned paper but Jules manages it to perfection.
Armed with several stamps (as I didn't have one complete flower and stem stamps that would have been suitable!) and some leftovers from my Ella paper pad (and yes I have still got some of it left despite my best efforts....) I set about imitating one of Jules' lovely creations.
I am pleased with myself at the result and am now wondering why I never did this before! I stitched all the papers and managed the paper piecing OK too- popped a couple pf pearls in the centre of the flower heads.
I thought the stamped flowers looked a bit plain on their own so added some grasses and a tiny bee... and of course HAD to add a teeny bit of stickles to the bee's wings! Finshed off with a cream organza bow.
Challenges -
Gem of a Challenge - Flowers
One Stop Craft - Anything Goes
Cupcake crafts - Paper Piecing
Charisma - CAS
Poodles Parlour - Anything Goes
Off to get out the Christmas stamps - and do a little trawl through blogland with my coffee! Have a lovely day! x
Wednesday, 17 October 2012
Nice Day for a ......
White Wedding!
Have been doing a few commissioned cards this week - in between the Christmas ones, I had a couple of orders for other things - so to take a break from 'Kiddie Kristmas' (will share later!!) I set about a wedding order.
This was one of those cards that I enjoyed doing and suprisingly was pleased with the result!
I used silver grey pearlised card as the base after fiddling with pale blue and pink - the grey seemed to give the card 'depth' whereas the other colours did not give as much definition as I wanted.
I used a Martha Stewart punch around the page set and cut two different sizes out of white linen textured card.
The paper roses were made using a Marianne Die and I sat for a long time rolling and glueing!
The silver flourishes are also a Marianne Die and I used a X-Cut leaf punch, highlighting the embossed bit of the leaves and the edges with a Silver Leafing pen.
The two large hearts were PC generated and printed onto the same linen card. I have an extreme fondness for this sentiment which I have seen used several times and think it is a nice change from the usual wedding greetings.
I assembled it all together and layered the smaller card onto the larger piece with 3d foam pads and then layered the whole thing onto the silver card base again using 3d foam pads.
After adding some Liquid Pearls onto the roses I finished it off with some small crystals in the corners and randomly on the two hearts and then glued the gorgeous rhinestone and crystal heart (another Imagine DIY purchase!) onto the sentiment heart.
No wedding keepsake should come without a box so made one to match!
I am sitting though and wondering if I should add a wee bit of sparkly to the rose edges? What do you think?
Challenges -
Creative Crafts - 3 of something (Hearts)
Pan Pastel - Wedded Bliss
One Stitch at a time - Song (White Wedding - Billy Idol)
Anything Goes - Make your own Emellies (
Fashionista - Anything Goes
Gem of a Challenge - Flowers
Totally Papercrafts - Make your own Flowers
Emergency Crafters - Recipe- gems, flowers, die cut shape
Crazy Challenge - Handmade Flowers
Will be off to have a trawl through blogland once I've got my coffee - have a nice day whatever you're doing! x
Have been doing a few commissioned cards this week - in between the Christmas ones, I had a couple of orders for other things - so to take a break from 'Kiddie Kristmas' (will share later!!) I set about a wedding order.
This was one of those cards that I enjoyed doing and suprisingly was pleased with the result!
I used silver grey pearlised card as the base after fiddling with pale blue and pink - the grey seemed to give the card 'depth' whereas the other colours did not give as much definition as I wanted.
I used a Martha Stewart punch around the page set and cut two different sizes out of white linen textured card.
The paper roses were made using a Marianne Die and I sat for a long time rolling and glueing!
The silver flourishes are also a Marianne Die and I used a X-Cut leaf punch, highlighting the embossed bit of the leaves and the edges with a Silver Leafing pen.
The two large hearts were PC generated and printed onto the same linen card. I have an extreme fondness for this sentiment which I have seen used several times and think it is a nice change from the usual wedding greetings.
I assembled it all together and layered the smaller card onto the larger piece with 3d foam pads and then layered the whole thing onto the silver card base again using 3d foam pads. After adding some Liquid Pearls onto the roses I finished it off with some small crystals in the corners and randomly on the two hearts and then glued the gorgeous rhinestone and crystal heart (another Imagine DIY purchase!) onto the sentiment heart.
No wedding keepsake should come without a box so made one to match!

I am sitting though and wondering if I should add a wee bit of sparkly to the rose edges? What do you think?
Challenges -
Creative Crafts - 3 of something (Hearts)
Pan Pastel - Wedded Bliss
One Stitch at a time - Song (White Wedding - Billy Idol)
Anything Goes - Make your own Emellies (
Fashionista - Anything Goes
Gem of a Challenge - Flowers
Totally Papercrafts - Make your own Flowers
Emergency Crafters - Recipe- gems, flowers, die cut shape
Crazy Challenge - Handmade Flowers
Will be off to have a trawl through blogland once I've got my coffee - have a nice day whatever you're doing! x
Saturday, 13 October 2012
Eek!! A Week!!
Cannot believe it's an entire week since I posted anything... have been visiting blogs and making but sitting here realised I haven't put one solirtary thing on the blog this week!
In my defence, I HAVE been busy doing boring stuff like going to meetings and compiling two different lots of AGM papers and reports for both Club and County.......... which has seriously annoyed me as I wanted to play with paper PROPERLY instead of just typing and printing.........
I have though given myself a little bit of time each day to get on with some cards - I have a few to make for a lady who orders Christmas Cards for her great -grandchildren every year so have just one more left to do and then I shall get the camera out and share.
Get the camera out..........mmmmmmmmmmm.......... I did try so so hard with this card to get a decent picture but I cannot master taking pics of pearlised card at all - had a little blue cloud above my head as each attempt was looked at and discarded- in the end I gave up!
So this is what you get...not the sharpest but you get the general idea!
Stamped the greeting and the grasses in a light purple. The ink pad is a very very old Whispers one and I was surpised it hadn't dried out! The grasses stamp is a Hero Arts one (I think!). Clear embossed the greeting which )as the pic leaves a lot to be desired!) you can't see very well!
Embossed a frame round the greeting, tied some lilac gingham ribbon round the card and mounted it onto purple card then layered onto the tent card base with 3d foam pads.
Punched out a tiny butterfly and finished with a couple of purple pearls.
Was quite pleased with the finished article - it's a pretty card I think and the soft lilacs are a really nice shade - sometimes purple hits you in he face!
Challenges -
Southern Girls - Tie a Ribbon round it
Craftymess - Anything Goes
Lady Anne's - Anything Goes
The Cupboard Trilogy - Things with Wings
2 Sisters - Anything Goes
Thanks for commenting, appreciate it - now got myself a cup of coffee and am away to see what you've all been up to! x
In my defence, I HAVE been busy doing boring stuff like going to meetings and compiling two different lots of AGM papers and reports for both Club and County.......... which has seriously annoyed me as I wanted to play with paper PROPERLY instead of just typing and printing.........
I have though given myself a little bit of time each day to get on with some cards - I have a few to make for a lady who orders Christmas Cards for her great -grandchildren every year so have just one more left to do and then I shall get the camera out and share.
Get the camera out..........mmmmmmmmmmm.......... I did try so so hard with this card to get a decent picture but I cannot master taking pics of pearlised card at all - had a little blue cloud above my head as each attempt was looked at and discarded- in the end I gave up!
So this is what you get...not the sharpest but you get the general idea!
Stamped the greeting and the grasses in a light purple. The ink pad is a very very old Whispers one and I was surpised it hadn't dried out! The grasses stamp is a Hero Arts one (I think!). Clear embossed the greeting which )as the pic leaves a lot to be desired!) you can't see very well!
Embossed a frame round the greeting, tied some lilac gingham ribbon round the card and mounted it onto purple card then layered onto the tent card base with 3d foam pads.
Punched out a tiny butterfly and finished with a couple of purple pearls.
Was quite pleased with the finished article - it's a pretty card I think and the soft lilacs are a really nice shade - sometimes purple hits you in he face!
Challenges -
Southern Girls - Tie a Ribbon round it
Craftymess - Anything Goes
Lady Anne's - Anything Goes
The Cupboard Trilogy - Things with Wings
2 Sisters - Anything Goes
Thanks for commenting, appreciate it - now got myself a cup of coffee and am away to see what you've all been up to! x
Saturday, 6 October 2012
Blingy Duplicate!
Finally managed to do a card for LIM - been an age since I've been able to submit anything but here's one I made earlier and not shown before which fits the challenge... well I think it does - I think there's enough white space and hope it's CAS enough for the ladies over at Less Is More!
With the challenge this week being 'silver', the card really is a take on a couple of similar (but more fussy) ones I did for golden weddings and one I just made because I had a scrummy vintage bronzey coloured button from Mum's button box... so the design is basically the same for them all just different colours and the odd layer here and there!
Think that this is one of those quick designs that you could mass produce for a variety of different anniversary type occasions by merely changing the colour of the embossing and ribbon, so it's likely that I'll do a ruby one and maybe sapphire and just put them in my stash.... am always asked for specific anniversary cards when I don't have any!
I used white pearlised card and the stamp was a real 'cheapie' from Viva Decor, which I found in a bargain bin at a craft shop.
I really like it, hence all it's use over the last few months!
I used WOW embossing powder to emboss and because it's so fine it's perfect for the detail on the flourishes.
The stamped piece was mounted onto silver mirri card, then glued to the base card and I confess to using....... peel offs.......(aghhhhhh!!!) for the anniversary sentiment. (I found them whilst looking for my tiny little wooden blocks of number stamps - I cannot remember the last time I used a peel off!!!)
The broad grey satin ribbon is from my stash and the beautiful blingy embellishment is from Imagine DIY and happily they hide the join!
We've had a lovely sunny day here - not warm, but blue skies.... so am feeling a bit more upbeat today! Strange how grey skies make you feel down and blue ones make you feel happy isn't it?!!
Thanks for looking and if you've left me a comment you've added to my smiley day!! x
With the challenge this week being 'silver', the card really is a take on a couple of similar (but more fussy) ones I did for golden weddings and one I just made because I had a scrummy vintage bronzey coloured button from Mum's button box... so the design is basically the same for them all just different colours and the odd layer here and there!
Think that this is one of those quick designs that you could mass produce for a variety of different anniversary type occasions by merely changing the colour of the embossing and ribbon, so it's likely that I'll do a ruby one and maybe sapphire and just put them in my stash.... am always asked for specific anniversary cards when I don't have any!
I used white pearlised card and the stamp was a real 'cheapie' from Viva Decor, which I found in a bargain bin at a craft shop.
I really like it, hence all it's use over the last few months!
I used WOW embossing powder to emboss and because it's so fine it's perfect for the detail on the flourishes.
The stamped piece was mounted onto silver mirri card, then glued to the base card and I confess to using....... peel offs.......(aghhhhhh!!!) for the anniversary sentiment. (I found them whilst looking for my tiny little wooden blocks of number stamps - I cannot remember the last time I used a peel off!!!)
The broad grey satin ribbon is from my stash and the beautiful blingy embellishment is from Imagine DIY and happily they hide the join!
We've had a lovely sunny day here - not warm, but blue skies.... so am feeling a bit more upbeat today! Strange how grey skies make you feel down and blue ones make you feel happy isn't it?!!
Thanks for looking and if you've left me a comment you've added to my smiley day!! x
Thursday, 4 October 2012
Normal service....
has been resumed! Well as normal as possible anyway - back to the NORMAL weather - rain, rain and more rain..... honestly, stepped onto a plane yesterday in gloriously blue clear skies and temperatures of a mere 31 degrees, stepped off several hours later to a torrential downpour, black as pitch and a temperature that was stuggling to make double figures!
Taking into account the amount of washing I've done today I am convinced that numerous fellow travellers put their clothes in my cases when I wasn't watching... did I REALLY wear all these clothes?????? And joy of joys, I now have the ironing to look forward to!!!
Do I sound slightly irriated by the fact that I am now here and really want to be back there??? Well you're right!!!
Before I pop off to have a proper look at what you've all been up to whilst I have been acquiring this lovely golden brown sun tan, (and a few inches round the middle with all the fab food....), I thought I'd better share a make with you.
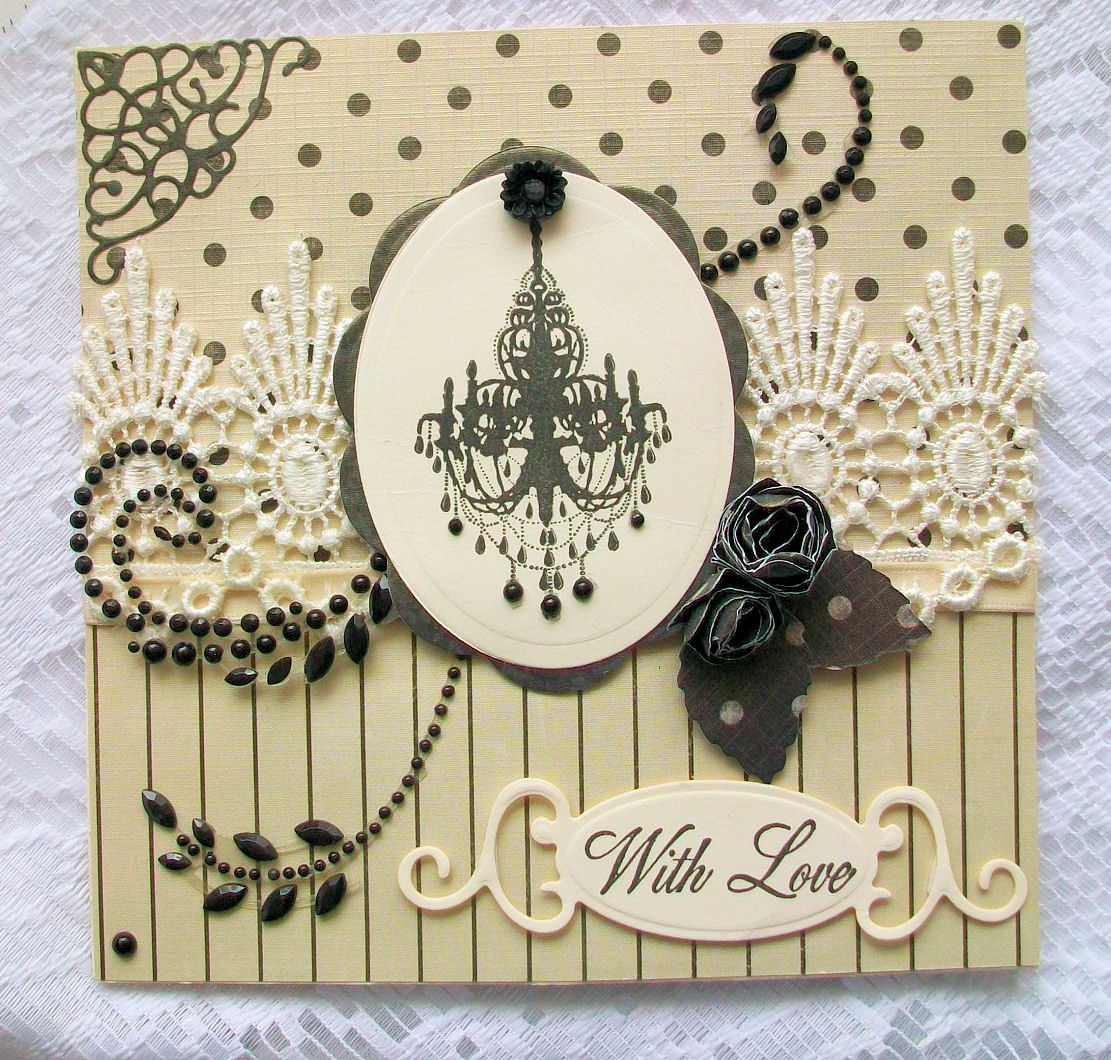
I found these last few scraps of 'Paris Nights' paper in a drawer and managed to squeeze enough out of it to decorate the front and inside of a card.This has got to be one of the most gorgeous papers I have ever used - it has the most amazing sheen and a beautiful texture.
The stamp is a Papermania one which once again I confess to never inking before. I used some cream textured card and then cut it out with a nestie, mounted it onto a scalloped piece of the Paris Nights paper before layering onto the card. I cut out a corner in black and a die cut frame in the same cream card and stamped the sentiment with Versamark Onyx Black.
The fabulous black crystal swirls were a present and I really didn't want to use them! The large floral piece at the top of the oval is from the same swirl pack and I used some tiny black pearls on the stamped image for some of the chandelier 'droplets'.
The cream lace is from my stash and I made two rolled paper roses from the remainder of the paper.
Challenges -
Simon says Stamp - Glimmer and Sparkle
Card Mania - Handmade Flowers
Lollipop Crafts - Something Old (paper and stamp), Something New (Black Crystals)
Cards Galore - Anything Goes
Paperplay- Shine On
Charisma Cards - Bling/Shiny
Craft Us Crazy - Anything Goes
Thanks for visiting me - off for a coffee and a trawl through blogland! x
Taking into account the amount of washing I've done today I am convinced that numerous fellow travellers put their clothes in my cases when I wasn't watching... did I REALLY wear all these clothes?????? And joy of joys, I now have the ironing to look forward to!!!
Do I sound slightly irriated by the fact that I am now here and really want to be back there??? Well you're right!!!
Before I pop off to have a proper look at what you've all been up to whilst I have been acquiring this lovely golden brown sun tan, (and a few inches round the middle with all the fab food....), I thought I'd better share a make with you.
I found these last few scraps of 'Paris Nights' paper in a drawer and managed to squeeze enough out of it to decorate the front and inside of a card.This has got to be one of the most gorgeous papers I have ever used - it has the most amazing sheen and a beautiful texture.
The stamp is a Papermania one which once again I confess to never inking before. I used some cream textured card and then cut it out with a nestie, mounted it onto a scalloped piece of the Paris Nights paper before layering onto the card. I cut out a corner in black and a die cut frame in the same cream card and stamped the sentiment with Versamark Onyx Black.
The fabulous black crystal swirls were a present and I really didn't want to use them! The large floral piece at the top of the oval is from the same swirl pack and I used some tiny black pearls on the stamped image for some of the chandelier 'droplets'.
The cream lace is from my stash and I made two rolled paper roses from the remainder of the paper.
Challenges -
Simon says Stamp - Glimmer and Sparkle
Card Mania - Handmade Flowers
Lollipop Crafts - Something Old (paper and stamp), Something New (Black Crystals)
Cards Galore - Anything Goes
Paperplay- Shine On
Charisma Cards - Bling/Shiny
Craft Us Crazy - Anything Goes
Thanks for visiting me - off for a coffee and a trawl through blogland! x
Subscribe to:
Posts (Atom)