Showing posts with label mixed media collage. Show all posts

Monday, 14 October 2013

A Visit to Grandma's House - Shabby Chic - Crafty Cardmakers DT

It's time for another challenge at Crafty Cardmakers and this one is one of my ABSOLUTE FAVES!! So I hope you will find time to join us this fortnight - prizes up for grabs!!
A big thank you to fellow Teamie BettyC who set this challenge - SHABBY CHIC. Love it!
 I have had soooo much fun creating this project and I used up lots of little bitty things - fiddly, time consuming, messy desk and sticky fingers - just what us crafters love!
 Be warned now before you go any further this is a VERY picture heavy post - I have put 'close up' views at the bottom - please enlarge if you want a better look!

I bought this house shaped box some time ago and had already painted and distressed it but when we moved house it got packed away and I finally got round to making it up.
It gave me a chance to just - well have a 'play'!

My gran was an accomplished dressmaker. She made everyone's wedding dresses, bridesmaids outfits, winter coats etc and all my summer dresses. I was the proud owner of a beautiful red velvet dress with a white crochet collar one Christmas when I was about 8 followed by a luscious brown corduroy coat with a leather collar for my birthday.

So this project is in it's own way a tribute to her amazing needle skills - and of course her prowess with a Singer sewing machine!

Quick run down through the 'storeys' -
Attic - small cardboard box liberally stamped, a little Paris Passport rescued from another project, a hat, parasol, old clock and old sign, a bit of lace thrown in!

First floor - Paris backed Perfume Advert, small parcel of fabric, vintage lace and a teeny pink thimble, some 'rolls' of fabric (done by using cocktail sticks and scraps!), a couple of tiny buttons, sewing machine (stamped on metal) and a 'remember' sticker. Dressmakers dummy covered in paper and some floaty fabric, a mirror made by using modelling paste, acrylic paints and metallic rubs for the frame with the insert from a piece of tin foil, a reel of vintage ribbon secured with a sparkly pin and a small cotton reel.

Ground floor -from the left -  image printed onto fabric (reminded me of the way my hair was done in 'ringlets' when I was small!) edged with vintage lace, a fabric rose and a pearl earring,
Centre - a sewing 'basket' containing some vintage style pins, a safety pin, tape measure and scissors, a button and specs and a candelabra to see by!  
Right - a ladies vintage boot, more buttons and a tiny hanger with a feather bit all sat on some vintage lace.
Challenges -
Natalie & Amy - Shabby Chic
Altered Eclectics - Alter Something
Dream Valley - Buttons
The Crafting Cafe - Anything Goes
All Crafts Challenge - Anything but a Card
Challenges 4 Everybody - Anything Goes
Created with Love - Sewing
ALBC - A little bit Shabby

I hope you have enjoyed my little trip down memory lane - the box is now sat on my work room wall where it evokes memories of my childhood!
Thanks for visiting today - have a great time whatever you're doing. x

Wednesday, 13 February 2013

Spreading Dreams

What a Day! Snow this morning, howling winds now it's pouring down! So cold too... not where I am though!! LOL
Heaters on and a woolly jumper sat here in the crafty space making messy listening to the awful weather - what more could a girl want??
Started this little project a few days ago and have fiddled and fiddled and eventually put something together which I now think is acceptable!
The canvas measures 8" square and I wanted some 'depth' so turned it over and used the inside aperture. (I lined it with two M and S Sofa Fabric samples!)
Before starting I needed to 'square off' the inside to make a box so I used some canvas covered mount-board and painted it in a dark creamy colour before gluing it in place.
Made quite a bit of mess doing the frame really - I put some modelling paste all over the edges and once dry started adding layers of paint in varying shades of cream to make a textured base.
Out with the Bronze Cosmic Shimmer which was just randomly applied, then a few spots of gold embossing powder. I then blasted the whole frame with the heat gun.
Not content with this I then rubbed some metallic cream over it in a verdigris colour and just for good measure painted some watered down pearlescent tint across the whole thing and blasted again with the gun!
Some vintage cotton lace and seam binding ribbon with a bronze heart charm on the bottom and two metal corners. 

The quote is one of my all time favourites - I love it - 'I have spread my dreams beneath your feet - tread softly because you tread on my dreams' is from He Wishes for the Cloths of Heaven by W.B.Yeats and I printed it onto fabric then after suitable distressing and ragging glued it in place.
The vintage image, music sheet and script were all printed onto fabric and stitched, before placing into the centre onto a wooden board to lift it up.
I used some muslin, a few paper flowers, a scrap of lace, a tiny chipboard piece with a pearl glued on and then finished it with a tiny pearl where the lady's necklace is and a string of pearl beads.

Challenges -
WOW - Romance and Love
Happy Campers - Shabby Chic
Anything but a card - Share the Love
Hotshot Crafts - Anything but a Card
Anything Goes - Vintage
Top Tip Tuesday - Let me call you Sweetheart
My All Crafts Challenge - Show what you create
Creative Creations - Love themed
Simon Says - Something Messy 
Pretty Little Ribbon Shop - Anything Goes


Off to grab a coffee then a trawl through blogland! Have a great day! x

Thursday, 12 August 2010

Vermeer

Jan (Johannes) Vermeer was a 17th century Dutch painter and is one of my favourite artists. Although he was not a prolific painter (it's thought he only painted about 35 works of art during his short lifetime), his ability to capture the effects of light and his attention to detail within each work is amazing.

Probably his most well known piece is 'Girl with a Pearl Earring' which is an awesome interpretation of youth, beauty and innocence.

I have made this project using the one of Vanmeer's painting's that ranks amongst those at the top of my fave list. This is called 'The Lacemaker' and depicts an industry which was flourishing at the time in the Delft area where Vanmeer lived. I love the concentration on the face of the lace girl as she uses her bobbins to make a border for maybe a tablecloth or pillow.

My piece measures about 6" square and is made from mountboard. I printed the image onto linen textured paper - I like this paper for the 'oil on canvas' effect it gives. I used K and Co 'Madeleine' backing paper and then added a variety of cotton lace from my stash, including a small crocheted coaster/doily which I think once belonged to my gran! The oversized needle must have come in a button pack at one time (don't know how long I've had it.....) and I know the two cotton 'spools' (probably from the same button pack) are not strictly to do with lacemaking but hope I'll be forgiven.
The rose lace in the top corner was cut from a wide strip and the addition of 2 buttons finish my small mixed media attempt!

and Play Date Cafe's Colour Challenge is green, beige and dark brown - and as one of my little 'spools' is dark brown I am entering this there too!

Monday, 9 August 2010

Marrakech Remembered

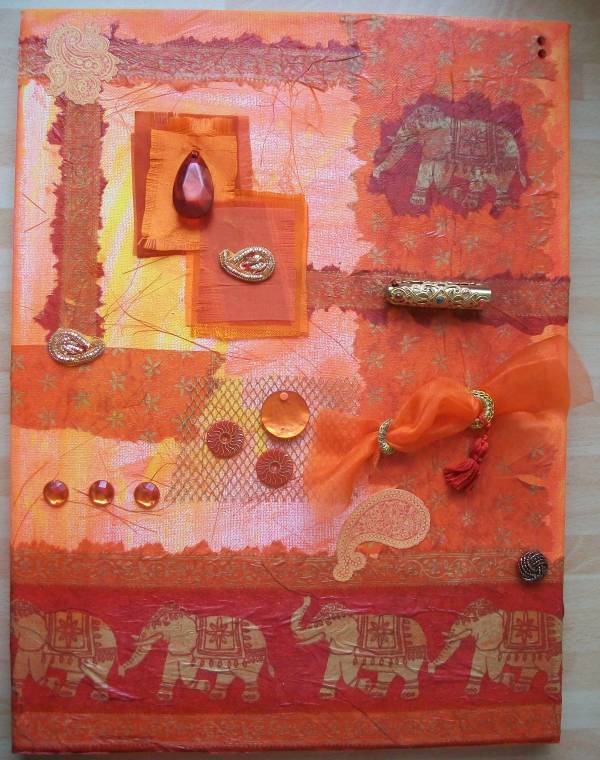
I chose a fanciful title for this fanciful piece of work! Please click on to enlarge for a better view!

I spent yesterday pricing up the cards and other fabulous things made by Maureen for the charity day and then turned myself away from card making and lifted out a plain canvas. A rather large canvas for me actually, as it measures 15" x 12".

The images are torn from a paper napkin - don't you just love these elephants??!
(Why anyone would want to use napkins as pretty as the ones that I've managed to acquire over the last couple years to wipe their mouths with after eating is just beyond my comprehension!)

Anyway back to the napkin and the canvas..... this gorgeous coloured piece of paper just evoked images of the Souks with their array of wares in strong geometric designs in rich spicy colours.

So the background was done using red, orange and yellow acrylics and a baby wipe, the napkin torn up and stuck on with gel medium. I rummaged through the crafty stash and found these jewels, rings, buttons and tassel and the fabric bag revealed some small pieces of silks and organza in red and orange. (The fibres taken from the edges of the silks were just thrown randomly onto the canvas background whilst wet and I then built up the design over them). The gold jewelled engraved 'tube' I sewed on as well as glueing the length because of the weight of it. I have no idea what purpose in life this piece had. I have put a cklose up pic of it on my Flickr account and maybe somone out there can tell me what it began it's life as?

I am quite pleased of this canvas - I have placed it on the work room wall and every time I look at it I can smell ginger, cinammon, paprika, saffron type aromas!!

Mixed Media Mondays theme this week is Memories
One Powerful Hour has a challenge of Vacation
Gingersnap Creations Theme Challenge 64 is to used Yellow, Red and Orange.

Sunday, 18 April 2010

The Caged Bird

The Caged Bird title describes how I've felt this week perfectly. I have been longing to put aside the orderly (and OK yes I admit - cutesy - lol) card making stash and make a mess with paints and inks!
This project has been spinning round in my head for 4 days and today I finally finished it. I have, on several occasions, been really frustrated with myself as it never seemed to be about to 'come together'. I'm not sure it ticks all the boxes as far as cohesion is concerned but I confess that it was good to get back to the satisfaction that mixed media chaos brings to me after being more concerned that what I was making had to satisfy other people's tastes and not my own!

This canvas measures 12" x 10". I painted the background with a mixture of acrylics, watercolours and distress inks in shades of green, brown and white. Whilst the paint was still wet I put some plasterers jointing tape over it and brushed over some thinned down paint then quickly removed the tape to leave a small chequerboard appearance. Once dry I stuck on the script background (by Artylicious and printed onto glossy paper), used some alcohol inks first then painted it with gesso and then stamped the edges of the canvas. I used black Stazon for the crackle stamp and white Versamagic for the flourishes.

The large images on the right were cut from a Graphic 45 sheet that I have had for EONS -(I steeled myself before cutting into it- lol) and the one on the top left is an image from an old book with some gold paint, gold mesh and 3 small metal pieces added.

I used some Paperartsy and Elusive Images stamps for the foliage and the large bird was stamped onto a piece of acetate. The butterfly was a present from a fellow crafter and I used some Glossy accents on the wings and some tiny black gems. The caged bird is also acetate attached with clear glue.
Please click on the pic to enlarge.

The theme at 'So Artful' is 'Shy Beauty' - and I believe that the women's faces are beautiful (shy I'm not sure???) 'Lots To Do' has challenged us to use Alcohol Inks, Gingersnap Creations (GCSP3) has their Blue Moon challenge theme of 'Take on a Tutorial' and I chose the tutorial on 'Creating a Background With Acrylics' , the Sunday Stamper's theme is 'Free (as a bird)'. Sunday Stampers is also having a blog candy give away to mark their 100 weeks! Click on the link in my sidebar! and last but not least Mixed Media Monday's theme is 'Look what I've found'....and as I 'found' the courage to use the paper, I've submitted my canvas!

Tuesday, 15 December 2009

3 down................


After the rose (see post below!) I was spurred to try and create something pretty!

Here is another piece for my (hopefully) soon to be assembled fabric book. I now have three projects completed and need to do a couple more. Maureen (the mentor...lol) has kindly sent me some canvas to use as the pages for the book and am looking forward to finishing this project, not because I am fed up doing it, far from it(!), but because I have really enjoyed doing it and want to finish it!

I have again used as the backing fabric, more of the chinese silk. This time I used a pale blue piece which really is a beautiful colour and it seemed a pity to cover it but needs must.. so cover it I did, although you can see a small bit of it at the top and bottom!

I used some old cream and pale blue lace for the right hand side (the blue of which has not shown up too well in the pic), a piece of striped fabric from my stash which I frayed and some paper from the huge K and Co pad I recently bought.

The image is printed onto cotton fabric and the blue picot edging was, like all the silk, given to me by my mother in law! I put the image onto a piece of frayed muslin and hand stitched the ribbon roses and pearls.
As the theme at Created by Hand is Vintage this week, I have submitted this as my entry.

Wednesday, 2 December 2009

Winter Wonderland


Another beer can! Basics are the same as the Winter Birds further down in this blog - a beer can ungrudgingly donated by the Other Half, the frame is the same Cuttlebug embossing folder. Wanting to create a 'cold' feel this time I used 'Sail Boat Blue' and 'Stream' alcohol inks with a silver mixative.

I mixed two different sets of beading along the bottom to try and represent varying shades of icicles. The snowmen image was printed onto canvas type card for texture. The greeting was in a pack of Christmas buttons and the pearly snowflake is from my stash with some fluffy snowy white fibres wrapped round it. I used the same fibres to make the hangers.

I have submitted this to Gingersnap Creation's, whose December challenge is 'Winter Wonderland' and also a very late entry into Theme Thursday's theme of 'Christmas Holiday Creations'.

Tuesday, 22 September 2009

A First in Fabric


As well as messing with metal during Maureen's visit, she also cast a watchful eye over me whilst I transferred some images onto fabric. What is a relatively easy process was difficult for me because the ink in my HP printer is obviously not designed to allow you to take a printed image and transfer it onto cloth! I managed it eventually - but had to use some of the pics Maureen had printed off at home.
With that mission accomplished I was then taken to task about my lack of use of the new sewing machine that was a present about 5 years ago! After a couple of hours deciphering the instruction leaflet and a trial run,I promised Maureen faithfully that I would use it (and also use the beautiful sewing case she had made for me - complete with already threaded needles!!LOL).

I had been completely overwhelmed by the beautiful fabric collages Maureen had done and we spent rather a long time trawling through other people's blogs looking at their work too! I was instructed to just 'treat fabric like paper' when making collages, which was sound advice from my learned mentor!!

After Maureen went home I was determined to give a fabric collage a try..... unfortunately a large card order coupled with my bad neck giving me lots of aggravation in the last week meant it was a slow process.

BUT ............... here is the result! OK it's not perfect and I am not completely satisfied ...... but it's a start!

Saturday, 5 September 2009

Canvas

I had this small canvas that measured just under 3ins square and have been wondering what to do with it!
Yesterday I covered it with some script paper and some music score paper which was torn from a napkin sent to me by Maureen. I stuck it on the canvas then used Mod Podge over it and left it to dry.
This morning (cos it was raining!! - a good crafters excuse to sit and make messy I find!!), I stamped the Eiffel Tower and the 'Paris' word and distressed the word using Antique Linen Distress Ink, then glued them onto the background.
The image of the lady is from a collage sheet I bought some time ago and I cut it out to fit inside the black iron look frame which I placed a paper filigree cut out behind.
I then used a clear glaze over the tower and the lady picture which has given them a nice muted glossy finish and highlights them quite well - although this hasn't shown up very well in the photo!
The metal corner, lace, ribbon, pearl drops and pearl button were added to finish.

Wednesday, 19 August 2009

Castles in the Air


After a hectic few days I found some 'me' time and decided to start a project I have been wanting to do ever since I saw an example in a magazine.

The designer had been inspired by a recent holdiay in Venice and had created a truly stunning mosaic by stamping into polymer clay.

Never trusting myself and my own creativityand certainly not being an expert in polymer clay I decided to attempt something in a similar shape but on a much smaller scale.

Overall I'm not sure making it smaller was a good idea as I can't make my mind up if the balance is right but........ my initial impression is 'not too bad'!!!!

As with all things my photography skills are not up to scratch and unfortunately the mica powders shimmering colour is not well reproduced in the picture - (the grey clouds didn't help the daylight either).

I used a variety of colours in both metallic rub ons and mica powders but predominantly used Golden Pear, Mathracite, Copper and Red Bronze powders and Brass and Gunmetal metallic creamy rub ons and used edges and pieces taken from some stamps to make the impressions. And of course, I had to pop on a fimo face somewhere!

I have mounted the piece onto an acrylic painted canvas (as in the original example) but it may end up on another background as I'm a little unsure about the gold paint - I might try a dark background to make the piece stand out more, but at the moment can't make my mind up about what colour! (Any suggestions gratefully received!)

Thursday, 23 July 2009

Coaster Book


I have been looking after two of our Flickr groups whilst our group leader Margaret is taking a break for personal reasons. I am currently setting challenges on the monthly groups of Art Dolls and also the Altered Swap.
I set the challenge of an 'Altered Coaster Book', which saw several members running for the nearest pub/bar/restaurant - (any excuse..........)
One of the reasons behind setting this as a theme was because I had never done one before! I said that there should be one stamp used somewhere on the book and also some texture but you could make it on any theme you want.
Here is my first attempt. I decided that I perhaps should only use 2 coasters for the first try - nothing too ambitious!!!

I covered the front and back of the coasters with stiff brown corrugated paper. The back has an embossed leaf design mounted onto mulberry paper with a couple of stickers and a button.
Inside I used some more mulberry paper to cover the coaster and added some stamped images of trees, a skeleton leaf and some small letter tags. A couple of different fibres and a leaf shaped button finished the inside.
On the front cover I used the quote (from a tag book), another stamped image of a tree, another skeleton leaf and a couple of acorn and leaf stickers. I added the metal corners and the little metal watering can charm. Finally, I attached some fibres to the front and secured the booklet with two strips of brown organza ribbon.

I have thoroughly enjoyed doing this and am now determined to do another with some pages inside.

Friday, 17 July 2009

Pink and Black


I made this ATC a couple of days ago for no other reason other than the bits and pieces were laying about on the desk and I had a mad fit of 'tidy up'!!!

The pink background paper is embossed with a black velvety texture (like vintage flocked wallpaper) and I am going to submit this into the 'Tuesday Tagger's' challenge as their theme is 'texture'.

The pink and black paper flowers were from my stash and the fibres and black lace were just little loose bits at the bottom of the drawer so instead of throwing them away I used them up!

I threaded some black and pink beads onto some wire and used the 'mask' bead as a centrepiece.

I was a bit bothered that the whole thing was a bit too startling but couldn't decide what to use to 'tone it down'!! I left it laid on the desk for a couple of days and it's actually growing on me a bit so have posted it!

Wednesday, 8 July 2009

Tag


Today it is Maureen's birthday - she is 21 again. LOL
It was Maureen who persuaded me to move away a little from 'safe' card making and to explore altered stuff.... she keeps finding me 'large things to alter'. Amongst other things she's sent me massive match boxes, huge jigsaw pieces and enormous playing cards!
Some time ago she sent me a very large luggage tag so I decided she would get it back - can post it now as she's opened it! I sponged the background then added various mica powders in blue, green, gold and copper. I tried to give the background a smooth textured look so dotted 'blobs' of the mica powders and heated with the heat gun.
I thought the little mermaid's expression looked like she was dreaming of doing other things - maybe being able to stand selling sea shells instead of just swimming amongst them? Out came the 'shell' box - some of these shells were brought back from Florida - and I figured if they'd survived travelling that sort of distance they could survive Royal Mail!
I edged the image with gold ink and stuck it on the tag then stamped the words.
I stuck some blue, green and gold fibres along the bottom of the image and put a small pearl bead next to the large shell.
Finally I embossed the entire edge of tag in gold, adding some more tiny blue and green beads, a moon snail button and little gold starfish and of course some more shells. Please enlarge the pic for a better view!
Happy Birthday Maureen!!!
(Oh - and I have entered this into Wednesday Stampers theme of 'Colourful' and I hope it also is acceptable for the challenge of 'friends' at Tuesday Taggers)

Thursday, 18 June 2009

Men and Numbers


Two challenge sites this week, Tuesday Taggers and Saturday Surprise had themes of Men/Male and Mixed Media Monday's theme was Numbers so I incorporated both into this ATC!


I used a page torn from an old dictionary showing decimal numbers and coloured by sponging distress inks. The 'Real Gentlemen' image was stamped onto some thick card, sponged with inks and some gold mica powder added round the edges, then I added a further edge using a stazon ink pad. I used the same distress ink on the tag, then stamped the numbers on the background and the tag before adding the few fibres. Finally, I put a small pocket watch embellishment on the ATC.


Friday, 12 June 2009

A Caged Bird


Whilst I was trying to concentrate on creativity I remembered this pic so I applied myself to making an ATC as I have wanted to use this image for a while.

The background is courtesy of Flickr and the little hazy blue bird reminds me of Summer - (which I hope is coming soon 'cos it's raining again!).

The bird cage is printed onto a transparency and I cut round it. I always find fixing transparencies a challenge as if you don't get them tight enough the image is blurred! I opted to secure the top of this with an eyelet and I used some glue intended for jewellery to fix the bottom and thankfully it dried clear. The chain was added and fixed with a brad.


Art Creations Friday supplied this gorgeous textured background for todays challenge.


I added some lace and ribbon and a lace flower secured with a pale pink pearl brad.


I wanted to keep the overall 'textured' look of the background and after experimenting in edging a small section with embossing powder (unsuccessful!!) I reverted back to the 'torn tissue paper covered with acrylic paint then blasted with a heat gun' technique!


This is my first challenge for a while - and at least I feel I spent the little spare time I had doing something!

It's been very difficult to find any inspiration - it's not that I don't want to craft because I do, it's just that my mind is full of other things and I cannot push all the other things that are going on to one side in my head and let any creativity see the light of day - there are too many teams to pick, games to play and lots of County Administration. In a way I want September to come then I can get back to just being messy on the desk instead of having to be organised!

Tuesday, 5 May 2009

Faces


I know it's a week since I posted - I have suffered from severe crafting withdrawal symptoms as I have had very little free time - and what free time I have had I've spent selecting teams for forthcoming games and when I'd finished that I was just too tired to do anything!
I did however manage to scrape a win last Saturday in our first event of the season! If you want to look at a pic follow this link!
As I've had no crafting time this is something that I made a few weeks ago and didn't get round to posting on here - it was made for a jigsaw charm swap. You could send a 'stand alone' jiggy charm to be put onto a bracelet or a charm mounted onto an ATC, and the swap host would send you soemthing similar in return.

I am not very good with small jiggy bits!!! Only large ones!

I wasn't particularly confident of being able to produce something that would be good enough for attaching to a bracelet, so I decided to put the jigsaw piece onto an ATC. The background is a paper collage of various cities, I stamped the face image onto the acrylic painted jigsaw piece and coloured it before applying a couple of coats of glaze and once dry then added the charm at the bottom.
As I haven't entered any challenges for ages, I have submitted this into the 'Lots to Do' challenge this week who's theme is 'Faces'.

Tuesday, 28 April 2009

On Safari


Just been doing bits and bobs lately and nothing particularly creative or constructive!

I made this ATC at the weekend.

I used two different mediums for the background, imitation fur skin sent to me some time ago by a crafting mate Sassy - it has a lovely soft feel to it (a bit like stroking a cat!) and a strip of some patterned paper which co ordinated with the main zebra image.

I mounted the zebra on card then used 3d foam pads to raise it.

The beads are from a set in my stash and I finally managed to stamp a word into Sculpey clay that you could read! I covered the clay with gold ink and added a few fibres.


Saturday, 18 April 2009

Egypt


It's been a lovely day here, lots of sunshine - fingers crossed the sunshine stays with us for tomorrow as it is our 'Official' Club Opening Day!
I started this ATC last night and finished it this morning. It wasn't made for a challenge or anything, merely made because I have done so little in creative mode just recently.
I covered the ATC in brown mulberry paper and then distressed using a cream versamark ink. I then added the hieroglyphic printed paper attaching with 3d foam.
I have hardly used this set of stamps from Hero Arts so decided to give at least one of them a try! I stamped it onto black paper and then gold embossed, I think it's turned out OK! Again this was attached with 3d foam. I randomly gold embossed the entire ATC before threading the beads onto wire and glueing in place. I chose blue, black and gold as these colours always remind me of Tutankhamun's mask.
To complete the ATC I used a black cat brad, a 'coin' and glued on a couple more loose beads in the same colours.

Sunday, 12 April 2009

Sew Time


My blog posts today are like buses....... you wait ages for one to come along, then two arrive together!

I kept my promise to myself to make something tonight after being 'craft less' for nearly a week and here it is!

The challenge on Theme Thursday was 'Sewing' and Margaret's theme this week was 'Time'.

I have combined the two challenges and made this mixed media ATC.

The background is a pretty fabric that was sent to me by another crafter, the image is from Seneca Pond Crafts, the embellishments, lace and ribbon were from my stash.