Showing posts with label CAS Stencil DT. Show all posts

Thursday, 4 June 2020

Stencil and Acrylic

Someone mentioned to me 'Acrylic Deboss' recently.
I kinda scratched my head a little when they said it as I had no idea what it was! But after a quick internet search and watching a video tutorial it became clear -
it's simply scraping Acrylic Paint over a debossed stencil impression to give some dimension - different eh? And another way to stretch your stencils.

I played about with a few different ones before settling on this Mini Stencil called 'Splash'.

I used some green and blue acrylic paint and an old gift card to drag the paint down the debossed stencilled panel. 
The wellies were from a freebie set coloured with watercolours and fussy cut.

The die cut puddles were part of the same free set and I cut them out using the edges of the card outside the stencil where the paint had been dragged to.

 I quite like the effect of the green and blue acrylic paint on the stencil and another technique that I shall practice.


Friday, 15 May 2020

CAS Stencil - Mid Month reminder!

Hilary is our host at CAS Stencil this month and she chose the theme of 'Layered Stencils' and I'm here with my mid month reminder that there's still time to enter!

I recently had a little treat of several layered stencil sets which range in size from 2.5" square to 4" square.

Although most of the sets have 3 stencils to use I used just 2 for the butterfly on this card. 

The background strip is an old stencil (sorry I have no idea who makes it but if you scroll down to my previous post you will see it used again!) inked in Pumice Stone DI.
Stencilled the butterfly body over and then when dry used the detail stencil and heat embossed in gold.

Added the sentiment and a small black enamel dot.

We have a wonderful guest designer this month - GRETA (GG Creations)
Greta and the rest of the Design Team have made some great cards to inspire you too (if you need any that is!!)

Thanks for looking - have a great day whatever you're doing. x

Monday, 4 May 2020

CAS Stencil May Challenge

Hilary is our host at CAS Stencil this month and she has chosen the theme of 'Layered Stencils'.

I started by creating a soft spotty background using a pale grey ink, fading it out as I moved across the card.

I have a bit of a 'thing' about blue poppies! I love the red ones but I had a blue Oriental Poppy in the garden of our previous house and once it began to bud I checked it lots - (sometimes several times a day πŸ˜‰πŸ˜‰!)  - as I loved to watch it unfurl and flower.
Although this one isn't a frilly oriental one I decided I wanted to make it blue!

The layered stencil is from Altenew and this is the first time I have used it (it won't be the last!)

The sentiment from Penny Black stamped in Grey ink.

Our Guest designer this month is GRETA - please go visit and see her lovely creation!
My team mates have also done some fab work again this month and if you need any help there's also links to a couple of video tutorials.
Hope that you will create something and share it with us!
There's a few changes afoot with our CAS group of challenges starting next month. CAS Stencil will be combining with CAS Watercolour and CAS Mix Up into one monthly challenge and the new CAS Mix Up Challenge will include a rotation of challenges ... Mixed Media, Stencil, Watercolour (repeat).
We hope that you will come and join us at the new CAS Mix Up from June onwards! x

Wednesday, 15 April 2020

CAS Stencil Mid Month

I am here with my mid month reminder for our challenge at CAS Stencil set by Cathy.
Cathy chose Gilding Flakes for her theme and we hope that you can come along and give this technique a go - my Gilding Flakes were gathering dust in a drawer until this month!

I used the same stencil for this card as I did for my first one but instead used black card as the base.(My first one is HERE)

I wanted a card which would be OK for a bloke - (hate πŸ˜–doing man cards) hence the black and silver colour scheme.
I simply used some circle dies to cut out my gilded piece and a wavy die so I could insert the piece of silver card which has a matt finish rather than a mirri one.

Using the same stencil on different coloured card gave a completely different finish  and although it was difficult to capture the shine on the circles but happy with the finished piece!

There's some video links over on the challenge blog - so dust off the flake jars and join Guest Designer  Mac  and the rest of our really talented team and upload a make into the gallery! 

Saturday, 4 April 2020

CAS Stencil April

Time for another challenge at CAS Stencil and this month, Cathy has chosen the theme of 'Gilding Flakes'.

Oh boy was there some fun in our joint Office/Craft Room/Gaming Room when the husband decided to be nosey and see what was in that jar of shiny papery stuff................now everyone knows that shiny papery stuff is not to be messed with - particularly by someone who hasn't a clue what he is doing -  and tipping the jar slightly when opening is definitely not recommended. We had lovely papery confetti EVERYWHERE. After a massive clean up operation I think in future he may just leave my side of the room well alone.....
So here's my card

Laid my stencil over a piece of white pearl cardstock and applied the glue.
A few Gilding Flakes next on the top of the stencil and glue and I have a small 'Scoochy' Polishing sponge (similar to a piece of Stamp Cleaning pad!) to work the flakes in.

I picked out the copper colour of the flakes using a piece of copper mirri card to frame the gilded piece and die cut a leafy branch.
The sentiment is done in Copper Metallic Ink.

I have used this stencil quite a lot and was pleased with the different effect of the gilding flakes -definitely stretching my stencil stash!

Lots of inspiration and a couple of links to tutorials over on the challenge blog - and a gorgeous make from our wonderfully talented Guest Designer  Mac   - please join us this month - we love to see your work in the gallery!

Sunday, 15 March 2020

CAS Stencil Mid Month

My Heat Emboss challenge is half way through at CAS Stencil - so there's a little time left for you to share something with us in our gallery.
There are some great makes over at the blog and some links to a couple of tutorials if this is something you haven't done before.
We also have a beautiful make from our Guest Designer - 

I don't use colored card very often considering I have a simply huge stash of it and think maybe I should at least make an effort to make a small dent in it!

I used Slate Grey for this card base and heat embossed in white through a feather stencil from Bee Crafty.

The sentiment (also from Bee Crafty) was one I simply had to have - I love it!

Stamped and embossed the sentiment and the inside of the card has a PC generated sentiment - 'Spread your wings'

I added a couple of sequins to the front to finish.

Thanks for stopping by.
Have a great day whatever you're doing! x

Wednesday, 4 March 2020

CAS Stencil - March

This month at CAS Stencil is my very first time hosting and my challenge is HEAT EMBOSSING.
I have had my eyes openedπŸ‘€ discovering there are so many different ways to use stencils, not just sticking them down and ink blending over them!

So I really hope you will try this technique this month - and hope that you enjoy doing it as much as I did - links on the challenge blog to a couple of videos to help if you need it.

My card has an ink blended panel (Cracked Pistachio, Peacock Feathers and Blueprint Sketch).
Stamped some bulrushes (Inkylicious) in Smokey Grey and spattered a little water over the panel.
Brilliance Archival Ink (Called 'Peacock' - 3 lush colours on the pad!) used for the 2 dragonflies and clear embossed.

The large stencil is from Imagination Crafts. Applied the Versamark Ink, removed the stencil and heat set with white embossing powder.
The sentiment was a freebie but it seemed to fit!

The DT have some lovely makes to inspire you and don't forget to check out the gorgeous card from our Guest Designer - Cat  (Cat Luvs Paper)

Tips
Dab the Versamark, don't rub.
Always use an anti static pad on your card before placing your stencil on top
Remove your stencil before getting out the heat gun! ...... Seriously, I know someone who didn't..... 😡😡

Friday, 21 February 2020

Fun with Foil!

I have enjoyed playing about with Foils recently and there is still a few days left in our current challenge at CAS Stencil so have made another card!

It is a bit of a change for me to use a coloured card base and I have been disappointed with some coloured card that I have bought recently as it had a rough feel to it like it was unfinished! I am now on a mission to find somewhere here in the UK that sells smooth high quality coloured card in small packs (- I don't want to be buying 100 sheets - ) and doesn't need me to take out a second mortgage to buy it.

This grey card pack of 10 sheets was in a recent sale and was happy that it has a lovely smooth finish to it when it arrived.

The silver mirri card was a left over bit and fitted the length of the card so cut it out with wavy dies. The white was also a left over piece.
I heat embossed the sentiment (not very well looking at it!!!) in silver to keep the grey and white colour combo throughout.

I'm popping into the Playground this week with my make too.
Thanks for looking - would love to see your foiled stencil creations in the gallery if you have time to spare over the next few days! x

Saturday, 15 February 2020

CAS Stencil Mid Month Reminder

We're halfway through our challenge of Using Foil with your Stencils at CAS Stencil this month set by Barb.
I had fun using this technique and here's my DT card

I used some Brushos on mixed media paper for the background to my stars.
The stencil was a Christmas present!

Used Transfer Gel and a blue Deco Foil, running it through the old laminator.
After foiling I die cut out the stars.

The rest of the stamping on the card was done with silver metallic ink using a Stampin Up set.

Another card for my stash of masculine cards!

The one thing that no one tells you is that sometimes taking a pic to show off the shiny bits is a tad difficult!
So here's a little close up of my stars which are very shiny!!

Look forward to seeing your creations in the gallery!x

Tuesday, 4 February 2020

CAS Stencil February Challenge

This month at CAS Stencil, Barb has set us the challenge of using Foils.
Before I really looked into this, I thought that you had to have proper foiling machines to use foiling on your cards - but I found out that you can try foiling without buying lots of products if, like me, you are simply wanting to have a go at something different and don't have lots of cash to spend.
I used 2 different techniques on this card -and no it's not perfect (will explain in a minute) but I was happy with the finished article.

I watched some tutorials (lots listed on the challenge blog) and realised that I could perhaps try this technique with a little outlay.

I bought 6 A4 sheets of foil in different colours (from e bay) and invested in some Transfer Gel - neither broke the bank.

So - onto the card - the sentiment was done with a die cut, some foil left over from the main stencil and double sided sticky tape.
This was really easy - a sticky tape sandwich of card,tape and foil-  using a bone folder to smooth out the foil before die cutting.

The rose stencil is a new one. Secured it onto the card and used a palette knife to apply the Transfer Gel.
Once done, removed the stencil and left the Gel to dry. It dries clear so you know it's ready!
Foil over it, then put it between a sheet of parchment paper and ran it through an ancient (and I mean  ancient - like 20 years old!!!) laminator.

Filled with trepidation when I took it out and peeled off the foil..... ..........
Not too bad considering!!

There are some small gaps where the foil didn't stick - although this may have been my uneven application of the gel rather than the foil and the pre-historic laminating machine!

The DT have some lovely examples to show you so please pop over to the challenge blog and pay them a visit - and don't forget to visit our talented Guest Designer Steph's blog HERE
Love for you to try this out and join us this month - Happy foiling!! xx

Wednesday, 15 January 2020

CAS Stencil Mid Month Reminder

Half way time at the challenge at CAS Stencil and the theme this month has been chosen by the lovely Nancy who's set us  the task of  'Use A New Stencil'
I bought this stencil last year and it's never been out of the packet -😏 in fact there's a few in there that have never been exposed to daylight so I have promised myself that I will systematically start to use them!

This stamp was a mag freebie - again from last year- (or was it the year before??)
Another item in this craftie space that is still in its cellophane and hasn't been manhandled by me.
I think the expression on the gull is priceless! He looks quite stern and fed up sat on his wooden posts.

Stamped, watercoloured and fussy cut before tucking him behind the framed wave stencil. 

I thought this was another suitable 'man' card  - which I desperately need in my stash

There's bags of wonderful inspiration over on the CAS Stencil blog and I know my teamies would really appreciate a visit and a comment if you have time.
Hope too that you will make something with a stencil and show your creation in our gallery - because
 
ITS OUR FIRST BIRTHDAY!! 
So we're celebrating and have a prize on offer this month!

What you waiting for?????

Saturday, 4 January 2020

CAS Stencil January Challenge

Hello Stencillers!
Welcome back to a brand new challenge at CAS Stencil and there are celebrations going on because CAS Stencil is ONE! Yes, we're having a birthday and to celebrate we are offering a fab prize to one of our visitors who links up their creation in our gallery!

The theme this month has been chosen by the lovely Nancy who's set us  the task of  'Use A New Stencil'
So perfect for you to get out the Christmas pressies and start stencilling!
My only problem was which one of my new stencils to use...... πŸ˜„πŸ˜„

In the end I chose a Creative Expressions mini stencil and did a mono print using Fossilized Amber and Mowed Lawn DI's.

This colour combo cheered me up and made me think of Spring - although I don't dislike Winter at all, I sometimes wish the long dark nights weren't quite as long and dark!  

The cone flowers are a Sizzix die painted with watercolours.

Our Guest Designer this month is  Arlene and she and the rest of the Design Team have done some fab cards to inspire you - although with new stash AND the chance to win I bet you won't need any prompting!

Thanks for looking today - looking forward to seeing all your creations in the gallery!

Linking also to  Stamplorations Anything Goes Stencil challenge HERE

Monday, 18 November 2019

CAS Stencil - November half way reminder

Half way through November and halfway through our  challenge at CAS Stencil.  This month our host Linda has chosen the theme of 'Stencil Monoprint'.

I had some fun with this challenge and made quite a few monoprint backgrounds which are now in a neat pile waiting to be used up!
I had two attempts using a snowflake stencil. One was perfect and I have used the monoprint in it's entirety on a card front.

The other attempt was the second pass and a little too patchy for my liking but I did manage to cut out some circles!

The sentiment was done using Pearlescent Ice Blue ink.

Do pop over to the blog and  have a look at the lovely examples done by my team mates and our Guest designer Lucie 

We'd love you to share a make with us in the gallery this month.

If you've not tried this, it's not as difficult as you think! Honest!!

The CAS Stencil team are having a little break during December so we will be back in January with a brand new challenge.

I hope though you will continue to visit me during the next few weeks and that you also remember to check the blog at the end of the month to see who our Top Picks are!

To all of you who have joined us at CAS Stencil this year we wish you all a very happy and peaceful Christmas and look forward to seeing you all again in 2020. x

Monday, 4 November 2019

CAS Stencil - November

Time for another challenge at CAS Stencil and this month our host Linda has chosen the theme of 'Stencil Monoprint'.

If you've never done a stencil monoprint before I promise you will be hooked once you try it. There are some video links on the challenge blog to give you some tips and instructions, and whilst you're there have a look at the lovely examples done by my team mates and our Guest designer Lucie 
So here's my card -
Love these colour combos - Fossilized Amber, Peacock Feathers, Mermaid Lagoon for the monoprint frame.
Once dry I cut out the inside frame with a stitched die.

The background behind was done by smooshing the colours on my craft mat with a small piece of watercolour card.

I used a tiny 'circles' stamp (and it WAS tiny) inked in Salty Ocean.  It reminded me of bubbles.

A simple white die cut anchor and a sentiment stamp finished it off.

 I really enjoyed this challenge and hope that you will find time to make something using one of your stencils and share it with us in the gallery!


Friday, 18 October 2019

CAS Stencil - October Mid Month reminder

We're halfway through our October challenge at CAS Stencil where Loll set us the theme of 'Patterned Paper'.
My paper comes from a vintage themed pad called - ?????  No idea 'cos I lost the front cover but it is full of scripts/roses/newspaper print/old franking machines and ink and pencils!

I used one of the lighter coloured and less fussy sheets for this make.

The newspaper print, pencils and word 'Perfect' is actually part of the sheet and I just stamped the other words round it after heat embossing in white through this pretty corner stencil.

I dabbed a little bit more embossing powder round the edge before matting onto grey card.

Finished with a couple of scored lines and a bit of twine.

So - you have time to come and join us oif you haven't already done so - and even if you have - MAKE ANOTHER!!!
Our Guest designer Gundi and the rest of the team have some great makes to inspire you!

Friday, 4 October 2019

CAS Stencil - October

Our challenge at CAS Stencil this month is 'Patterned Paper' and has been set by Loll.
Loll seems to think that we all have patterned paper mountains lying about.. have no idea where she gets that idea from...............πŸ˜„πŸ˜„
So here's my DT card -

I recently had a mass purge of patterned paper and got rid of a lot but I did keep some odd sheets from pads which I knew I would definitely use!

I used a small hearts stencil and heat embossed - white ones first leaving the centre red one till last.

Placed onto a die cut piece of black card.
I heat embossed the die cut sentiment and it is really shiny in real life! (Saving this card to give to my other half!)

Stencilling onto patterned paper was another first for me and I hope that will have a go and join in with us this month - 'cos I know you're all now looking at your paper pads!!

Lots of inspiration over on the challenge blog too - my talented teamies have so many wonderful ideas!
AND - we have a wonderful guest designer this month - Gundi- who has made a fantastic card showcasing her stencil and patterned paper!

Am sharing my make over at -
CHNPP - A/Goes
The Male Room - CAS
CAS on Friday -  Masculine

Wednesday, 18 September 2019

CAS Stencil - Mid month reminder


It's time for my CAS Stencil little mid month reminder!

Julia set the challenge of using Baby Wipes with your stencils - a simple technique but really effective for backgrounds!
My first DT card this month (if you haven't seen it) is here - and here's my reminder card!

One for a rather sad occasion but there's no getting away from it - we all need sympathy/condolence cards at some time.

Watercolour card inked with Peacock Feathers DO.

The leaf stencil ( a bargain buy from The Range), placed over and the baby wipe used to reveal the design.

A simple die cut frame for my leaf sprig die cut and a sentiment stamped in Smokey Grey ink.

There's lots of lovely ideas and inspiration  on the challenge blog and also a couple of links to video tutorials.
Hope that you will join us this month - we love to see our gallery full of amazing creations!

By the time you read this I will have just arrived on Day 1 of my holiday - warm sunshine and a complete relax -and no doubt the odd long cool drink on occasions!! (Purely to be sociable πŸ˜‡πŸ˜‡πŸ˜)

Thanks for looking today - whatever you're doing and wherever you are, I hope your day is a good one. x

Wednesday, 11 September 2019

Leaves

Autumn is here in the north west of England - we have had really strong winds overnight and it's still blowing a gale this morning - had to rescue a few of my pots on the patio which had been battered by the wind. The weather as always though gives me the perfect excuse to shut myself in the craft room - and that's what I intend to do!!
So here's today's share -

A simple and quick birthday card - and it's one layer too, so not too fat for posting!

I fixed my leaf stencil over the card and masked off the bottom using masking tape.

I used Twisted Citron and Peeled Paint Distress Inks and using a baby wipe I pressed the colour through the stencil.
Using a wipe instead of a sponge gives a lighter and more delicate colour impression which I really like.

Am popping this into the gallery at CAS Stencil where our theme this month is to use Baby Wipes!

Cut 2 leaves and before removing from the die pressed the inky baby wipe through the die.

Stamped the sentiment, fixed the leaves adding a teeny bit of twine and job done.

Desperate for masculine makes in my stash box so this is the first one done!

Sharing my quick CAS card over at
AAA Birthday - Use a Stencil
APTS - Masking
Dragonfly Dreams - Happy Birthday

Thanks for stopping by - have a great day whatever you're doing. x

Wednesday, 4 September 2019

CAS Stencil September Challenge

Julia is hosting our CAS Stencil challenge this month and she would like to see us using Baby Wipes with our Stencils to make CAS cards.

There are some links on the challenge blog showing a couple of techniques, so if you're unsure of how to mix a baby wipe with a stencil, pop over and have a look!

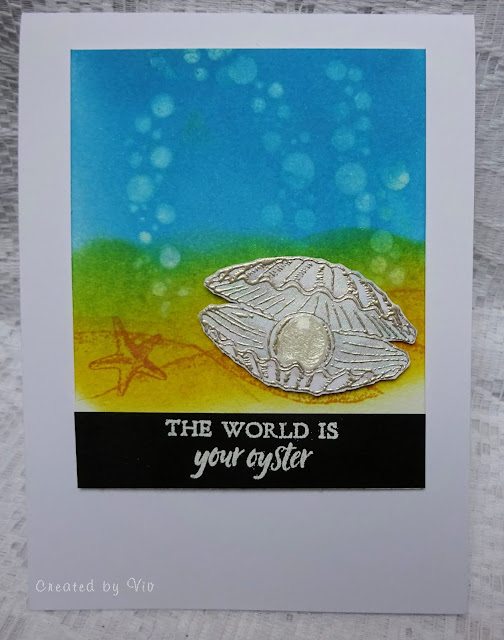
The idea for this card has been swimming round (no pun intended!) in my head for a little while. But several attempts to make it look like I imagined it (using a Bokeh technique) were unsuccessful - this month's challenge though gave me an opportunity to have a re-think as to how to achieve what I wanted.

The Oyster stamp was a mag freebie. Heat embossed with Platinum EP and coloured with Cosmic Shimmer powders. The pearl was done using Nuvo Crystal with a teeny bit of Pearl Cosmic Shimmer scattered over it then when dry added a layer of Glossy Accents. I was rather pleased with the way it turned out as it stands proud of the shell and kinda 'glows' -  even dear husband said it looked like a pearl!!

Blended Salty Ocean, Fossilized Amber and Mustard Seed DO onto watercolour card and stamped some 'sandhills' and a starfish.

My 'wavy bubbles' stencil I have had for a while and never used but I kept fingers crossed it would work and turn out like the idea in my head!
I used the baby wipe and very carefully removed the colour by GENTLY rubbing across the stencil, it worked better in some places than others but having messed up a couple of pieces by pressing too hard when trying out this technique I learnt my lesson - only LIGHT pressure is needed!!

The sentiment also from the same freebie set simply heat embossed in white onto black card.

I hope you will try out this simple technique and share your makes in our gallery. We have a great Guest Designer too this month - Sarah and the rest of the CAS DT would love to hear what you think of their cards too!
Thanks for looking - hope I have inspired you to have a go! Happy Crafting. x
Sharing over at
Crafty Cardmakers - Pearls
Country View - Under the Sea

Sunday, 18 August 2019

CAS Stencil - Mid Month!

I'm here with a reminder that the CAS Stencil challenge is mid way through this month -  and the challenge that Robyn set us was to use sprays with your stencils.

At the beginning of the month I used a spray I had made up myself using Brushos in the usual way of simply spraying through a stencil - if you've not already seen my card, it's here.

I watched a couple of videos and rather liked the idea of mixing an Ink Mist Spray with embossing paste to create texture and colour  so thought I'd have a play with paste and get messy!

The spray I used was a Cosmic Shimmer Ink Spray Mist called 'Paradise Pink' and the stencil is 'Beautiful Baroque Swirls' by Hunkydory.

Using a palette knife I scooped some white embossing paste onto a craft sheet, added a few drops of the ink and mixed them together thoroughly.
I layered this through the top of the stencil then added a few more drops to darken the colour, repeating twice more and applying through the stencil, ending up with an ombre effect.

Before the paste dried I sprinkled a teeny bit of Glamour Dust down the centre - doesn't show up very well on the pic but it looked very pretty in real life!

The die cut sentiment was triple embossed.

My thanks go to Svitlana for inspiring me to have a go at this technique and I hope I have inspired you to do the same and join us if you haven't already! x

Sharing at
Creative Knockouts - Sparkle and Shine