Showing posts with label CAS Mix Up. Show all posts

Thursday, 1 April 2021

CAS Mix Up April Challenge

It is Mixed Media month at CAS Mix Up and Linda has chosen the theme of 'Paper Piecing'.

I have lots of coloured cardstock which I very rarely use as I much prefer crisp white backgrounds for CAS but once I'd decided on which stamp and paper I was going to use I thought I would try a different coloured base.

I stamped the Funky Fossil Lotus Reflections stamp onto the card first, then used the additional flower from the set, stamping and heat embossing onto the patterned paper which is so old I can't remember anything about it!

I also stamped and embossed two of the smaller elements.
The sentiment is from another Lotus set (no packaging so no idea again!) but I think I may have bought it from Amazon.

The thick black line looks really odd on the pic but it is straight and true on the card!
My elements for the challenge are Stamping, Heat Embossing and of course the theme - paper piecing.

Please go visit the challenge blog and my talented team mates and we have Bonnie (Paper Crafter at Large) as our Guest Designer this month too.

Hope to see you linking up your creation in our gallery! x

Friday, 1 January 2021

2021 and CAS Mix Up is back!

So we say goodbye to what has been such a difficult year for so many people and let's hope that 2021 brings us better times. I am blessed and thankful to have had support and friendship from so many fellow crafters and my crafting has been my 'escape' from the mad mad world outside.
CAS Mix Up is back after our little December break, Joanna has stepped down (miss you Jo) but we welcome two new members to our team - Leslie and Coni!

Our first challenge has been set by Hilary -  and she has chosen the theme of 'Splatters'.
I am a Splatterer!
Without doubt it's one of  my favourite things on CAS cards as it gives a bit more interest yet still retains the uncluttered un-embellished space.

When I read the challenge theme I knew right away what I wanted to do.

I have had these red rubber stamps for such a long time and they hardly ever get used.
This was a reasonably quick card to do - made slower for me because I have got so used to clear stamps and MISTI positioning that working with red rubber ones now presents a bit of a challenge!

To comply with the Mixed Media element of the challenge my elements are Heat Embossing, Stamping and Watercolouring.

I did a light grey watercolour 'grounding' of the ink pots to try to achieve a bit of depth. 

The large ink splat is from Visible Image and I used a Black Posca pen tapping it with a cocktail stick for my other spatters, masking off the top part of the card in order to keep the white space clear.

Hope you will kick off your year by joining us this month - our very talented Guest Designer  Elaine (Craft-E-Place) and the rest of the DT have made some great cards!

Thanks for stopping by. x

Monday, 20 April 2020

Bleaching

I have never had much success with Bleaching techniques but the challenge over at CAS Mix Up this month was just that,  so thought I would have another go.
The background was an experimental piece trying colours out together and left in the 'may get
round to using one day' pile!

I gold embossed the flower stamp and then lifted out the colour. I was tempted to simply use water but determined to have another effort with the bleach!

There are a couple of places where I went outside the embossing slightly but it didn't turn out too bad.

Instead of leaving it, I tried to colour it with Distress Inks - not sure that this was a success or not as apart from anything else my shading leaves a little to be desired! Can't quite make my mind up about this card -  I think it may have been better left alone as the background is quite dark but too late now!

My elements for the challenge are Bleaching, Stamping, Heat Embossing and Watercolouring.

Also entering over at
Sweet Stampin' - Bloomin' Wonderful

Thanks for looking! x


Tuesday, 10 March 2020

Dirty Leftovers Part 1!

Following on from my last post this is the 2nd card made with my finished 'Dirty Pour'. I've  a smallish square bit left which will be subject to a third and final post in due course!! But I just want to say a massive thank you to everyone who visited and left me so many wonderful amazing comments - I was happy with my card but even happier that you all took the time to visit!
I have no idea why this frame looks like it isn't square! Cos it is...........................

Anyway -the background of the frame was the leftover piece from the embossed background on the first card.

I stamped a few grassy bits in Smokey Grey ink, then added a couple of pale pink flowerheads and a couple of small dots.

The flower is a die I have had for a while and never used and happily two small pieces cut off from the heart fitted so I was able to paper piece.
I haven't added a sentiment yet as can't make my mind up!

The same with the middle of the frame that I now have left over and have to decide what to do with it! Such decisions!!

Linking up to
CAS Mix Up - Acrylic Paint (Stamping/Die Cutting/Paper Piecing)

Flower Challenge - Anything Goes
Pixies Playground - # 373

Thanks for looking today. x


Friday, 6 March 2020

Dirty Technique!

I have made such a mess!
Not that's anything unusual - but I have made more of a mess than normal..... I was going to take some pics of the desk but decided it would be unfair to those of a nervous disposition!
This mess though is another to add to my list of  - FUN THINGS TO DO!
I have been DESPERATE to try the Acrylic Dirty Pour Technique and this months challenge at CAS MIX UP is to use Acrylic Paint - so bought a very cheap set of acrylic paints and watched millions of videos - well 3 or 4 anyway....

I covered the desk with some plastic, donned a pair of rubber gloves and had a few practice sessions mixing small amounts of all kinds of daft colours and pouring onto on odd bits of card  - (now I know why it's called DIRTY pour!) - before I was confident enough to use a piece of precious Yupo.

I AM SOOOOOO PLEASED WITH MYSELF! Turned out pretty well I think? Even the critic in the room said it was 'cool'!!!

Added bonus is I have quite a bit left
after cutting out my heart so have made another card (a later share) and have a small piece left for a third!

It's CAS MIX UP's 4th Birthday too so Happy Birthday and thanks for setting challenges which make me try out new things!

TIOT also has a challenge of New Technique so am linking my dirty poured heart (😁😁) over there too
and popping in at Crafty Gals Corner where the challenge is Add a Heart!

Can recommend having a go at this if you've not done it before - there's something simply amazing watching the paints run into each other and make yummy patterns - and it's well worth the mess! x

Saturday, 8 February 2020

Lovely Lilac!

Purple shades are not colours which I tend to use a lot, so if anyone asks me why I used Lilac on this card I would honestly answer that I simply don't know!!

The main challenge over at CAS Mix Up is to 'Make a Stencil from a Die Cut' .
This die used to be one of my 'go to' ones but it has been neglected recently.

I spent a little while agonising over the use of the pearls and am still not sure if their addition was needed or not but what's done is done!


So the elements of my card to comply with the CAS Mix up requirements are
Stencil from a Die Cut, Stamping, Die Cutting (the frame) and heat embossing (the sentiment and the spotty border are clear embossed).

Also sharing at
Mix It Up - Use a Stencil
Crafty Calendar - Use Dies

I am off for a few days with friends and a trip to see the Tutankhamun 'Treasures of the Golden Pharoah' Exhibition. Although there is no Death Mask (already back in Egypt), this will be the last chance to see the rest of the artefacts before they go to their permanent home in Cairo.
This exhibition is celebrating the Centenary of the discovery of the tomb and I am really looking forward to it!

Thanks for calling to see me today - hope everything is well with you in your part of blogland. Hugs from me. x

Friday, 8 November 2019

Inks and Powder

Blue skies and sunshine (but cold) here today after all the rain yesterday - mad when you think just across the Pennines 40 minutes drive away they once again are experiencing floods. Although one of the downsides of living so high up on the top of a moor means you experience high winds 💨and snow ⛄ the upside is at least you don't get flooded out💧⛆🌊!

Because the weather was so bad yesterday I spent a very nice cosy time in the craft space doing what I do best - making messy!

I have never tried hot glue embossing but continuing with my decision to try out new techniques and re visit old ones and after seeing a similar card to this on Pinterest the small piece of metal left on the desk from my card here seemed to say 'Use Me'! - So I did!

I ran the metal through an embossing folder and then dropped some Alco Inks on it and simply let them run.

Out with the glue gun! Confess don't use the glue gun a lot (cos I am VERY messy), but am really pleased that I only managed to get the glue where I wanted it and not all over everywhere else!
A few blobs, then gently heated again to make warm, added some gold embossing powder and heated again.
Once finished I matted it onto an off cut of gold card before putting on the card base and stamping the sentiment.
Another 'man' card I think?

Liked doing this technique so the glue gun is still out........😏😏

Saturday, 2 November 2019

Metal

CAS Mix Up has the challenge of 'Oxidized Metal' this month.

I wanted to try a 'new to me' technique using ink refills on mirri card  - as I have tons of it which I don't use - but don't have many ink refills as I usually just buy new pads when they dry out!
When I went to find the refills I possess 2 were empty and the other had dried up! So it was back to a tried and trusted technique using a thin flexible metal bought when I was doing a lot of mixed media and now a little neglected.
I had it in my head to do a 'man' card too as I so rarely make them.

I took my piece of copper metal and dry embossed with a 'Cogs' folder  then used my clear embossing pad on it.  Gold, Silver and Copper embossing powders sprinkled on top. I re did this a couple of times until I got the effect I wanted.

Once dry I swiped a Stazon Ink pad across the top.

I fiddled about with layouts and frames for a while but in the end I chopped up my metal piece into 2 strips!
Simply matted onto black card before placing on the card base and stamped the sentiment.

To be honest I'd forgotten how much I enjoyed messing about with metal  - so whilst I had the metal pack out I embossed a couple more pieces and have made my hands very very messy using alco ink on them without gloves.....😒😒

As well as CAS Mix Up, I am also sharing my man card at
Rainbow Card Challenge - Magically Metallic
Sisterhood of Crafters - CAS

Tuesday, 22 October 2019

A Foiling First!

I have been trying out some new to me techniques the last couple of days and I confess I am now hooked............... on.................. foiling! I am sat here now waiting for some new stash 😊😊 after buying some teeny samples to see if I could master/like using foil.
I have a laminator (very old but works!) and I have also made some cards using that too and been happy with the results for first attempts.
This share is a card made without having to use a laminator!

I am dead chuffed with how this turned out (although those of a nervous disposition should not have been in the room when I was trying to take the photograph!)

Red Pepper and Lettuce Alcohol Inks onto a scrap of Yupo and just let them mingle together.

Allowed to dry for a short time then laid over a small piece of gold foil and rubbed with my finger. Where the 2 colours meet and leave a marked 'join'  the foil simply sticks to whilst it is tacky!
Simples really!

My trees were done by using double sided tape on another odd piece of card and putting the foil over. Rubbed lightly with a bone folder and then die cut.

Here's a close up -  I L💗VE it!!
 
Stamped a greeting in Metallic Gold Ink, die cut an oval frame and done!

CAS Mix Up's challenge this month is Foiling so am linking up to the gallery before the challenge closes in a couple of days.

Allsorts challenge is Add something gold/silver

It's dry here but a little overcast today.
I am off for some fresh air and a little walk round out local dam and then intend to foil, foil and foil some more!!
Have a great day whatever you're doing! x

Saturday, 7 September 2019

Inchie

Made a couple of cards today - both for the same challenge but will just share one for the time being!

CAS Mix Up has 'Inchies' as it's main challenge - so one single Inchie, a tiny bit of stamping, some die cutting and a little watercolouring make up my required elements for this first card.

I used my small cone flower die and cut it out twice,watercoloured then snipped off the smaller flower stem from each (as there wasn't enough room!) - not wasted them though - have glued them on the inside!

Embossed a frame round the Inchie and then die cut using a cross stitch die.

The sentiment stamped in Smokey Grey ink.

Our weather has turned distinctly Autumnal the last couple of days - seems this summer has been one of extremes - with red hot days then rain of monsoon proportions - and as always the nice weather was over far too quickly.
That said I have managed to get all my washing dry today! (Ironing is the problem......😡😡!)
Linking to these other Challenges
Flower Challenge - Anything Goes
Sheepski - Dies
MMM - Use a Shape

Enjoy the rest of your weekend!

Tuesday, 6 August 2019

Mop Up Your Mess!

I have been saving the paper towels I use for mopping up my mess for a little while (there's a lot 'cos I am VERY messy😁😁), because I saw a technique to reuse them to make backgrounds.

And that is the challenge at CAS Mix Up this month.
(If you've not done this technique before there are some videos over at the challenge blog!)

So here's my card -  

I had a small piece of watercolour card left over from a previous make so I took my dried paper towel, laid it on top and liberally spritzed it with water.

Pressing down on it the colour transferred onto the watercolour card - I was more than a little pleased with myself  when I lifted it off and was left with this soft pastel background in shades of yellow and pink.

The die cut was another scrap piece of watercolour card and I coloured with Distress Inks. I adore cherry blossoms - you know that once they flower spring is here.

A square card for this make, as the die seemed to look better inside the circle aperture.
A stamped sentiment and a few sequins to finish.

Here's my paper towel!
Mostly Picked Raspberry, Squeezed Lemonade and Fossilized Amber  (I think!).

Am also sharing over at Uniko, the Playground, the Flower Challenge  and Make My Monday this week.
Thanks for taking the time to look at my blog today and if you have left me a comment, I am really grateful!
Have a great day whatever you're doing. x

Sunday, 14 July 2019

Complete Overhaul (and a long post!)

A week since my last post. I sit now in a completely overhauled craft 'studio' - taken almost a week to do, but it has been worth it as the room had become cluttered and untidy and a revamp was long overdue!
It's not quite finished as it needs painting but at least now I have all my crafting stuff neatly to hand and dear husband has a proper area now for his electric piano to sit  alongside his iPad and laptop. Just to the right are his main PC and 3 screens (don't ask - but apparently they are an ABSOLUTE necessity when you command the Starship Enterprise😵 or are a General in War Planet Online😉😉!).

Having been able to actually sit at a desk yesterday I spent my time making up a few cards from my saved 'practice' bits.
I had messed about on some small pieces of Yupo with Alcohol Inks trying out different colours. I put them to one side to dry then promptly forgot about them until we began the big re-vamp! So here's one -  I topped it with a NBUS die cut (another odd bit!) and a gold metal butterfly.
Gold embossed the sentiment.
Quick, easy and more bits used up so am calling in on my good friend Di at Pixie's Playground with this make and also sharing at the CAS challenge at Allsorts.

Whilst my first DT card at CAS Stencil involved Alcohol Inks, (my card is HERE)  the challenge at CAS Mix Up called for  Alcohol Ink Lift Technique.

I found this technique much easier using a dry baby wipe with blending solution wrapped round a stamping block and applied to the stamp rather than using the Lift Ink Pad.  

Easier ?  Yes but happy with the results? Not really!!

My seahorse and seaweed stamp design looked so much better in my head!
But I will have another go at this I think as I like the soft etheral look  that is achieved using the blending solution to lift off the colour (and I have LOTS of bits of Yupo to use!)

I have a couple of plants to pot up outside then I am planning to enjoy my lovely new 'studio' (and use up the rest of the bits on the desk!)
Thanks for looking - enjoy your day whatever you're doing. xx

Friday, 7 June 2019

Ombre

Had a couple of hours last night in the craft space, so made a couple of cards for challenges.
This one is for this month's CAS Mix Up, which is being hosted by the wonderful Mac (who has so much talent she annoys me!!!😉😉 )

She chose Ombre as her theme so my card combines Ombre technique with ink, Stamping, heat embossing and die cutting.

My stamp is from WOW and called Tropical Flowers. Heat embossed in white then added the inks - I used just two shades, Fired Brick and Candied Apple.
Chopped my card front and popped the panel into the card then re-assembled the card front.

The die cut sentiment had about 20 positions before ending up where it is!
The heat embossed greeting placed underneath the die cut was done on an offcut from the ombre technique.

Sharing over at
A2S+M - CAS
Alphabet - F for Flowers
Creative Moments - A/Goes
Crafty Catz - A/Goes

Have a great weekend! x


Friday, 24 May 2019

Baby Wipes!

It has been a struggle this month for me to keep my promise to myself to enter the CAS Mix Up Challenge each month (reason explained in the post below this one) and I am almost at the last minute sharing this into the gallery.
I tried a couple of things using the Baby Wipe techniques suggested on the challenge blog but was disappointed with the results. I desperately wanted to have a go with my limited Distress Oxide stash on glossy paper, however the photo paper I have is very thin so didn't take the inks well. (Will buy some better stuff next time I am out!)

In the end I opted to use the Baby Wipe as an Ink Pad, again with only limited supplies!
Tattered Rose, Worn Lipstick and Weathered Wood ink refills dropped onto the wipe , a very old Hero Arts stamp set used for the leaf flourish and flower head.
The 'splatters' are from SU.

Then I got very messy and folded the wipe and dragged across the bottom of the card.
More ink on the fingers and the surrounding craft mat than on the card but undeterred had another couple of 'passes'!

The die cut sentiment was lying on the desk so used it before it became too tatty.
Overall, don't think it looks too bad!
There's also a brand new challenge over at The Foiled Fox   asking for a Colour Trio, so am linking up there too!.

Thanks for looking today and thanks to everyone who has sent me their best wishes for my M-I-L. They are much appreciated.  x 

Thursday, 4 April 2019

A learning curve and thoughts to ponder!!

Have you ever wondered (when you look at little piles of failed attempts in the bin ), why you tried in the first place?

Have you ever wondered (when you look at the greasy fingermarks), why you decided to use some (rather expensive) navy blue card which is coated with something that instantly attracts every single teeny bit of anything that is floating about above the craft desk?

Have you ever wondered (when you look at the finished article) why, even though there is nothing on the actual card the camera appears to have picked up strange shading and tiny specks?

I have.
I have wondered all these things  🔮 -  and don't know the answers!!

But in the making of the little pile of mess now sat in the bin I discovered that Pink embossing powder does not work when applied direct to this particular card.
Nor does Blue.
Nor does  Yellow
Nor does Green.

This stamp set  is called 'Under The Cherry Blossom tree' from Altenew and I confess that although I coveted it, it was not what I expected when it arrived.
There is nothing wrong with the set, it is a really pretty set but for me the majority of the sentiment stamps are really tinyand likely I will only use one or two.

I used Gold and Platinum EP on the branch - then, on trying to layer the cherry blossom in pink and the teeny birdie in aforementioned colours, I found out that this card definitely does not like it!

Try #1 - pink blossom ended up a sludgy maroon colour
Try #2 - blue birdie ended up translucent
Try #3 - yellow birdie was green
Try #4 = Green birdie looked as sick as the proverbial parrot!!

So blossom and birdie ended up white!

I am entering my tale of woe (and the card) into the following challenges
CAS Mix Up  - (Layered Embossing, Stamping and Die Cutting)
Time Out - Inspiration Pic (Blue, gold, white and blossom)
Stamplorations CAS Challenge - Dark Navy

I am off to put away pots of EP and empty the bin!! x


Sunday, 3 March 2019

CAS Mix Up - March

(If you are here to see my March Stamping Sensations DT post, just scroll past this one!)

I am trying to submit an entry into as many of the CAS Mix Up challenges (and their sister blogs) as I can.  And this month CAS Mix Up is 3 years old so they are having a birthday celebration too!
The challenge set is 'Faux Stained Glass'.
Not a technique I have used before but I watched the videos (all linked on the challenge blog) and decided to have a go.

  As it was my first try I wanted something relatively simple! There are some fab examples of mandalas etc but I wasn't confident enough to plunge into degrees of difficulty!

The balloon is part of a 2 die set and scarcely used.
Cut four times (with sticky sheets on the back of each cut) from a small off cut of white card.
I dusted another piece with Tumbled Glass DI, and positioned the first die cut onto it. 
I coloured the balloon with Promarkers then built up two more layers.
Then used Nuvo Crystal Glaze, finally adding the last die on top.

The 'clouds' were odd scraps lying about! (Not that using them has made much difference to the mess on the desk.....😉😉)
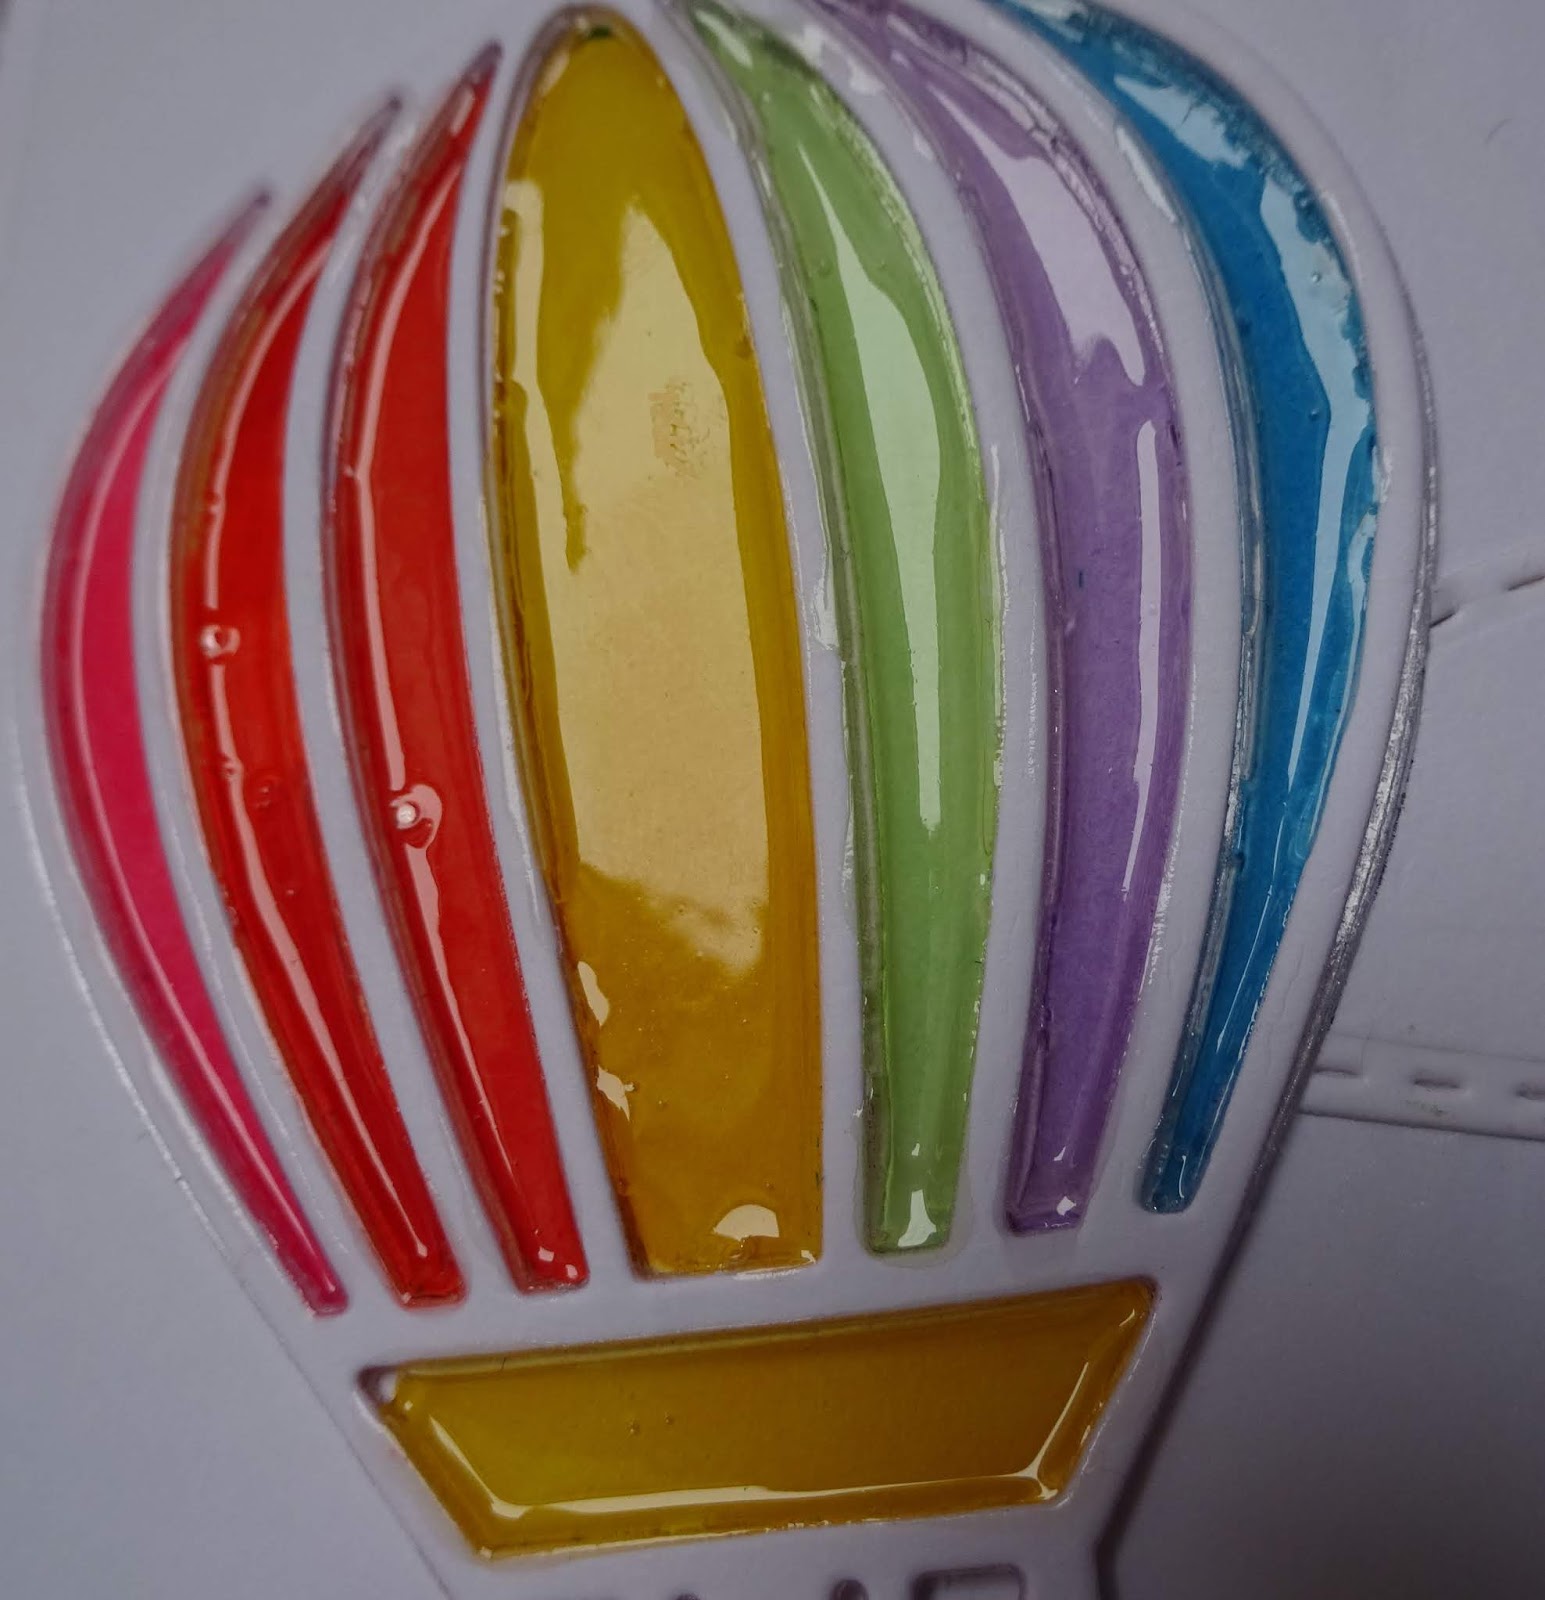
I was a little disappointed when the glaze dried as the left side colours were pink, red and orange but the glaze took a little of the vibrant shade out of the red - a lesson learned!

Here's a close up though of the lovely glossy shine

And I think not too bad for a first attempt.

Am sharing my ballon at the Playground  and also at
Inkspirational - Use Your Stash
Die Cut Divas - A/Goes
AAA #135 - Sentiment plus 3 (die cut/matted layer/coloured pens)
Fusion - Inspiration Pic - a rainbow cupcake handle!

Thanks for stopping by - I really appreciate your visits and any comments you leave me.
Have a nice day whatever you're doing. x

Monday, 4 February 2019

Love is everywhere..... except in my kitchen!

As currently the house is in a state of disarray🙈🙈 (no kitchen - just a bare concrete floor and re-plastered walls, no electrics, no water, nothing, zilch), I have had to spend the weekend sat in what little uncluttered space was left on the top floor.
There was me thinking that I would be able to come back from our little break (more on that at the bottom of the post) and be able to not find white cement dust everywhere..... WRONG!!!  The lounge has the old kitchen table and chairs in it, the 2nd and 3rd bedrooms turned into store rooms and the top floor the same, so surrounded by glasses, pans and the like (did ALL that stuff actually come out of the old units???) I made some room on my craft desk.

CAS Mix Up's challenge this month is 'Dimensional Dies' and although I hate mess anywhere else except the craft table, I managed to find enough spark of imagination to come up with this card. 

Coveted this stitched die for a while and was very happy when I returned home at the weekend to find it waiting for me!
I stamped the back panel in Versafine Smokey Grey Ink as I thought black may be too stark. The stamp I used is a very old one and as I removed it from it's wood backing a long time ago have no idea whose make!

The heart die cut was triple embossed with 'Red Tinsel'.  It glittered quite well but had a slightly rough finish to it, so gave it the Glossy Accents treatment!
Very pleased with the way it turned out when dry. Here's a close up.

Added it to the little stamped panel with some foam pads and then die cut the 'string'.
I hooked the little curl of the string around the word die and simply stamped to finish.
(Dimensional Dies/Stamping/Embossing)
Quite happy with the way it turned out all things considered!
Sharing  at
Allsorts - Love
CUYL - Love
JUGS - Love
JOS#2 - Glimmer/Red/Heart
Country View- Black/White + One
MTTC - All you need is Love
Time Out - Inspired by the hearts on the pic (to see it please go to their BLOG
And finally - a great week away with some really good friends, lots of food/drink and a bit of bowling thrown in!
4 years on from first winning this trophy we managed to do it again last week!  A lovely end to a lovely week.
Can only hope that in another 10 days time the kitchen also has a lovely ending!

Sorry this has been a picture heavy post! Hope all is well with you all - and thanks for visiting me today! x

Tuesday, 15 January 2019

CAS Mix up - Mid month reminder

It's middle of the month and time for a reminder for the CAS Mix Up challenge.
Was so proud to have been asked to be guest designer this month and I have enjoyed revisiting the long forgotten technique of Bokeh. (be warned - there are more made yet to share!)

For my mid month post I have gone for coloured Bokeh instead of the usual white on a darker inked background as I did for my first post here

I used a stencil I made myself from acetate and circle dies and selected 3 shades of ink in soft pastel colours.
Inking then commenced!
When done I cut it out with a wavy stitched die.

The sentiment is a Technique Tuesday die and stamp and I finished my card front with a flower die before layering it onto the base card.

 Still time to have a go and join us - and lots of inspiration to be had over at the blog!

I am sharing this with -
Alphabet Challenge-  Use stitching (my frame die)
Crafty Calendar - Make it Flowery
CAS on Friday - Flowers
HLS January - A/G with Dies
Crafters Castle - A/G + Fun Technique

Tuesday, 1 January 2019

Guest Designer at CAS Mix Up!

Super excited to have been invited to be the Guest Designer over at CAS Mix Up this month after winning the November challenge, although I did have to think a bit as the technique is one I haven't done for a long time!
But as I started to do my Bokeh background I wondered why I had hadn't done these backgrounds on more things!
Bokeh is a simple technique really - so there is no excuse for me not doing it more often! And you can use a variety of mediums to create the effect.

I used Distress Inks in shades of Cracked Pistachio, Mermaid Lagoon and Stormy Sky for my background and a White pigment ink for the circles.

Originally I was going to make my own circle stencil but then I remembered I had this one by Inkylicious called 'Bubbles'.

I had no idea what I was going to do until I finished the background and then the card just came together.

The colours which are amongst my fave DI's just reminded me of the sea so Miss Mermaid seemed to be appropriate!
She is from a freebie stamp set which I have had for ages and never used.

I stamped her sat on her rocks twice onto white card and fussy cut. I had to extend the rocks as they weren't big enough to cover the whole of the card base!
I coloured her with the same Distress Inks mixed with a bit of Golden Malachite and Tropic Blue Cosmic Shimmer Powders - her tail is lovely and shimmery! 

Popped her rock seat on small foam pads, slid the background in behind then sat her back on top.
Finished off with a couple of Dew Drops and a sentiment from the same set which I rather liked.

There it is - my GD card - Bokeh, Stamping and my choice was watercolouring!
There are plenty of Bokeh tutorials on You Tube if you've never tried it - and it would be lovely if you could join in - you can see some wonderful examples from the talented lot on the Mix Up DT over on the blog.
Happy Crafting and Happy New Year!x