I have been struggling to come up with ideas of late. There have been a few 'real life' things which have invaded into my little cocoon and this has resulted in me being unable to make anything that I am happy with!
I sat yesterday and just made a couple of simple cards - achieved by smooshing watercolours onto watercolour card.
The basic design of both is the same - I used the same stamp, embossed and smooshed! Will share the other (even plainer) one at a later date but here's the first
I have tried a different way of smooshing and found this works better for me - it is simply instead of putting the colours onto your craft mat and dipping the card into it, I put the colour onto a piece of acetate, spritzed and then pressed it over the embossed image.
It's probably not as random as you can actually position the colours but as I can see where the colour is going it stops me from covering massive areas when I only wanted to cover a tiny bit!
The stamp is a smaller one from a 2 part Woodware set.
I used Mustard Seed, Wild Honey and Dried Marigold with a little bit of Peeled Paint, drying each colour with the heat gun before moving onto the next.
I added a teeny bit of Vintage Photo into the centre of the flower.
I finished it with a few (did I say few?) ink spatters and a new to me die cut sentiment.
Then I decided it wasn't finished and added the little black card with the white embossing - THEN it was finished!
Sharing over at
TIOT - Say It With Flowers
AAA - 1 image/Spring
Crazy 4 CAS - Watercolour
Alphabet - Z for Zesty
Cut It Up - Flowers
We have had a dry but very windy day here today - but it really IS cold!!
Have a lovely day whatever you're doing and thanks for coming to see me today. x
Sunday, 24 March 2019
Friday, 22 March 2019
Guest Designer at CAS on Friday
(if you are visiting to see my card for CAS Stencil, please scroll down to the next post!)
I was delighted to be asked to join the CAS on Friday team this week as their Guest Designer.
The theme for this challenge is 'Baby'.
I don't have call to make a lot of Baby cards and coupled with having to make it CAS was, I confess, a bit of a challenge!
I thought a bubble or bokeh effect might work well whilst keeping the card CAS so chose a Pink and Grey colourway for the Bokeh circles.
I used a stencil I made myself from some acetate for another project and just used the smallest circle.
The pink colour is Spun Sugar and the Grey is a Metallic Silver (which really doesn't show up very well in the pic- but has a really pretty subtle shimmer to it in real life.)
Did a few ink splatters with the Spun Sugar ink.
I stamped our little elephant (from Lawn Fawn) in the same silver ink and clear embossed then coloured her in, before cutting her out with a stitched circle die.
The teeny heart is from the same set and the sentiment is LOTV.
The very talented design team have made some wonderful examples this week - I am honoured to be in such talented company!
Sharing my little baby card over at
Creative Moments - A/Goes
AAA - 1 image
I was delighted to be asked to join the CAS on Friday team this week as their Guest Designer.
The theme for this challenge is 'Baby'.
I don't have call to make a lot of Baby cards and coupled with having to make it CAS was, I confess, a bit of a challenge!
I thought a bubble or bokeh effect might work well whilst keeping the card CAS so chose a Pink and Grey colourway for the Bokeh circles.
I used a stencil I made myself from some acetate for another project and just used the smallest circle.
The pink colour is Spun Sugar and the Grey is a Metallic Silver (which really doesn't show up very well in the pic- but has a really pretty subtle shimmer to it in real life.)
Did a few ink splatters with the Spun Sugar ink.
I stamped our little elephant (from Lawn Fawn) in the same silver ink and clear embossed then coloured her in, before cutting her out with a stitched circle die.
The teeny heart is from the same set and the sentiment is LOTV.
The very talented design team have made some wonderful examples this week - I am honoured to be in such talented company!
Sharing my little baby card over at
Creative Moments - A/Goes
AAA - 1 image
Thursday, 21 March 2019
Just Beachy!
This is another one of those cards that didn't really end up like I thought it would!
Looking back I had no idea how it would turn out as I simply wanted to try out the Ghosting technique again.
I have lots of odd pieces of watercolour card perfect for practicing with (Playground for me!) so made a couple of backgrounds using different colours - mostly blue and greens with varying degrees of success and this one which was done in shades of orange DI's, lifting the colour by spraying with water, leaving for a few seconds and lifting the stencil off.
The stencil is by That's Crafty.
I stamped and embossed the shell and the sentiment in gold and cut the frames and sentiment frame from the left over base card - there was no waste left from this particular piece of card!
The shells were collected from a trip last year and the seed beads were from my stash.
I am not sure if this is CAS enough for the CAS Stencil challenge but am linking anyway!
Also linking at the Mixed Media Must Use a Stencil challenge at Stamplorations
A2S+M - Holiday (and right now I can't wait to get on a beach somewhere!)
The Card Concept also have a lovely Inspiration Pic and I chose the shells and the overall beachy theme to inspire this make.
My kitchen floor has finally been laid today - the whole project has taken 7 weeks - there is just the skirting boards to be fixed now so my house is almost back to normal!
Thanks for visiting today - have a great day whatever you are doing! x
Looking back I had no idea how it would turn out as I simply wanted to try out the Ghosting technique again.
I have lots of odd pieces of watercolour card perfect for practicing with (Playground for me!) so made a couple of backgrounds using different colours - mostly blue and greens with varying degrees of success and this one which was done in shades of orange DI's, lifting the colour by spraying with water, leaving for a few seconds and lifting the stencil off.
The stencil is by That's Crafty.
I stamped and embossed the shell and the sentiment in gold and cut the frames and sentiment frame from the left over base card - there was no waste left from this particular piece of card!The shells were collected from a trip last year and the seed beads were from my stash.
I am not sure if this is CAS enough for the CAS Stencil challenge but am linking anyway!Also linking at the Mixed Media Must Use a Stencil challenge at Stamplorations
A2S+M - Holiday (and right now I can't wait to get on a beach somewhere!)
The Card Concept also have a lovely Inspiration Pic and I chose the shells and the overall beachy theme to inspire this make.
My kitchen floor has finally been laid today - the whole project has taken 7 weeks - there is just the skirting boards to be fixed now so my house is almost back to normal!
Thanks for visiting today - have a great day whatever you are doing! x
Monday, 18 March 2019
March Mid Month at Stamping Sensations
Our March 'Rainbow' themed challenge is well under way and this is a little reminder that you still have time to enter if you haven't done so, (or even if you have you can have another go!).
Great 'Lucky Dip' prize of lovely dies and embossing folders up for grabs. (A pic of our prize can be seen HERE at the bottom of my post)
Check out the Stamping Sensations blog for full details - and PLEASE read our rules before entering!
For my mid month card I opted for a simple CAS design with rainbow colouring.
I used a 'Cherry Blossom' embossing folder for the background.
The Butterfly is from an old set and I stamped it with Versafine ink starting with the centre one then simply masked and stamped again along the panel.
Following the colour spectrum of the rainbow I coloured the butterflies with a host of DI's and then made a few ink spatters.
The sentiment die and the sentiment are both Technique Tuesday.
Am sharing this over at -
Sunday Stamps - Sketch
Fab N Funky - Butterfly
Stamps + Fun - Butterfly
Have a great day whatever you're doing! x
Great 'Lucky Dip' prize of lovely dies and embossing folders up for grabs. (A pic of our prize can be seen HERE at the bottom of my post)
Check out the Stamping Sensations blog for full details - and PLEASE read our rules before entering!
For my mid month card I opted for a simple CAS design with rainbow colouring.
I used a 'Cherry Blossom' embossing folder for the background.
The Butterfly is from an old set and I stamped it with Versafine ink starting with the centre one then simply masked and stamped again along the panel.
Following the colour spectrum of the rainbow I coloured the butterflies with a host of DI's and then made a few ink spatters.
The sentiment die and the sentiment are both Technique Tuesday.
Am sharing this over at -
Sunday Stamps - Sketch
Fab N Funky - Butterfly
Stamps + Fun - Butterfly
Have a great day whatever you're doing! x
Friday, 15 March 2019
Ghost
If you are visiting and the title of my blog post has you thinking you will see friendly Casper 😱 then you are going to be disappointed!
Although there were several times during the course of the last week that I may have been happy to see the little white sheeted person 👻👻 - instead of seeing the inside of the waste basket with failed attempts.
I am enjoying being back in the swing of being able to enter challenges - and challenging this one was - for me.

I have though finally managed to make TWO fairly passable cards for this months CAS Stencil challenge of 'Ghosting' and here's the first.
The 'Ghosting' technique entails inking a piece of card, placing a stencil over it, spritzing with water (or rubbing with a baby wipe) to remove the ink and leave a 'ghosted' image.
Sounds relatively easy??
NOT!!
I tried several times with small stencils and tried both water spritzing and baby wipe method.
I had varying degrees of success before turning to a very large stencil and a baby wipe.
The background was inked in Seedless Preserve/Cracked Pistachio/Mermaid Lagoon (without doubt these are 3 of my very fave DI's)

The stencil is from AliExpress and a new purchase.
I found this metal die cut amongst some of my stash and it just seemed to fit.
The large purple stone was cut off an old jumper (I have quite a few of these!!).
The hardest part for me was the actual assembly of the card.
I agonised for ages about putting it in a frame and adding more die cut feathers - in the end I simply got frustrated and opted to just keep it as plain as possible.
Am sharing over at
A2S+M - Make Your Mark
MMM - Something New (Stencil and Technique)
Crafters Cafe- Include metal (my sentiment)
Thanks for looking today - I welcome all comments and hope that you are having a great day whatever you're doing! x
Although there were several times during the course of the last week that I may have been happy to see the little white sheeted person 👻👻 - instead of seeing the inside of the waste basket with failed attempts.
I am enjoying being back in the swing of being able to enter challenges - and challenging this one was - for me.

I have though finally managed to make TWO fairly passable cards for this months CAS Stencil challenge of 'Ghosting' and here's the first.
The 'Ghosting' technique entails inking a piece of card, placing a stencil over it, spritzing with water (or rubbing with a baby wipe) to remove the ink and leave a 'ghosted' image.
Sounds relatively easy??
NOT!!
I tried several times with small stencils and tried both water spritzing and baby wipe method.
I had varying degrees of success before turning to a very large stencil and a baby wipe.
The background was inked in Seedless Preserve/Cracked Pistachio/Mermaid Lagoon (without doubt these are 3 of my very fave DI's)

The stencil is from AliExpress and a new purchase.
I found this metal die cut amongst some of my stash and it just seemed to fit.
The large purple stone was cut off an old jumper (I have quite a few of these!!).
The hardest part for me was the actual assembly of the card.
I agonised for ages about putting it in a frame and adding more die cut feathers - in the end I simply got frustrated and opted to just keep it as plain as possible.
Am sharing over at
A2S+M - Make Your Mark
MMM - Something New (Stencil and Technique)
Crafters Cafe- Include metal (my sentiment)
Thanks for looking today - I welcome all comments and hope that you are having a great day whatever you're doing! x
Saturday, 9 March 2019
Watery World
Happy weekend everybody!
Over the last few days we have experienced an awful lot of heavy rain showers ☔ so I made a watery themed card!
The background was cut from a larger background piece made a while ago whilst playing about experimenting with Brushos.
The foliage inked in Forest Moss Distress Ink was shadow stamped a couple of times and I found a tiny stamp in the 'no idea where these came from' box 😄 which looked like a stream of bubbles so used it after inking in Salty Ocean. It gave a really subtle effect I think. (Although you may have to enlarge the pic to get a better view!)
Some gold embossing powder on the bottom which I hope resembles some sparkly sand!
The Seahorse die is from a free set that came with a mag last year, coloured in gold ink and clear embossed.
I have rather a lot of this textured card from American Crafts bought some time ago and like the finish it gives so note to self - use more!
Sharing my seahorse over at
A2S+M - A/Goes
Cardz4Guyz- CAS
Creatalicious - A/Goes
Craft Stamper - March - A/Goes
As once again we have heavy showers 🌂 here I am planning on sitting in the craftie space and having an inky day today.
(I should really be doing housework but hey ho!) - have a great weekend! x
Over the last few days we have experienced an awful lot of heavy rain showers ☔ so I made a watery themed card!
The background was cut from a larger background piece made a while ago whilst playing about experimenting with Brushos.
The foliage inked in Forest Moss Distress Ink was shadow stamped a couple of times and I found a tiny stamp in the 'no idea where these came from' box 😄 which looked like a stream of bubbles so used it after inking in Salty Ocean. It gave a really subtle effect I think. (Although you may have to enlarge the pic to get a better view!)
Some gold embossing powder on the bottom which I hope resembles some sparkly sand!
The Seahorse die is from a free set that came with a mag last year, coloured in gold ink and clear embossed.
I have rather a lot of this textured card from American Crafts bought some time ago and like the finish it gives so note to self - use more!
Sharing my seahorse over at
A2S+M - A/Goes
Cardz4Guyz- CAS
Creatalicious - A/Goes
Craft Stamper - March - A/Goes
As once again we have heavy showers 🌂 here I am planning on sitting in the craftie space and having an inky day today.
(I should really be doing housework but hey ho!) - have a great weekend! x
Tuesday, 5 March 2019
Vellum
Visitors to my blog will know that on Sunday here I made a wild statement to try and join in as many of the CAS Mix Up and Sister blog challenges as I could. My intentions were good at that time - and then............
I saw this months challenge at CAS Watercolour.
Vellum .... I mean VELLUM???? Vellum hates me. I don't know why, it just does.
But a statement of intent is a statement of intent - so I found the vellum (thrown away in a drawer in disgust no doubt) and looked at it.
It stared back at me. I still looked at it. It still stared back at me.
I looked at it and before it got a chance to look back I decided to use it - to use as little as possible - but to use it.
I count the Cherry Blossom stamp from Technique Tuesday as one of my faves. Cherry Blossom reminds me of Spring and I love Spring when everything is starting to grow and flower.
I stamped and white embossed.
I imprisoned the hated vellum in a frame of tape (stuck down as hard as I could to get my own back) and used my watercolour pencils to colour.
When dry I reluctantly released it from it's tape prison .... and then cut it up. (Revenge is mine👿👿)
Fussy cut the 3 flowers and dotted teeny blobs of liquid pearls onto the stamens.
I die cut and watercoloured a branch and a frame and used one of the very first EF's ever bought (Oriental Set) as the Cherry Blossom EF I thought was a good background .
Mounted the embossed piece behind the frame.
A simple stamped sentiment finished it off.
And I finished the vellum off by returning it to it's dark drawer!!
Am sharing this over at
Flower Challenge - A/Goes
Allsorts - Fave Season (Spring)
CAS on Friday - Vellum
Daisy Chain - Spring
Thanks for looking! x
I saw this months challenge at CAS Watercolour.Vellum .... I mean VELLUM???? Vellum hates me. I don't know why, it just does.
But a statement of intent is a statement of intent - so I found the vellum (thrown away in a drawer in disgust no doubt) and looked at it.
It stared back at me. I still looked at it. It still stared back at me.
I looked at it and before it got a chance to look back I decided to use it - to use as little as possible - but to use it.
I count the Cherry Blossom stamp from Technique Tuesday as one of my faves. Cherry Blossom reminds me of Spring and I love Spring when everything is starting to grow and flower.
I stamped and white embossed.
I imprisoned the hated vellum in a frame of tape (stuck down as hard as I could to get my own back) and used my watercolour pencils to colour.
When dry I reluctantly released it from it's tape prison .... and then cut it up. (Revenge is mine👿👿)
Fussy cut the 3 flowers and dotted teeny blobs of liquid pearls onto the stamens.
I die cut and watercoloured a branch and a frame and used one of the very first EF's ever bought (Oriental Set) as the Cherry Blossom EF I thought was a good background .
Mounted the embossed piece behind the frame.
A simple stamped sentiment finished it off.
And I finished the vellum off by returning it to it's dark drawer!!
Am sharing this over at
Flower Challenge - A/Goes
Allsorts - Fave Season (Spring)
CAS on Friday - Vellum
Daisy Chain - Spring
Thanks for looking! x
Sunday, 3 March 2019
CAS Mix Up - March
(If you are here to see my March Stamping Sensations DT post, just scroll past this one!)
I am trying to submit an entry into as many of the CAS Mix Up challenges (and their sister blogs) as I can. And this month CAS Mix Up is 3 years old so they are having a birthday celebration too!
The challenge set is 'Faux Stained Glass'.
Not a technique I have used before but I watched the videos (all linked on the challenge blog) and decided to have a go.
As it was my first try I wanted something relatively simple! There are some fab examples of mandalas etc but I wasn't confident enough to plunge into degrees of difficulty!
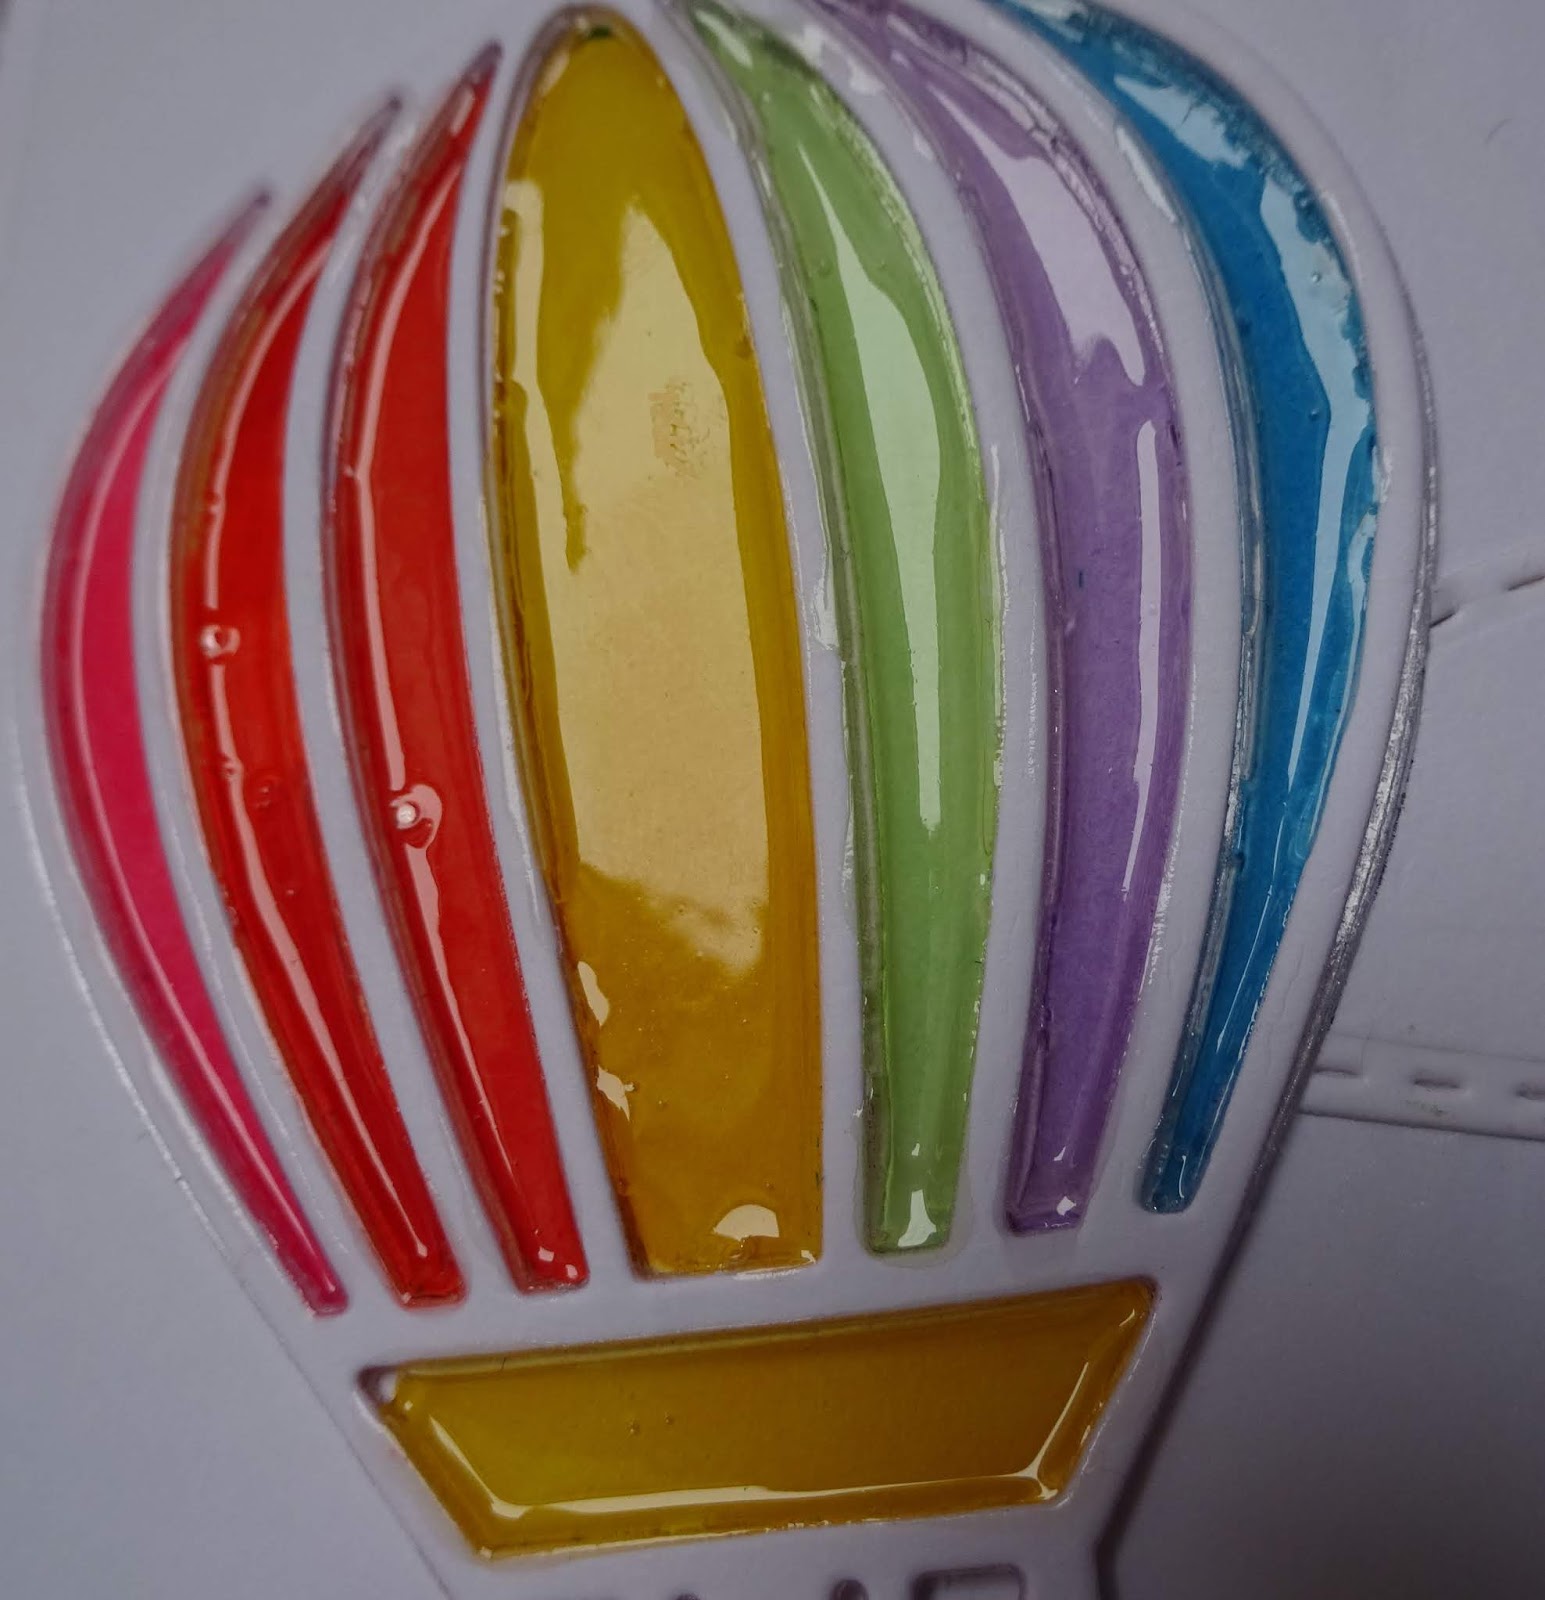
The balloon is part of a 2 die set and scarcely used.
Cut four times (with sticky sheets on the back of each cut) from a small off cut of white card.
I dusted another piece with Tumbled Glass DI, and positioned the first die cut onto it.
I coloured the balloon with Promarkers then built up two more layers.
Then used Nuvo Crystal Glaze, finally adding the last die on top.
The 'clouds' were odd scraps lying about! (Not that using them has made much difference to the mess on the desk.....😉😉)
I was a little disappointed when the glaze dried as the left side colours were pink, red and orange but the glaze took a little of the vibrant shade out of the red - a lesson learned!

Here's a close up though of the lovely glossy shine
And I think not too bad for a first attempt.
Am sharing my ballon at the Playground and also at
Inkspirational - Use Your Stash
Die Cut Divas - A/Goes
AAA #135 - Sentiment plus 3 (die cut/matted layer/coloured pens)
Fusion - Inspiration Pic - a rainbow cupcake handle!
Thanks for stopping by - I really appreciate your visits and any comments you leave me.
Have a nice day whatever you're doing. x
I am trying to submit an entry into as many of the CAS Mix Up challenges (and their sister blogs) as I can. And this month CAS Mix Up is 3 years old so they are having a birthday celebration too!The challenge set is 'Faux Stained Glass'.
Not a technique I have used before but I watched the videos (all linked on the challenge blog) and decided to have a go.As it was my first try I wanted something relatively simple! There are some fab examples of mandalas etc but I wasn't confident enough to plunge into degrees of difficulty!
The balloon is part of a 2 die set and scarcely used.
Cut four times (with sticky sheets on the back of each cut) from a small off cut of white card.
I dusted another piece with Tumbled Glass DI, and positioned the first die cut onto it.
I coloured the balloon with Promarkers then built up two more layers.
Then used Nuvo Crystal Glaze, finally adding the last die on top.
The 'clouds' were odd scraps lying about! (Not that using them has made much difference to the mess on the desk.....😉😉)
I was a little disappointed when the glaze dried as the left side colours were pink, red and orange but the glaze took a little of the vibrant shade out of the red - a lesson learned!

Here's a close up though of the lovely glossy shine
And I think not too bad for a first attempt.
Am sharing my ballon at the Playground and also at
Inkspirational - Use Your Stash
Die Cut Divas - A/Goes
AAA #135 - Sentiment plus 3 (die cut/matted layer/coloured pens)
Fusion - Inspiration Pic - a rainbow cupcake handle!Thanks for stopping by - I really appreciate your visits and any comments you leave me.
Have a nice day whatever you're doing. x
Rainbow for March

We have a 'RAINBOW' challenge this month at Stamping Sensations.We want you to be inspired by the colours or the words of the song.
Please read our rules before linking up - thank you!
I opted to used the rainbow colours for this card.
The background stamp is a WOW one called 'Tropical'.
I stamped onto watercolour card and heat embossed.
I think perhaps I should have stamped and embossed again to make the background more defined as I didn't quite get the effect I wanted once I started colouring. But wasn't going to risk re-doing once I had removed it from the Misti!
I used lots of Distress Oxides(Shaded Lilac, Picked Raspberry, Dried Marigold, Squeezed Lemonade, Twisted Citron, Blueprint Sketch and Wilted Violet).
Mounted onto black card,sentiment stamped and hear embossed and a couple of black sparklies.
A quick unfussy and uncomplicated card which I actually like rather a lot!
Hope you can join us - once again we have a wonderful prize which you can see when you go to read our rules HERE!
Tuesday, 26 February 2019
A long time!
Been over a week since I have shared anything -I finally finished my 4 year term of office on Saturday night culminating in the final time as part of the Presidential team at the National Presentation. A strange feeling but I have said I am not sad it is over, I am just happy that it happened!
The kitchen is almost completed - we are hopung to lay the flooring tomorrow then it's just a few odd small bits. I will be glad to get rid of the white dust cloud that has pervaded the house for the last month.
The weather here has been amazing the last few days so it inspired me to make a spring/summer card.
I confess that this was my second attempt - my first attempts to spritz the stamp for the watercolour background were a little too heavy handed and I ended up with mass splodges!
Fared better with this one and for someone who is really not confident with this technique I am really chuffed with myself. So much so that I am going to keep trying!
The stamp is from Technique Tuesday as is the accompanying die. It was one of their releases last year and have never used it until now.
I am really upset as I have had to cancel my subscription as I got stung with a £13 import duty on top of my monthly subscription and it simply is not feasible to keep up with the fluctuation in the tax rates here - apparently the rates are calculated on a particular day each month so it is pot luck if you miss it or not.
I love TT Greenhouse Society stamps and feel really put out!
The stitched frames are from The Works.
Finished with a tiny gingham bow and a Thank You sentiment.
Joining in at
SOS - Fabulous February (Several themes which reminded me of purple!)
Crafty Cardmakers - Flowers
PB&M - A/Goes
TTCRD - A/Goes
JUGS - Amethyst
Inkspirational - Use Your Stash
Sweet Stampers - Stitched
Hope you are all enjoying the same weather we are having here and thanks for looking today. Happy Crafting! x
The kitchen is almost completed - we are hopung to lay the flooring tomorrow then it's just a few odd small bits. I will be glad to get rid of the white dust cloud that has pervaded the house for the last month.
The weather here has been amazing the last few days so it inspired me to make a spring/summer card.
I confess that this was my second attempt - my first attempts to spritz the stamp for the watercolour background were a little too heavy handed and I ended up with mass splodges!
Fared better with this one and for someone who is really not confident with this technique I am really chuffed with myself. So much so that I am going to keep trying!
The stamp is from Technique Tuesday as is the accompanying die. It was one of their releases last year and have never used it until now.
I am really upset as I have had to cancel my subscription as I got stung with a £13 import duty on top of my monthly subscription and it simply is not feasible to keep up with the fluctuation in the tax rates here - apparently the rates are calculated on a particular day each month so it is pot luck if you miss it or not.
I love TT Greenhouse Society stamps and feel really put out!
The stitched frames are from The Works.
Finished with a tiny gingham bow and a Thank You sentiment.
Joining in at
SOS - Fabulous February (Several themes which reminded me of purple!)
Crafty Cardmakers - Flowers
PB&M - A/Goes
TTCRD - A/Goes
JUGS - Amethyst
Inkspirational - Use Your Stash
Sweet Stampers - Stitched
Hope you are all enjoying the same weather we are having here and thanks for looking today. Happy Crafting! x
Monday, 18 February 2019
Mid Month at Stamping Sensations
Our 'All Things Bright and Beautiful' theme this month has attracted some lovely entries and there is still time for you to link up and join us at Stamping Sensations.
We have a great prize from Bee Crafty on offer - full details are on the challenge blog where all the DT have offered their makes for inpsiration (be lovely if you left a comment!) and also you will find our challenge rules. PLEASE READ THEM BEFORE LINKING!! Thank you!
I really liked this Sunflower from Bev's BEAUtanicals range. I used to grow sunflowers from seed in the garden at my last house along the fence at the bottom of the garden and they always cheered me up when I went down there and saw them, so I had to buy this stamp. (New Years resolution not to buy anything until at least April just disappeared.....😞😞)
I stamped on watercolour card and used distress inks.
This is quite a large stamp (about 6") but seeing many examples of flowers tucked behind a die frame I thought I would do the same with my happy Sunflower.
I added the simple sentiment stamp - probably unnecessary as who couldn't smile when they saw a pretty flower?!
I resisted doing any other colouring or stamping on the textured card base as I just wanted the Sunflower to take centre stage.
As this is a new stamp I am sharing this make over at the Flower Challenge and also at
Crafty Catz - A/G Keep it Simple
Hope you're having a happy smiley sunflowery day wherever you are! x
We have a great prize from Bee Crafty on offer - full details are on the challenge blog where all the DT have offered their makes for inpsiration (be lovely if you left a comment!) and also you will find our challenge rules. PLEASE READ THEM BEFORE LINKING!! Thank you!
I really liked this Sunflower from Bev's BEAUtanicals range. I used to grow sunflowers from seed in the garden at my last house along the fence at the bottom of the garden and they always cheered me up when I went down there and saw them, so I had to buy this stamp. (New Years resolution not to buy anything until at least April just disappeared.....😞😞)
I stamped on watercolour card and used distress inks.
This is quite a large stamp (about 6") but seeing many examples of flowers tucked behind a die frame I thought I would do the same with my happy Sunflower.
I added the simple sentiment stamp - probably unnecessary as who couldn't smile when they saw a pretty flower?!
I resisted doing any other colouring or stamping on the textured card base as I just wanted the Sunflower to take centre stage.
As this is a new stamp I am sharing this make over at the Flower Challenge and also at
Crafty Catz - A/G Keep it Simple
Hope you're having a happy smiley sunflowery day wherever you are! x
Wednesday, 13 February 2019
Hello Love!
I don't do Valentines. He doesn't do Valentines. We have never done Valentines.
That's because it is Dear Husbands birthday - (we don't do Birthday cards either which is surprising considering how much I like making them!) - and because everywhere is full of lovey doveyness on 14th we normally end up having a birthday meal at another time!
I have though made a card which is a CASE of a CASE that I did a couple of years ago.
It is not for Valentines specifically and I think it could also be used for Christmas or anything else so have CASE'd it again!
The image is from A Day for Daisies.
I don't use digis a lot (although I have loads of them) as I always end up not getting the placement right/ printing them out too small/too big/ not waiting long enough for them to dry before trying to colour etc etc etc. List is endless!
And I DO prefer to actually hold a stamp (or put it in the MISTI) but I think I need to try more digis as there are so many really nice ones out there!
A simple card and the colouring is not the best as I have seen this image with proper shading on her dress and it looked amazing - sadly I am not that good with the Promarkers!
I glittered her wings and halo and added a few sparklies.
The sentiment is by SU.
Lots of love themes around so am sharing over at
Cute n Crafty - Love
Use Your Stuff - Hearts
Dream Valley - Love
CUYL - Love
So kitchen slowly taking shape - no water connected yet - hopefully that will be in the next 24 hours - then at least I can get some washing done. I confess I am fed up with the white dust that pervades everywhere in the house - made worse by the bare concrete floor.
We are likely to be almost there apart from the floor by the end of the weekend - so at least I will be able to start putting some of the stuff that currently is living on all the bedroom floors back!
Will be round to visit you all a bit later! x
That's because it is Dear Husbands birthday - (we don't do Birthday cards either which is surprising considering how much I like making them!) - and because everywhere is full of lovey doveyness on 14th we normally end up having a birthday meal at another time!
I have though made a card which is a CASE of a CASE that I did a couple of years ago.
It is not for Valentines specifically and I think it could also be used for Christmas or anything else so have CASE'd it again!
The image is from A Day for Daisies.
I don't use digis a lot (although I have loads of them) as I always end up not getting the placement right/ printing them out too small/too big/ not waiting long enough for them to dry before trying to colour etc etc etc. List is endless!
And I DO prefer to actually hold a stamp (or put it in the MISTI) but I think I need to try more digis as there are so many really nice ones out there!
A simple card and the colouring is not the best as I have seen this image with proper shading on her dress and it looked amazing - sadly I am not that good with the Promarkers!
I glittered her wings and halo and added a few sparklies.
The sentiment is by SU.
Lots of love themes around so am sharing over at
Cute n Crafty - Love
Use Your Stuff - Hearts
Dream Valley - Love
CUYL - Love
So kitchen slowly taking shape - no water connected yet - hopefully that will be in the next 24 hours - then at least I can get some washing done. I confess I am fed up with the white dust that pervades everywhere in the house - made worse by the bare concrete floor.
We are likely to be almost there apart from the floor by the end of the weekend - so at least I will be able to start putting some of the stuff that currently is living on all the bedroom floors back!
Will be round to visit you all a bit later! x
Friday, 8 February 2019
Another Stencil
Earlier this week I shared a make here with Brushos and Stencils. As I had the Brushos out and my first attempt turned out OK, thought I would try another!
I think I may be getting hooked on stencils! And I am going to blame it on some (talented) crafters over at CAS Mix Up as I wouldn't have bothered with stencils if it wasn't for them deciding to start a new challenge - CAS Stencil.
This amazing flower was amongst the pack that I got from AliExpress and I used Scarlet, Orange and Yellow for the petals and a teeny amount of Brown for the centre.
Once again there was panic when the colours began to pool together!
I wasn't sure about the way the centre turned out initially but it grew on me as I waited for it to dry.
I randomly added some small seed beads to the middle.
Opted for no sentiment as think the bold flower makes enough of a statement on it's own!
I had some odd bits of coloured card which were a good match for the shades I used so after cutting out my flower with a stitched square die I layered it onto them.
A few Brusho ink splats on the base card and done!
Also sharing over at ATS+M where the challenge is Make Your Mark
We have rather a nasty stormy day here and normally wouldn't consider venturing out - but lack of cooking facilities mean we don't have a lot of choice so it will be coat/hat/boots/gloves for our daily meal out trip!
Have a great day whatever you're doing and thanks for visiting! x
I think I may be getting hooked on stencils! And I am going to blame it on some (talented) crafters over at CAS Mix Up as I wouldn't have bothered with stencils if it wasn't for them deciding to start a new challenge - CAS Stencil.
This amazing flower was amongst the pack that I got from AliExpress and I used Scarlet, Orange and Yellow for the petals and a teeny amount of Brown for the centre.
Once again there was panic when the colours began to pool together!
I wasn't sure about the way the centre turned out initially but it grew on me as I waited for it to dry.
I randomly added some small seed beads to the middle.
Opted for no sentiment as think the bold flower makes enough of a statement on it's own!
I had some odd bits of coloured card which were a good match for the shades I used so after cutting out my flower with a stitched square die I layered it onto them.
A few Brusho ink splats on the base card and done!
Also sharing over at ATS+M where the challenge is Make Your Mark
We have rather a nasty stormy day here and normally wouldn't consider venturing out - but lack of cooking facilities mean we don't have a lot of choice so it will be coat/hat/boots/gloves for our daily meal out trip!
Have a great day whatever you're doing and thanks for visiting! x
Grungy Birthday
I have made very few male cards over the last few months and decided I needed to have at least one in the stash box.This was a really quick card and think I might do some more using different colours.
I've had the brick background stamp from our sponsor for a while but have only just got round to using it.😳
I decided on a red/grey colour combo and inked the brick background in Archival Watering Can ink - which is a really nice grey shade).
All the other stamps were inked in Versafine Crimson Red.
Quite like this grungy/graffiti look and think it would be fine for a teenager - I always find those cards so difficult!!
Tuesday, 5 February 2019
Stencils and Brushos
CAS Stencil challenge this month is to use powdered inks. I have just acquired a few small stencils so played about with them and my Brushos. Was a bit nervous at first as I have never used Brushos on a stencil before and worried about the inks running underneath the stencil but I watched a couple of video tutorials over on the CAS Stencil blog and plunged right in!
Here's my first attempt
The stencil reminded me of a Rennie McIntosh rose.
I was careful and taped it in place on my watercolour card and made sure it was secure and held in place as tight as possible.
I used Yellow, Orange and Bright Red brushos.
I am normally VERY heavy handed with Brushos so I was really extra careful this time, making sure I didn't use too much and was also very sparing with the water! I used a Mini Mister and sprayed from a LONG way above the stencil!
Panicked a little bit as the colours pooled and kept my fingers crossed that it hadn't 'leaked' underneath.
When I was feeling brave, I carefully removed the stencil and this is the result. Not bad even if I do say so myself!!
I found some red card in the paper mountain which was a near enough match to the red Brusho and finished it off with a simple sentiment stamp from Altenew.
Full of confidence 😳😳 I got out another stencil right away and had another go!!
Will share in the next day or so once I can take a pic.
Sharing my make over at SSS Monday - Add Some Red and at Colour Throwdown (check out the blog for the colours).
The kitchen has some units assembled!!! And all my appliances were delivered today. Still no electricity/water/etc etc but a start made.... only another 8-10 days to go!
AND I have been told by Dear Husband that I HAVE to make my mind up about the new flooring PRONTO.... 😟 well - have whittled the 10 that I liked down to 3..... so maybe by the weekend I will have decided??
Hope all is well in your part of blogland. x
Here's my first attemptThe stencil reminded me of a Rennie McIntosh rose.
I was careful and taped it in place on my watercolour card and made sure it was secure and held in place as tight as possible.
I used Yellow, Orange and Bright Red brushos.
I am normally VERY heavy handed with Brushos so I was really extra careful this time, making sure I didn't use too much and was also very sparing with the water! I used a Mini Mister and sprayed from a LONG way above the stencil!
Panicked a little bit as the colours pooled and kept my fingers crossed that it hadn't 'leaked' underneath.
When I was feeling brave, I carefully removed the stencil and this is the result. Not bad even if I do say so myself!!
I found some red card in the paper mountain which was a near enough match to the red Brusho and finished it off with a simple sentiment stamp from Altenew.
Full of confidence 😳😳 I got out another stencil right away and had another go!!
Will share in the next day or so once I can take a pic.
Sharing my make over at SSS Monday - Add Some Red and at Colour Throwdown (check out the blog for the colours).
The kitchen has some units assembled!!! And all my appliances were delivered today. Still no electricity/water/etc etc but a start made.... only another 8-10 days to go!
AND I have been told by Dear Husband that I HAVE to make my mind up about the new flooring PRONTO.... 😟 well - have whittled the 10 that I liked down to 3..... so maybe by the weekend I will have decided??
Hope all is well in your part of blogland. x
Monday, 4 February 2019
Love is everywhere..... except in my kitchen!
As currently the house is in a state of disarray🙈🙈 (no kitchen - just a bare concrete floor and re-plastered walls, no electrics, no water, nothing, zilch), I have had to spend the weekend sat in what little uncluttered space was left on the top floor.
There was me thinking that I would be able to come back from our little break (more on that at the bottom of the post) and be able to not find white cement dust everywhere..... WRONG!!! The lounge has the old kitchen table and chairs in it, the 2nd and 3rd bedrooms turned into store rooms and the top floor the same, so surrounded by glasses, pans and the like (did ALL that stuff actually come out of the old units???) I made some room on my craft desk.
CAS Mix Up's challenge this month is 'Dimensional Dies' and although I hate mess anywhere else except the craft table, I managed to find enough spark of imagination to come up with this card.
Coveted this stitched die for a while and was very happy when I returned home at the weekend to find it waiting for me!
I stamped the back panel in Versafine Smokey Grey Ink as I thought black may be too stark. The stamp I used is a very old one and as I removed it from it's wood backing a long time ago have no idea whose make!

The heart die cut was triple embossed with 'Red Tinsel'. It glittered quite well but had a slightly rough finish to it, so gave it the Glossy Accents treatment!
Very pleased with the way it turned out when dry. Here's a close up.
Added it to the little stamped panel with some foam pads and then die cut the 'string'.
I hooked the little curl of the string around the word die and simply stamped to finish.
(Dimensional Dies/Stamping/Embossing)
Quite happy with the way it turned out all things considered!
Sharing at
Allsorts - Love
CUYL - Love
JUGS - Love
JOS#2 - Glimmer/Red/Heart
Country View- Black/White + One
MTTC - All you need is Love
Time Out - Inspired by the hearts on the pic (to see it please go to their BLOG)
And finally - a great week away with some really good friends, lots of food/drink and a bit of bowling thrown in!
4 years on from first winning this trophy we managed to do it again last week! A lovely end to a lovely week.
Can only hope that in another 10 days time the kitchen also has a lovely ending!
Sorry this has been a picture heavy post! Hope all is well with you all - and thanks for visiting me today! x
There was me thinking that I would be able to come back from our little break (more on that at the bottom of the post) and be able to not find white cement dust everywhere..... WRONG!!! The lounge has the old kitchen table and chairs in it, the 2nd and 3rd bedrooms turned into store rooms and the top floor the same, so surrounded by glasses, pans and the like (did ALL that stuff actually come out of the old units???) I made some room on my craft desk.
CAS Mix Up's challenge this month is 'Dimensional Dies' and although I hate mess anywhere else except the craft table, I managed to find enough spark of imagination to come up with this card.
Coveted this stitched die for a while and was very happy when I returned home at the weekend to find it waiting for me!
I stamped the back panel in Versafine Smokey Grey Ink as I thought black may be too stark. The stamp I used is a very old one and as I removed it from it's wood backing a long time ago have no idea whose make!
The heart die cut was triple embossed with 'Red Tinsel'. It glittered quite well but had a slightly rough finish to it, so gave it the Glossy Accents treatment!
Very pleased with the way it turned out when dry. Here's a close up.
Added it to the little stamped panel with some foam pads and then die cut the 'string'.
I hooked the little curl of the string around the word die and simply stamped to finish.
(Dimensional Dies/Stamping/Embossing)
Quite happy with the way it turned out all things considered!
Sharing at
Allsorts - Love
CUYL - Love
JUGS - LoveJOS#2 - Glimmer/Red/Heart
Country View- Black/White + One
MTTC - All you need is Love
Time Out - Inspired by the hearts on the pic (to see it please go to their BLOG)
And finally - a great week away with some really good friends, lots of food/drink and a bit of bowling thrown in!
4 years on from first winning this trophy we managed to do it again last week! A lovely end to a lovely week.
Can only hope that in another 10 days time the kitchen also has a lovely ending!
Sorry this has been a picture heavy post! Hope all is well with you all - and thanks for visiting me today! x
Sunday, 3 February 2019
February at Stamping Sensations
Our February challenge at Stamping Sensations is ' Happy Anything'! So that can be a wide range of things that need to be celebrated - a birthday, anniversary, wedding etc etc the list is rather a long one!
We're sponsored by Bee Crafty - They have fabulous stamps and stencils, and loads of other things too, and our lucky winner will be able to choose £25 of goodies from their online shop.
Please read the rules on the CHALLENGE BLOG before submitting your entry.
It struck me that whilst I have been trying to use up coloured cardstock, it was a long time since I last used some of the Kraft card.
I had a piece cut from a larger sheet so as I'd made my mind up to use it I simply worked a colour combo round it.
The Teasel stamp and sentiment is from Bee Crafty BEAUtanicals collection and I teamed them with some other floral stamps from my stash.
Inked them all in Black.
I took a couple of different wildflower stamps and inked them in Weathered Wood DI, gave them a quick spritz and just randomly stamped.
A few ink spatters and the front was done.
Matted onto the Kraft and attached the sentiment with a grey (almost Weathered Wood colour!) brad.
Hoping that you will find some time to join in this month!
I am joining in at
A2S+M - A/Goes
Crafty Creations - A/goes
Aud Sentiments - A/Goes + sentiment
MAWTT - Add a Sentiment
CRAFT - A/Goes
We're sponsored by Bee Crafty - They have fabulous stamps and stencils, and loads of other things too, and our lucky winner will be able to choose £25 of goodies from their online shop.
Please read the rules on the CHALLENGE BLOG before submitting your entry.
It struck me that whilst I have been trying to use up coloured cardstock, it was a long time since I last used some of the Kraft card.
I had a piece cut from a larger sheet so as I'd made my mind up to use it I simply worked a colour combo round it.
The Teasel stamp and sentiment is from Bee Crafty BEAUtanicals collection and I teamed them with some other floral stamps from my stash.
Inked them all in Black.
I took a couple of different wildflower stamps and inked them in Weathered Wood DI, gave them a quick spritz and just randomly stamped.
A few ink spatters and the front was done.
Matted onto the Kraft and attached the sentiment with a grey (almost Weathered Wood colour!) brad.
Hoping that you will find some time to join in this month!
I am joining in at
A2S+M - A/Goes
Crafty Creations - A/goes
Aud Sentiments - A/Goes + sentiment
MAWTT - Add a Sentiment
CRAFT - A/Goes
Sunday, 27 January 2019
Special Day!
Over at Pixie's Snippets Playground,
Di 👸 recently celebrated her SEVENTH anniversary as Headmistress of
Pixie's, having taken over at the beginning of 2012 from the lovely Jules!
Fancy having to put up with us lot for that long!! 🙈🙈😁😁
If you don't know about the Playground 😞 (and I can't believe you don't!!) and fancy joining in this fortnightly challenge, all you need to do is bring your creation with at least one element made with a snippet ~ that is a scrap/left-over/tiny tatty bit of paper left lying on the desk!
I have made many friend in blogland over the last hundred years (actually it's 13 but I thought that may be unlucky......) and Di is one of them.
Darnell has set up a Linky Party for all of Di's friends to get together en mass to thank her for all she has done for us all these years!
To play along, please post a card and thank Di on your blog, and then go visit Darnell and link your card on this post.
So in honour of Di here's a snippet make for this week.
Textured card left over from the previous make made into two squares. Smaller one inked with Scattered Straw and Tumbled Glass DI.
A little bit of shadow stamping and some Gold Pearl used on the top of the bolder flowers, a few birdies and a sentiment stamp especially for Di.
Also sharing at
Allsorts - Friends
ATCAS - Friends
Time Out - Inspirational Quote (Friends)
I am away for my penultimate duty as part of the Bowls England Presidential Team this week, so will catch up with you all when I get back (providing the kitchen fitters have not demolished the house) - thanks for visiting me - Have a great week! x
Fancy having to put up with us lot for that long!! 🙈🙈😁😁
If you don't know about the Playground 😞 (and I can't believe you don't!!) and fancy joining in this fortnightly challenge, all you need to do is bring your creation with at least one element made with a snippet ~ that is a scrap/left-over/tiny tatty bit of paper left lying on the desk!
I have made many friend in blogland over the last hundred years (actually it's 13 but I thought that may be unlucky......) and Di is one of them.
Darnell has set up a Linky Party for all of Di's friends to get together en mass to thank her for all she has done for us all these years!
To play along, please post a card and thank Di on your blog, and then go visit Darnell and link your card on this post.
So in honour of Di here's a snippet make for this week.
Textured card left over from the previous make made into two squares. Smaller one inked with Scattered Straw and Tumbled Glass DI.
A little bit of shadow stamping and some Gold Pearl used on the top of the bolder flowers, a few birdies and a sentiment stamp especially for Di.
Also sharing at
Allsorts - Friends
ATCAS - Friends
Time Out - Inspirational Quote (Friends)
I am away for my penultimate duty as part of the Bowls England Presidential Team this week, so will catch up with you all when I get back (providing the kitchen fitters have not demolished the house) - thanks for visiting me - Have a great week! x
Thursday, 24 January 2019
Rainbows
The Card Concept has an inspirational pic of Rainbow Cupcakes (HERE) which matched an inked background made for another project that I never completed (😏😏)- and thinking back I had made 2 cards using a die cut and the negative left over.
So my original idea (which was just shades of blue), the yummy cupcake pic and a trawl through my 'card ideas' folder' produced this! (I cannot credit for it as the link no longer exists, but the addition of the 2 strips down the side of the white textured card were from the ideas folder).
I cut out two flower dies from the inked panel and another from the white, and using the negative from the white positioned it so you couldn't see where the coloured flowers had been cut from. So no waste!
I really like the vibrant hues to this make although I think maybe I should have used a different colour instead of the Pistachio at the bottom but overall am happy.
Sharing this over at
Crafty Creations - A/Goes
Creative Crafters - A/Goes
HLS (Dies) - A/Goes
It has been a bit of a dusty week here.
Dear husband and a friend took up the kitchen floor in preparation for a complete kitchen makeover which starts next week and is expected to not be completed for 3 weeks.
The very large tiles that were down were 'a bit of a 'pig' to get up' (I've cleaned that up a bit 'cos that's NOT the word dear husband used) and the dust created got everywhere despite best efforts to contain it - even onto the craft desk etc which are on the 3rd floor!
Happily for me I will not be here next week when the wall tiles are removed (more dust) and the re-plastering commences - sometimes a duty at Bowls England CAN be a blessing!
Hope all is well in your part of blogland! x
Monday, 21 January 2019
Happy
For a flower that is associated with sadness and Remembrance it probably says a lot about me that - Poppies make me happy. I don't know why but they do!
I love to see the wild ones in the fields and hedgerows and when I had a big garden in my other house I had lots of poppies! California Yellow and Oriental Blue and of course Red. There is something so delicate about them and although there are many flowers that I like, poppies are right there amongst my favourites.
This card was inspired by a talented lady called TaeEun.
The poppy stamp is from Technique Tuesday as is the sentiment (same set). I stamped and clear embossed them both onto some smooth cream card.
Used Candied Apple DI to colour the flowers and some Mowed Lawn for the centres.
The inking at the bottom is Shabby Shutters.
I made a few splats onto base white card and then after fussy cutting the cream panel simply popped it onto the card base.
I am happy with the way it turned out although my colouring isn't a patch on TaeEun's!
Saturday, 19 January 2019
Blue and Silver
The challenge at CAS Christmas this month is Blue and Silver.
I only wish that the taking of the pic of this card was a quick as it was to make. I have had a pig of a job trying to get a photo that didn't have a real icy blue tinge on it.
However, several hours after the first pic attempt I have finally got a reasonable one!
I took some fern and pine needle stamps, inked them in Versa Summer Sky and just stamped randomly at the bottom and sides of the card.
The 'Snowberry' is from an old Elusive Images (Chocolate Baroque) set and heat embossed in silver.
Some of the berries are simple outlines so I added some silver Nuvo Crystal drops to the larger ones.
The die is a new purchase (a bargain!) and I silver embossed that too after cutting out.
So into the stash for Christmas - not a bad idea to try and do a couple of cards each month - I doubt if I will stick to it but will try!
We have had some snow showers today, although nothing has stuck but boy is it cold! So perhaps the blue/silver combo is just right for today!
Hope you are warm wherever you are!
Joining in at
SSS (Wednesday) - CAS
A2S+M - CAS
ABC Christmas - B for Berries
Christmas @Sweet Stampin - Anything Christmas
Craft Rocket - Winter
I only wish that the taking of the pic of this card was a quick as it was to make. I have had a pig of a job trying to get a photo that didn't have a real icy blue tinge on it.
However, several hours after the first pic attempt I have finally got a reasonable one!
I took some fern and pine needle stamps, inked them in Versa Summer Sky and just stamped randomly at the bottom and sides of the card.
The 'Snowberry' is from an old Elusive Images (Chocolate Baroque) set and heat embossed in silver.
Some of the berries are simple outlines so I added some silver Nuvo Crystal drops to the larger ones. The die is a new purchase (a bargain!) and I silver embossed that too after cutting out.
So into the stash for Christmas - not a bad idea to try and do a couple of cards each month - I doubt if I will stick to it but will try!
We have had some snow showers today, although nothing has stuck but boy is it cold! So perhaps the blue/silver combo is just right for today!
Hope you are warm wherever you are!
Joining in at
SSS (Wednesday) - CAS
A2S+M - CAS
ABC Christmas - B for Berries
Christmas @Sweet Stampin - Anything Christmas
Craft Rocket - Winter
Friday, 18 January 2019
Mid Month at Stamping Sensations
Our challenge at Stamping Sensations is 'Fabulously Feminine'.
I was sent this Stampin Bella stamped image by one of my friends after drooling over it - see - if you annoy someone enough they give in to shut you up! 😂😂
Showing no shame either I also copied the same colour scheme!
Seriously tho' I really do love it so thank you (you know who you are x).
I used Promarkers to colour - Poppy and Ruby for the jacket, Apricot and Honeycomb for her skirt.
I had some tiny black gems so they doubled as buttons.
I fussy cut her out (not a job I am going to repeat!) and popped her onto a Sun Ray embossed background which I thought was perfect for the sentiment using foam pads so she stood out.
We have an amazing prize this month - please visit the challenge blog to check out what it is, and
PLEASE read and follow our rules before linking up.
If you don't follow our rules the DT can't comment on your entry and then you can't be in with a chance of winning!
Sharing at
Cardz 4 Galz - Dimensional Element
I love Promarkers - A/goes
Crafty Creations - A/goes
I was sent this Stampin Bella stamped image by one of my friends after drooling over it - see - if you annoy someone enough they give in to shut you up! 😂😂
Showing no shame either I also copied the same colour scheme!
Seriously tho' I really do love it so thank you (you know who you are x).
I used Promarkers to colour - Poppy and Ruby for the jacket, Apricot and Honeycomb for her skirt.
I had some tiny black gems so they doubled as buttons.
I fussy cut her out (not a job I am going to repeat!) and popped her onto a Sun Ray embossed background which I thought was perfect for the sentiment using foam pads so she stood out.
We have an amazing prize this month - please visit the challenge blog to check out what it is, and
PLEASE read and follow our rules before linking up.
If you don't follow our rules the DT can't comment on your entry and then you can't be in with a chance of winning!
Sharing at
Cardz 4 Galz - Dimensional Element
I love Promarkers - A/goes
Crafty Creations - A/goes
Tuesday, 15 January 2019
CAS Mix up - Mid month reminder
It's middle of the month and time for a reminder for the CAS Mix Up challenge.
Was so proud to have been asked to be guest designer this month and I have enjoyed revisiting the long forgotten technique of Bokeh. (be warned - there are more made yet to share!)
For my mid month post I have gone for coloured Bokeh instead of the usual white on a darker inked background as I did for my first post here
I used a stencil I made myself from acetate and circle dies and selected 3 shades of ink in soft pastel colours.
Inking then commenced!
When done I cut it out with a wavy stitched die.
The sentiment is a Technique Tuesday die and stamp and I finished my card front with a flower die before layering it onto the base card.
Still time to have a go and join us - and lots of inspiration to be had over at the blog!
I am sharing this with -
Alphabet Challenge- Use stitching (my frame die)
Crafty Calendar - Make it Flowery
CAS on Friday - Flowers
HLS January - A/G with Dies
Crafters Castle - A/G + Fun Technique
Was so proud to have been asked to be guest designer this month and I have enjoyed revisiting the long forgotten technique of Bokeh. (be warned - there are more made yet to share!)
For my mid month post I have gone for coloured Bokeh instead of the usual white on a darker inked background as I did for my first post here
I used a stencil I made myself from acetate and circle dies and selected 3 shades of ink in soft pastel colours.
Inking then commenced!
When done I cut it out with a wavy stitched die.
The sentiment is a Technique Tuesday die and stamp and I finished my card front with a flower die before layering it onto the base card.Still time to have a go and join us - and lots of inspiration to be had over at the blog!
I am sharing this with -
Alphabet Challenge- Use stitching (my frame die)
Crafty Calendar - Make it Flowery
CAS on Friday - Flowers
HLS January - A/G with Dies
Crafters Castle - A/G + Fun Technique
Saturday, 12 January 2019
Happy Thoughts
A simple and quick CAS card to share today but the pic quality is not the best as once again it is a grey damp and windy day!
I promised myself that I would try to enter the new challenge at CAS Stencils this month.
This brand new challenge is all about playing with stencils and learning how to use stencils with different techniques and different products.
It aims to make us stretch our stencils and if like me you don't own many this can only be a good thing as it will give me the opportunity to try what few I have in different ways.
The first challenge is the basic 'Sponging' technique and my other 2 choices are Stamping and Die Cutting.
I sponged my little circle stencil (a magazine freebie I only bought the magazine as it had 4 free stencils! ) with Squeezed Lemonade DI. As it is only small I had to move it around to re position a few times.
I then stamped the SU black grid and the tiny splats which had been stamped once on scrap paper before stamping onto the card so they weren't too harsh.
The black butterfly was die cut from some black pearlised card and the sentiment is from Technique Tuesday.
Matted onto black card before popping onto the card base.
Joining in at
Creatilicious - Something New (and that's my stencil!)
Crafty Catz - A/Goes
Cardz 4 Galz - New Stash
Thanks for looking today. Enjoy your weekend. x
I promised myself that I would try to enter the new challenge at CAS Stencils this month.This brand new challenge is all about playing with stencils and learning how to use stencils with different techniques and different products.
It aims to make us stretch our stencils and if like me you don't own many this can only be a good thing as it will give me the opportunity to try what few I have in different ways.
The first challenge is the basic 'Sponging' technique and my other 2 choices are Stamping and Die Cutting.
I sponged my little circle stencil (a magazine freebie I only bought the magazine as it had 4 free stencils! ) with Squeezed Lemonade DI. As it is only small I had to move it around to re position a few times.
I then stamped the SU black grid and the tiny splats which had been stamped once on scrap paper before stamping onto the card so they weren't too harsh.
The black butterfly was die cut from some black pearlised card and the sentiment is from Technique Tuesday.
Matted onto black card before popping onto the card base.
Joining in at
Creatilicious - Something New (and that's my stencil!)
Crafty Catz - A/Goes
Cardz 4 Galz - New Stash
Thanks for looking today. Enjoy your weekend. x
Wednesday, 9 January 2019
A Commission!
Over the last couple of years I have rarely made any commissioned cards due to lack of time but a few months ago a close friend asked me to make her a baby card.
Her daughter had given up all hope of ever becoming a Mum so it was much excitement and trepidation all round when they got the news that she was expecting - not least because in the normal course of things she was considered 'past the age' !!!
(In her 40's! -positively ancient 😲😲!!)
Baby Zach entered the world yesterday so I now can share the card.
I opted for a relatively simple card using an old image from Sugar Nellie - I have had this for a long time and it is one of my favourites - not least because I am pretty useless at shading and this stamp already has it.
Pearlised card used for it all - the embossed background was a piece I had cut out at some time and never used so I just tidied up the edges.
The oval (another odd piece of card!) is of course a Spellbinders die, and I inked the edges in Tumbled Glass DI.
Baby was coloured with Promarkers
The sentiment and the corners also inked were cut from some snippets of pearlised card.
The lace, ribbon and heart charm all from my stash.
Oh and here's Zach!

Popping over to the Playground to see what everyone has been up to.
Also joining in at
TIOT - Something Old (Image)/New (Baby!)
PB&M- New beginnings
Fab n Funky - New Beginnings
Cupcake Insp - New
We are having 2 new external doors fitted today - woke up to thick frost this morning - the poor workmen are frozen.... me - I'm tucked away in the Craftie Space at the top of the house with the heating on!!
Oh and here's Zach!
Have a good day whatever you're doing! x
Her daughter had given up all hope of ever becoming a Mum so it was much excitement and trepidation all round when they got the news that she was expecting - not least because in the normal course of things she was considered 'past the age' !!!
(In her 40's! -positively ancient 😲😲!!)
Baby Zach entered the world yesterday so I now can share the card.
I opted for a relatively simple card using an old image from Sugar Nellie - I have had this for a long time and it is one of my favourites - not least because I am pretty useless at shading and this stamp already has it.
Pearlised card used for it all - the embossed background was a piece I had cut out at some time and never used so I just tidied up the edges.
The oval (another odd piece of card!) is of course a Spellbinders die, and I inked the edges in Tumbled Glass DI.
Baby was coloured with Promarkers
The sentiment and the corners also inked were cut from some snippets of pearlised card.
The lace, ribbon and heart charm all from my stash.
Oh and here's Zach!

Popping over to the Playground to see what everyone has been up to.
Also joining in at
TIOT - Something Old (Image)/New (Baby!)
PB&M- New beginnings
Fab n Funky - New Beginnings
Cupcake Insp - New
We are having 2 new external doors fitted today - woke up to thick frost this morning - the poor workmen are frozen.... me - I'm tucked away in the Craftie Space at the top of the house with the heating on!!
Oh and here's Zach!
Have a good day whatever you're doing! x
Sunday, 6 January 2019
A new challenge year at Stamping Sensations!
Our first theme this year is 'FABULOUSLY FEMININE - suitable for a lady'.
Lots of scope for you to create something pretty!
So here we are -
Quite a change for me to do 'frilly'! Just lately I have been leaning towards more CAS cards simply because they don't cost as much to post!
Lots of coloured card in this craftie space and immediately someone says 'girly', I reach for Pink! The next sheet in the pile was a scrummy dark chocolate brown colour and they looked OK together!
I stamped and clear embossed the flower (SU) onto the pink background card.
Then stamped it twice more onto white card and once again on the scrap of pink left over from the base, using a brown ink.
Assembled it all onto another scrap of pink card before layering it.
Finished with a large brown bow and a couple of pearlies!
Now about our prize - just in case you didn't get enough crafty stash over Christmas we're giving someone the opportunity this month to win a STAMP BUNDLE!Ten stamps (yes I did say TEN) go to the person our Design Team vote as their winner this month - how can you resist?? 😍😍
Please follow our challenge rules and make stamping the focal point of your project! Look forward to visiting you to see what you make!
Joining in at
Simply Create Too - A/Goes
Creations in Pink - A/Goes
ABMTTC - A/Goes
CDTCB - Open Challenge #1
Craft-Dee Bowz - A/Goes
Tuesday, 1 January 2019
Guest Designer at CAS Mix Up!
Super excited to have been invited to be the Guest Designer over at CAS Mix Up this month after winning the November challenge, although I did have to think a bit as the technique is one I haven't done for a long time!
But as I started to do my Bokeh background I wondered why I had hadn't done these backgrounds on more things!
Bokeh is a simple technique really - so there is no excuse for me not doing it more often! And you can use a variety of mediums to create the effect.

I used Distress Inks in shades of Cracked Pistachio, Mermaid Lagoon and Stormy Sky for my background and a White pigment ink for the circles.
Originally I was going to make my own circle stencil but then I remembered I had this one by Inkylicious called 'Bubbles'.
I had no idea what I was going to do until I finished the background and then the card just came together.
The colours which are amongst my fave DI's just reminded me of the sea so Miss Mermaid seemed to be appropriate!
She is from a freebie stamp set which I have had for ages and never used.
I stamped her sat on her rocks twice onto white card and fussy cut. I had to extend the rocks as they weren't big enough to cover the whole of the card base!
I coloured her with the same Distress Inks mixed with a bit of Golden Malachite and Tropic Blue Cosmic Shimmer Powders - her tail is lovely and shimmery!
Popped her rock seat on small foam pads, slid the background in behind then sat her back on top.
Finished off with a couple of Dew Drops and a sentiment from the same set which I rather liked.
There it is - my GD card - Bokeh, Stamping and my choice was watercolouring!
There are plenty of Bokeh tutorials on You Tube if you've never tried it - and it would be lovely if you could join in - you can see some wonderful examples from the talented lot on the Mix Up DT over on the blog.
Happy Crafting and Happy New Year!x
But as I started to do my Bokeh background I wondered why I had hadn't done these backgrounds on more things!
Bokeh is a simple technique really - so there is no excuse for me not doing it more often! And you can use a variety of mediums to create the effect.

I used Distress Inks in shades of Cracked Pistachio, Mermaid Lagoon and Stormy Sky for my background and a White pigment ink for the circles.
Originally I was going to make my own circle stencil but then I remembered I had this one by Inkylicious called 'Bubbles'.
I had no idea what I was going to do until I finished the background and then the card just came together.
The colours which are amongst my fave DI's just reminded me of the sea so Miss Mermaid seemed to be appropriate!
She is from a freebie stamp set which I have had for ages and never used.
I stamped her sat on her rocks twice onto white card and fussy cut. I had to extend the rocks as they weren't big enough to cover the whole of the card base!
I coloured her with the same Distress Inks mixed with a bit of Golden Malachite and Tropic Blue Cosmic Shimmer Powders - her tail is lovely and shimmery!
Popped her rock seat on small foam pads, slid the background in behind then sat her back on top.
Finished off with a couple of Dew Drops and a sentiment from the same set which I rather liked.
There it is - my GD card - Bokeh, Stamping and my choice was watercolouring!
There are plenty of Bokeh tutorials on You Tube if you've never tried it - and it would be lovely if you could join in - you can see some wonderful examples from the talented lot on the Mix Up DT over on the blog.
Happy Crafting and Happy New Year!x
Wednesday, 26 December 2018
Santa has been!
Happy Day after Christmas!
I hope everyone had a lovely Christmas Day - I did - lots of lovely crafty stash from hubby... who proved that whilst I was muttering about 'Mmmmm that's a nice stamp - would really like it ' he was listening!
So I plan to spend the next couple of days playing about with the new stuff - be rude not to show how much I am enjoying the presents now wouldn't it???😊😊
Unsurprisingly though, today I am going to share a card made for sending next year - another one inspired by a Pinterest trawl.
(I actually don't know how many hours I spend looking at other peoples stuff instead of making myself!)
This card all made with little snippets of card laying about from the big Christmas card make, .
Have now had a BIG clean up on the desk and I was surprised to actually SEE the craft mat - been a long time since I have made it's acquaintance!
Used a 'snow' embossing folder on the card base and die cut 2 small circles.
On the smaller circle I brushed over some Peeled Paint DI then had a little bit of splattering fun with Festive Berries DO.
The holly flourish die I have had for a while, and the larger holly leaves and berries was a purchase earlier this year. Both again cut from tiny bits of card. The larger die cuts out the leaves and berries separately - trying to find 3 tiny berry circles amongst all the mess on the desk was fun (not 😕)
After painting all the die cuts I used some Glossy Accents on the all berries and sprinkled a little glamour dust onto the berry trio.
The sentiment was coloured with Festive Berries and also given a dose of glossy accents.
Am paying a visit into the Playground - (hoping that there's some Mince Pies left), although I will have to be well wrapped up as I am still suffering with that nasty cough!
Enjoy the rest of the Festive holidays everyone! x
I hope everyone had a lovely Christmas Day - I did - lots of lovely crafty stash from hubby... who proved that whilst I was muttering about 'Mmmmm that's a nice stamp - would really like it ' he was listening!
So I plan to spend the next couple of days playing about with the new stuff - be rude not to show how much I am enjoying the presents now wouldn't it???😊😊
Unsurprisingly though, today I am going to share a card made for sending next year - another one inspired by a Pinterest trawl.
(I actually don't know how many hours I spend looking at other peoples stuff instead of making myself!)
This card all made with little snippets of card laying about from the big Christmas card make, .
Have now had a BIG clean up on the desk and I was surprised to actually SEE the craft mat - been a long time since I have made it's acquaintance!
Used a 'snow' embossing folder on the card base and die cut 2 small circles.
On the smaller circle I brushed over some Peeled Paint DI then had a little bit of splattering fun with Festive Berries DO.
The holly flourish die I have had for a while, and the larger holly leaves and berries was a purchase earlier this year. Both again cut from tiny bits of card. The larger die cuts out the leaves and berries separately - trying to find 3 tiny berry circles amongst all the mess on the desk was fun (not 😕)
After painting all the die cuts I used some Glossy Accents on the all berries and sprinkled a little glamour dust onto the berry trio.
The sentiment was coloured with Festive Berries and also given a dose of glossy accents.
Am paying a visit into the Playground - (hoping that there's some Mince Pies left), although I will have to be well wrapped up as I am still suffering with that nasty cough!
Enjoy the rest of the Festive holidays everyone! x
Saturday, 22 December 2018
Santa is on his way
I love this Santa stamp!
Sadly he doesn;t belong to me so when I got an opportunity last year to steal him for an hour from a crafting buddy I stamped him rather a lot.... brought lots of him home.... and promptly forgot about him. 😧😧
So there I was putting away the Christmas stash for another year and he was there looking at me from the drawer.
He was still smiling so maybe he isn't too annoyed - and hopefully he will still come and visit me in a couple of days.
Coloured him lightly and popped him behind a die cut frame then added a few holly bough die cuts.
Gave him a bit of sparkle and finished card - unfortunately he will have to go back in the drawer now till next year!!
I have been quite poorly this week with what I can only describe as what started off as a cold but quickly developed into the worst cough in the universe. 😷
I ventured out to do some food shopping on Thursday and it only served to make me worse. I have been indoors ever since.
I am hoping that by Monday I at least start to feel a bit better - otherwise it will be Christmas Day in my PJ's on the sofa wrapped in a blanket feeling very sorry for myself!
If this is your last visit to me before the Big Day, I wish you all a happy Christmas surrounded by those you love. xx
Joining in at
MMM - CAS Christmas
Use Your Stuff - Christmas
LRW - All things Christmas
Dies R Us - Christmas
TIOT - Santa
Sadly he doesn;t belong to me so when I got an opportunity last year to steal him for an hour from a crafting buddy I stamped him rather a lot.... brought lots of him home.... and promptly forgot about him. 😧😧
So there I was putting away the Christmas stash for another year and he was there looking at me from the drawer.
He was still smiling so maybe he isn't too annoyed - and hopefully he will still come and visit me in a couple of days.
Coloured him lightly and popped him behind a die cut frame then added a few holly bough die cuts.
Gave him a bit of sparkle and finished card - unfortunately he will have to go back in the drawer now till next year!!
I have been quite poorly this week with what I can only describe as what started off as a cold but quickly developed into the worst cough in the universe. 😷
I ventured out to do some food shopping on Thursday and it only served to make me worse. I have been indoors ever since.
I am hoping that by Monday I at least start to feel a bit better - otherwise it will be Christmas Day in my PJ's on the sofa wrapped in a blanket feeling very sorry for myself!
If this is your last visit to me before the Big Day, I wish you all a happy Christmas surrounded by those you love. xx
Joining in at
MMM - CAS Christmas
Use Your Stuff - Christmas
LRW - All things Christmas
Dies R Us - Christmas
TIOT - Santa
Tuesday, 18 December 2018
Mid Month at Stamping Sensations
Not long to go before 25th and it is time for our mid month reminder at Stamping Sensations. If you're needing last minute reasonably quick cards here's one! Our theme is 'GLITTER AND SPARKLE'.
I am STILL trying to use up the coloured card mountain - barely a dent sadly..... but I AM trying!
Navy blue card this time -
Stamped and embossed the snowflakes then die cut the oval aperture.
Took a scrap of glitter card and die cut a smaller oval, then put it on small foam pads behind the big oval.
I stamped and embossed the tree on the base card then simply layered it all up.
Added a teeny sparkly at the top of the tree and job done! Quite pleased as it looks very effective and didn't take long to do.
Be Creative are our sponsors this month so make sure your entry has stamping as the focal point to be in with a chance to win, pop over and link up and good luck!
I am STILL trying to use up the coloured card mountain - barely a dent sadly..... but I AM trying!
Navy blue card this time -
Stamped and embossed the snowflakes then die cut the oval aperture.
Took a scrap of glitter card and die cut a smaller oval, then put it on small foam pads behind the big oval.
I stamped and embossed the tree on the base card then simply layered it all up.
Added a teeny sparkly at the top of the tree and job done! Quite pleased as it looks very effective and didn't take long to do.
Be Creative are our sponsors this month so make sure your entry has stamping as the focal point to be in with a chance to win, pop over and link up and good luck!
Monday, 17 December 2018
Last Minute cards
I for the first time in a long time am not panicking that I haven't made enough cards!
I am just using up stuff out on my desk and have made another for next year's stash.
This was seriously one of the quickest cards EVER!
A couple of (very) old tree stamps stamped and heat embossed onto a scrap of linen card.
Some Stormy Sky DI and a penny to create the sky!
A sentiment stamped inked in Versafine Majestic Blue.
Some Stckles sparingly used for a teeny shimmer of snowdust
All layered onto a base card and done!
Joining in over at
Allsorts - Trees
HIMCR - Keep It Simple with Xmas
HLS CAS - CAS Emboss
Fashionable Stamping - Winter
Well the snow I was looking forward to didn't materialise at all - so contented myself with making snowy scenes instead!
Hope all is well in your part of blogland and thanks for stopping by. x
I am just using up stuff out on my desk and have made another for next year's stash.
This was seriously one of the quickest cards EVER!
A couple of (very) old tree stamps stamped and heat embossed onto a scrap of linen card.
Some Stormy Sky DI and a penny to create the sky!
A sentiment stamped inked in Versafine Majestic Blue.
Some Stckles sparingly used for a teeny shimmer of snowdust
All layered onto a base card and done!
Joining in over at
Allsorts - Trees
HIMCR - Keep It Simple with Xmas
HLS CAS - CAS Emboss
Fashionable Stamping - Winter
Well the snow I was looking forward to didn't materialise at all - so contented myself with making snowy scenes instead!
Hope all is well in your part of blogland and thanks for stopping by. x
Subscribe to:
Posts (Atom)