Tuesday, 27 June 2023

Summer Blooms at Try It On Tuesday

Summer has indeed been blooming in my part of the world! We've had hot sunny days and what seemed to be even hotter nights!
TIOT's challenge this fortnight is entitled Summer Blooms. As always you can interpret any way you want in any medium as long as it follows the challenge theme.

There is a field  at the back of our house which has evolved into a wildflower meadow so my make this time has reflected that although the colours are not true to life I just wanted to encompass all the colours I can see!

These are several very old stamps that I own and this was a very quick card to do.

I used my Arteza waterbrush pens coloured the stamps, spritzed with water and stamped onto watercolour card.

Spritzing is one of my fave techniques as it gives such a soft dreamy effect! (My other half would say that describes me........😜

Finished it by matting onto a black background and heat embossing a sentiment in white.

Hope you can pop over to the blog and see what everyone else has served up this month and join us as we celebrate a flowery summer!

Thanks for looking . x 


Tuesday, 13 June 2023

Birds/Feathers at Try It On Tuesday

The weeks are simply flying by (no pun intended) and it's a new challenge over at Try It On Tuesday - the theme is Birds and or Feathers!

Some time ago I saw a painting depicting a bird who had escaped from it's cage and I wanted to try and make a card along the same theme.

We have so many lovely birds singing in the garden and they always sound so happy (they make me feel happy too) so my make this time is a combination of bird song and freedom which to me means - - Happiness!

This little bundle of feathers is out in the tree celebrating the fact that someone has left his cage door open and he is free.

Ink blended background of Picked Raspberry, Spun Sugar and Antique Linen.

I used Black Soot along the bottom and stamped the grass using Card-io stamps from the Textures set.

My birdcage is an old die - has a branch attached to it so I cut it off!

Bird and the tree branch is also Card-io.

Thanks for looking today! x

Thursday, 8 June 2023

Fiery Friend

 We have been blessed with some glorious weather recently so a lot of time has been spent outdoors - either in the garden pottering about and soaking up the sunshine or out armed with binoculars (husband with camera) looking at birds and nature in general. A few days away whilst the weather was so good adds up to a pretty perfect time at the mo!

BUT - I had to have an inky fix in between and here it is


I have been mulling over the idea for this for a while - sometimes I don't trust myself to try out an idea in case it looks rubbish - but I was pretty happy with this one!
A friendly dragon flying in to see his dragon keeper.
A clearing in a wood and a fiery sky whilst they say hello to each other.

Stamps of course by Lavinia and Distress Oxides for background.

I have had Zemira for a little while but this is the first time she (and the dragon) have seen ink!

I used a couple of different colours of Memento Inks for our fiery dragon (thanks to my Misti!) and put some Wink of Stella on Zemira which doesn't show up very well in the photo.

Currently trying to decide if I second/third generation stamp the Lavinia Dragon Verse on the right... been thinking about it for several days .... and still thinking! Instead there may be a few more tree trunks added on the right rather than the verse.... still thinking!!!

Sharing over at
Little Red Wagon - Things that Fly
I Spy - Something with Wings
Fairy and Unicorn - Anything Fantasy
Sweet Stampin' - Things with Wings
NBUS #51

Friday, 2 June 2023

May Card Chain Challenge Reveal

I sent my card this month to Greta in Oregon and received a lovely card from Kath who is based here in the UK!
The colour option for May's Card Chain Challenge seemed simple at first -

until I tried to bring something together and confess I found it quite difficult! I think I simply tried to overthink it! Anyway I soldiered on and also managed to use one of the product options of embossing powder and the 'ripped edges' technique option so that was a bonus!

I have a sneaking suspicion that this embossing folder I used on the background was a freebie in a mag (- but I may be wrong!) but as I had already decided to try and produce something with an Asian theme I used the folder!

The dies are all from a Sizzix set. The flowers/branches in the set are really fiddly but I like using them.

I watercoloured the flower stems using dark blue and a near as I could get it turquoise.

The base was tripled heat embossed with gold embossing powder.

I remembered I had a piece of pale blue vellum so tore a little piece  and used it to hang from the scroll after heat embossing the chinese script and word.
Finished with a heat embossed on vellum butterfly.

You have a few days to sign up for the next challenge - get over to the blog and add your name!
Thanks for looking today. x

Tuesday, 30 May 2023

Damn Men!

This fortnight's challenge at Try It On Tuesday is MAKE IT MASCULINE.

Man cards...I struggle so much with them! I try to come up with something different and original but in the end always revert back to the easy option - which is usually something rusty looking in the shape of cogs or clocks!

So here is the inevitable 'cog card for a damn man'!

Some time back I was gifted by a fellow blogger a couple of pieces of Tim Holtz shimmer card which is specifically for use with alcohol inks. This was the first piece I used and I must confess the shimmer is fantastic (which is probably why the pic is so bad!)

Once I'd covered the shimmer card with alco ink I took a cog stencil and inked over it to give a bit of depth to the background.

I used gilding wax to colour the die cut cogs.
Hope you can find time to make a man themed project this time round - and if you're seeking inspiration the rest of the DT and our Guest Designer have some for you over on the challenge blog!
Thanks for looking. x

Thursday, 25 May 2023

Is this happening to anyone else? EDITED - THANKS TO GUNDI!

 The annoying mystery has been solved. A big thank you to Gundi (Paperielle) for her answer and it all becomes clear now - it's not my posts at all which violate anything - it's the links in my blog post!
Here's Gundi's reply for anyone else who has (or may have in the future) received messages from Blogger (and it is more likely if you have been blogging for a long time)
Hi Viv,
I got emails like this from Blogger too. Then my son helped me. He said there are links in my posts to sites that no longer exist. I checked and it really was. But I didn't feel like deleting all those links, so I deleted all the posts in question. They were all posts that I had written 8 to 10 years ago, so deleting them didn't hurt that much. I hope I could help you. Gundi

Over the last couple of days I have received e mails from Blogger saying
"This post was unpublished because it violates Blogger Community Guidelines. To republish, please update the content to adhere to guidelines"
Today at the top of my Posts Page the same thing - yet it doesn't say which post!
Having read the Community Guidelines I am a little at a loss to see what violation has been done anyway as my blog has been in existence since 2008 and the only thing I have shared on it has been my art work!
I am not very impressed that these things are just deleted without any prior warning - particularly as at the moment the posts are really old ones dating back since 2010.
Is this happening to anyone else?
How do I stop it?

Tuesday, 16 May 2023

Keep It Simple at Try It On Tuesday

For the next two weeks our challenge theme at Try It On Tuesday is 'Keep It Simple'.
So a CAS card from me!


I smooshed a bit of watercolour card across some watery Mowed Lawn DI. One of my better results I thought!

Cut out with a stitched die and stamped some bamboo at one side. The bamboo stamp is years old and I think it's from Choc Baroque.

Added a thin stitched die frame on top as an experiment - didn't glue it at first!

I love Ginko leaves so when Inkylicious brought this set out I had to have it.  Stamped and fussy cut and then arranged them inside and outside the thin frame before glueing it all in place.

I was going to add another ginko on the top right but remembered I had a chinese writing stamp and a little bit of the smooshed piece left so used it up.

Finished it all off with a couple of little citrus green dots, using a bigger one to hide the overlap of the offcut bits!
For this make I used linen textured cardstock to give the background some interest.

Please go visit the challenge blog and see what the rest of the team have come up with this time!
Hope you can join us too and thanks for looking today. x

Tuesday, 9 May 2023

Reminder post - Try It On Tuesday - Use a Stencil


Mid way through our USE A STENCIL challenge at Try It On Tuesday.

Having made a card using my circles/bubbles die the waste was lying on the desk so I used it to make this!

Blending Cracked Pistachio, Mermaid Lagoon and Peacock Feathers over the waste and overlapping to make sure it filled the entire side of the card.

Added a white heat embossed sentiment on a scrap of black card and a couple of teeny sequins.

Was really quick to do and is now in the 'man' stash box! (yes even with the sequins on it!)

Just a week left for you to come and join our challenge - hope to see you there! x

Tuesday, 2 May 2023

Try it on Tuesday - Use a Stencil

Onto our next challenge at Try It On Tuesday!
(As promised here is the second post from me today - If you are here from the Card Chain Challenge April Reveal link post please just scroll down to the previous post!)
This time at TIOT we want you to 'Use A Stencil' - that's it - plain and simple use a stencil in anyway you want!

I did a simple technique called 'Double Stenciling' for this card.

My background stencil was inked with Antique Linen.

To my shame this Sweet Poppy (along with a couple of others)bought some time ago has never been used. 😞
I don't know why cos I really like it!

Leaving my background stencil in place, I put the poppy field stencil on top and blended the flower heads Abandoned Coral, Spiced Marmalade and Fossilized Amber.

I then removed the background stencil and put the poppy one on top lining it back up, then used the same colours over the top.

This gives a shaded effect where the stencils all overlap and you can see the background stencil on the flower heads. Quite like it!

A little bit of Bundled Sage for the stems and a triple die cut sentiment to finish .

Please have a look at the DT makes over on the blog - lots of lovely ideas and am looking forward to seeing your stencil makes too! x
Sharing over at
Crafting Happiness - Flowers
Make My Monday - Flowers
Stencil Fun - Flowers
NBUS - My stencil!


April Card Chain Challenge Reveal!

This is reveal day for our April Card Chain Challenge and as it's also launch date for our new challenge at Try It On Tuesday this is the first of 2 posts from me today!

This month I am feeling very pleased with myself as I had a go at replicating the sketch AND the colour combo (- very daring for me as I actually find following sketches quite difficult) and also used the Friendship theme. Not often I manage to do more than one thing!

I love this Altenew Wallpaper Art stamp set even though the flowers are quite big but they are beautiful.

I don't though have the matching dies so this involved an awful lot of fussy cutting.

The colour combo was charcoal, lime and bumblebee so I used Altenew Pure Graphite ink on the flower and the big leaves the coloured with Nuvo Watercolour 'Willow Green' which is the nearest I could match to.

Bumblebee proved a little bit trickier as I tried a couple of yellows for the flower centre and they all looked wishy washy and almost the same as the lime! In the end I went for a Promarker (Canary) and brushed over a teeny bit of yellow Wink of Stella - doesn't show up very well in the pic either!

Stamped the sentiment and decided instead of 'drops' to do a bit of spattering... got a teeny bit carried away I think!

My card flew off to to Gail in Norway and this month a big thank you to my friend Hilary who sent me a beautiful card and some gorgeous foiling!
There's still time to join in the May challenge - pop over to the blog and sign up!
Thanks for looking today - hope you'll check out my DT post for TIOT as well and maybe link up there too! x
Sharing my flower over at
MMM - Flowers
Crafting Happiness - Flowers

Tuesday, 25 April 2023

Try It On Tuesday - Reminder post!

 The start of the second week of our Rainbow Colours challenge at Try It On Tuesday and I've gone for something a little less 'full on' than my launch make!
(Here if you didn't see it and haven't a clue what I'm going on about!)

This time instead of vibrant colours I have gone for more pastel shades of the rainbow.

The leaf sprays are Altenew stamps, and I stamped and clear embossed.

I used Distress Oxides to watercolour

The sentiment stamp was a gift and I thought it was perfect for the pretty colours which although are muted are still a kaleidoscope of shades.

If you've not yet linked up to this fortnight's challenge, you still have time! x

Am sharing at
Colourful Options - Pastel
Sweet Stampin - CAS
Krafty Chicks - CAS

Tuesday, 18 April 2023

Try It On Tuesday - Rainbow Colours

Our new challenge at Try It On Tuesday is 'Rainbow Colours'

This was a bit of fun to do!

I used an air blower to splat out the paint -I thought these would be easy to use but I actually found it quite tricky.
It's definitely one to practice as the paint does splatter everywhere.

After a couple of failed attempts I managed to produce something I was happy with!

Been told that this technique is better/easier with Distress Re-inkers but I didn't have the colours I wanted so improvised by simply using watercolours.

Using watercolour paints I think some of the shades turned out not as vibrant as they should have been!

The sentiment is from Bee Crafty.

Hope to see your rainbow creation in our Linky this fortnight and please go visit the rest of the DT and our wonderful Guest Designer! x


Thursday, 13 April 2023

Hold On!

Been having a bit of inkiness the last couple of days whilst the weather has been so changeable. I've made a couple of cards and this one I am undecided as to whether it is finished or not!

It was though an absolute horror to photograph - I must have taken about 50 pics and wasn't happy with any of them.
None of the photos showed a true representation of the colours which are slightly muted nor any of the (liberal helping) of Wink of Stella.


Anyway here it is -
I started blending my background with Antique Linen then worked out using Stormy Sky, Weathered Wood and Hickory Smoke.

I masked off the trailing vines that Rue clings to on the stamp - this was a bit fiddly but happy with the way the image turned out.

I then white heat embossed several Dandelions and finally added some Spanish Moss Foliage in between the dandies, positioning them all from Rue's hand so she really is 'Hitchin' a Ride'!

I used lots of  clear Wink of Stella onto the dandies and dotted some about randomly before I coloured Rues wings with different colours.

Added some white spatters.

Am undecided as to how to complete it - jury is out between a sentiment or a Lavinia script stamp (second or third generation stamping) added down the side.
Shall put it to one side whilst I think about it!

Sharing Rue and her Dandy Flight over at
The Paper Shelter - Anything that Flies
Paper Funday - A/Goes with option of Flower Power (Rue is definitely powered by Flowers!)
Creative Inspiration - A/Goes

Thanks for stopping by today - hope all is well in your part of blogland. x

Tuesday, 4 April 2023

Try It On Tuesday - Hello Spring!

 Our challenge at Try It On Tuesday for the next 2 weeks is 'HELLO SPRING'.
Here's my make -

Stencil monoprinting is a fave technique of mine and I like that you never get two prints that look the same using the same stencil.
It's easy to do as well so another bonus!

For my background I took a wavy dots stencil, Fossilized Amber and Spiced Marmalade Oxides.
I rubbed the Oxides across the stencil (more Amber than Marmalade) and spritzed it with water.

Put the stencil on top of my cardstock and pressed lightly using a paper towel - this has the added bonus of mopping up any seepage through the stencil!

My flower was a present and didn't have any packaging so don't know make.

I stamped, clear embossed then fussy cut. I used the same 2 Oxides to give the flower a little colour and added a teeny bit of glittery schtuff to the flower centre.

Hope you will go over to the challenge blog and check out the rest of the DT's makes and also that you'll have a go and link up with us this time round! x
Am sharing over at
Stencil Fun - Pattern (my wavy dots stencil)
Crafters Cafe - Circles
613 Avenue Create - Stencils

Sunday, 2 April 2023

March Card Chain Challenge

 My card for this month's Card Chain Challenge made a mammoth journey to Suze in New Zealand! Thankfully it arrived before the end of the month!


The colours given were a bit tricky for me but I continued with my quest of using the colours and trying to combine with one of the other technique elements.
Fortunately the colours don't have to be exact so I used a lighter few shades interpretation of each colour and the 'Stamps' product option.

The vase of bright sunflowers is by Technique Tuesday.
It comes with a matching die although I cut this by hand as there was too much white outline for my liking!
Coloured with watercolours.

The wavy edge background panel was done blending Distress Inks Spiced Marmalade and Dried Marigold with a light brushing of Peeled Paint. I then simply watercoloured a few lines to 'ground' the vase.

The sentiment is from SU.
I received a lovely card from blogging buddy Pia in Norway too - so thank you Pia! x

There's time for you to join in our challenge for next month if you want to - simply pop over to the blog and check out how it works!

Tuesday, 28 March 2023

Bunny!


I bought these tiny Bunny dies years - some time- ago and found them whilst looking for something else!
They're a set of 3 and really quite cute so have no idea why I never used them before.

Someone asked me for a simple Easter card for a child and "please could I have it by Tomorrow cos I don't trust the post" !!!!!!!

I thought the CAS option was best - and although I was tempted to mess about a bit longer with a proper inky scene the time limitations were always in my mind.
Hence one very quick clean and simple card needed so that it can be included with a small Easter present.

Stamped the Eggs and the grass (all Card-io) direct onto the card base and just added a die cut frame and the two bunnies (the third one in the set had hopped off somewhere!)

The Card-io Egg stamps were part of the Christmas present consignment from my wonderful husband and these also used for the first time

For some reason the sentiment looks crooked in the pic - it isn't!

There's still time to join in our 'Oh So Sweet' challenge at TRY IT ON TUESDAY where we're looking for anything cute or sweet related- the linky is full of cuteness!

I'm linking my little bunny make over at
NBUS #48
Sweet Stampin - Spring/Easter
Get Creative - Bunny
MTTC - Springtime


Tuesday, 21 March 2023

Try It On Tuesday - Oh So Sweet

 The latest Try it on Tuesday challenge is called 'Oh So Sweet'.
So your make can be anything you like as long as it has a theme which is sweet related - Cute, pretty, cakes - anything which is sugary!


I used to do a lot of 'cute' cards but it's something that I don't do often now - that said I quite enjoyed doing this one which was simple and quick!

I took a honeycomb background stamp, inked and spritzed with water. This gave me a softer impression.

The bee stamps are all from MFT, coloured with Inktense watercolour pencils.
There was a matching set of dies but at the time I didn't get them so these are all fussy cut - the bees were little 'b's to cut out I can tell you!

Once I decided where they were going I stamped them directly onto the background so I could get their antennae and little stingy bit without having to worry about how I was going to cut them out - they looked real peculiar on the desk with just their round bodies and faces!

Once I'd stuck them down I gave their wings a little glittery dust and finished off with some tiny black paint splatters.

The sentiment is from the same set.

Look forward to seeing what you make this time round! x

Sunday, 19 March 2023

Little bits!

Made this from tiny bits of watercolour card that I had left over from a bigger project (which I can't share at the mo!)
I was about to sweep them all into the bin as they were really small scraps but remembered these dies which are quite small.

I masked off my white base card and lightly sponged on some distress ink
Die cut as many bits as I could starting with the vases as obviously they were the biggest and just coloured them all in pastel shades.
It was a bit fiddly assembling the flowers/leaves into the vases cos they were so tiny!

It's been a little while since I have been in the Playground and I feel rather naughty as one of my makes was chosen as a Top Pick a couple of weeks ago - I just don't seem to have found any time recently to simply sit down and have a play for myself.
So am taking my vases into the Playground today for Miss Di and Sarnie to show that I am sorry for being such a bad snippeter!

We are busy doing some prep work in the garden when the weather is dry - we have a major drainage problem as all the water from the driveway and small road at the back simply runs into the garden - coupled with some ridiculously heavy clay soil it really has been like a river running into a lake this winter - so work is starting middle of next month and we're in the process of trying to rescue as many of the plants I put in last summer, transferring them into pots before the driveway and the garden is dug up by the landscaper to install some proper drainage.
Am also sharing my make over at
Krafty Chicks - CAS
Paper Players - CAS/Spring
613 Avenue Create- CAS
Tic/Tac/Toe - I chose the middle row down - Pastel Colors, Flowers, Spring Theme

Thanks for finding the time to stop by. I hope all is well in your part of blogland. x

Wednesday, 15 March 2023

More Green!

We're just over mid way through at the 'Go Green' challenge at Try it on Tuesday and my DT card is the post below this but here's another green themed card and this time it has a pop of colour!

I've not added a sentiment as I don't know yet what I will use it for - so will stamp something once I know.

This was another inky make which I enjoyed doing.

Starting with a smooshed Mowed Lawn DI background on some watercolour card, I did some third generation stamping with an Indigo Blu script stamp which I have had for a long long time in Versafine Clair Verdant.

The foliage stamps all from stash (again old ones!)

The flower is a from a Penny Black set inked with Versafine Clair Charming Pink.
.
I did some green ink blending round the edges before matting onto lime green card.

There's still time to join us at TIOT this fortnight!
Thanks for popping in to see me today - I hope all is well with you in blogland! x

Am also linking up to
Crafty Gals  #241- Make it Green
Sisterhood of Crafters - Use Green
Crafting Happiness - Lots of Green

Tuesday, 7 March 2023

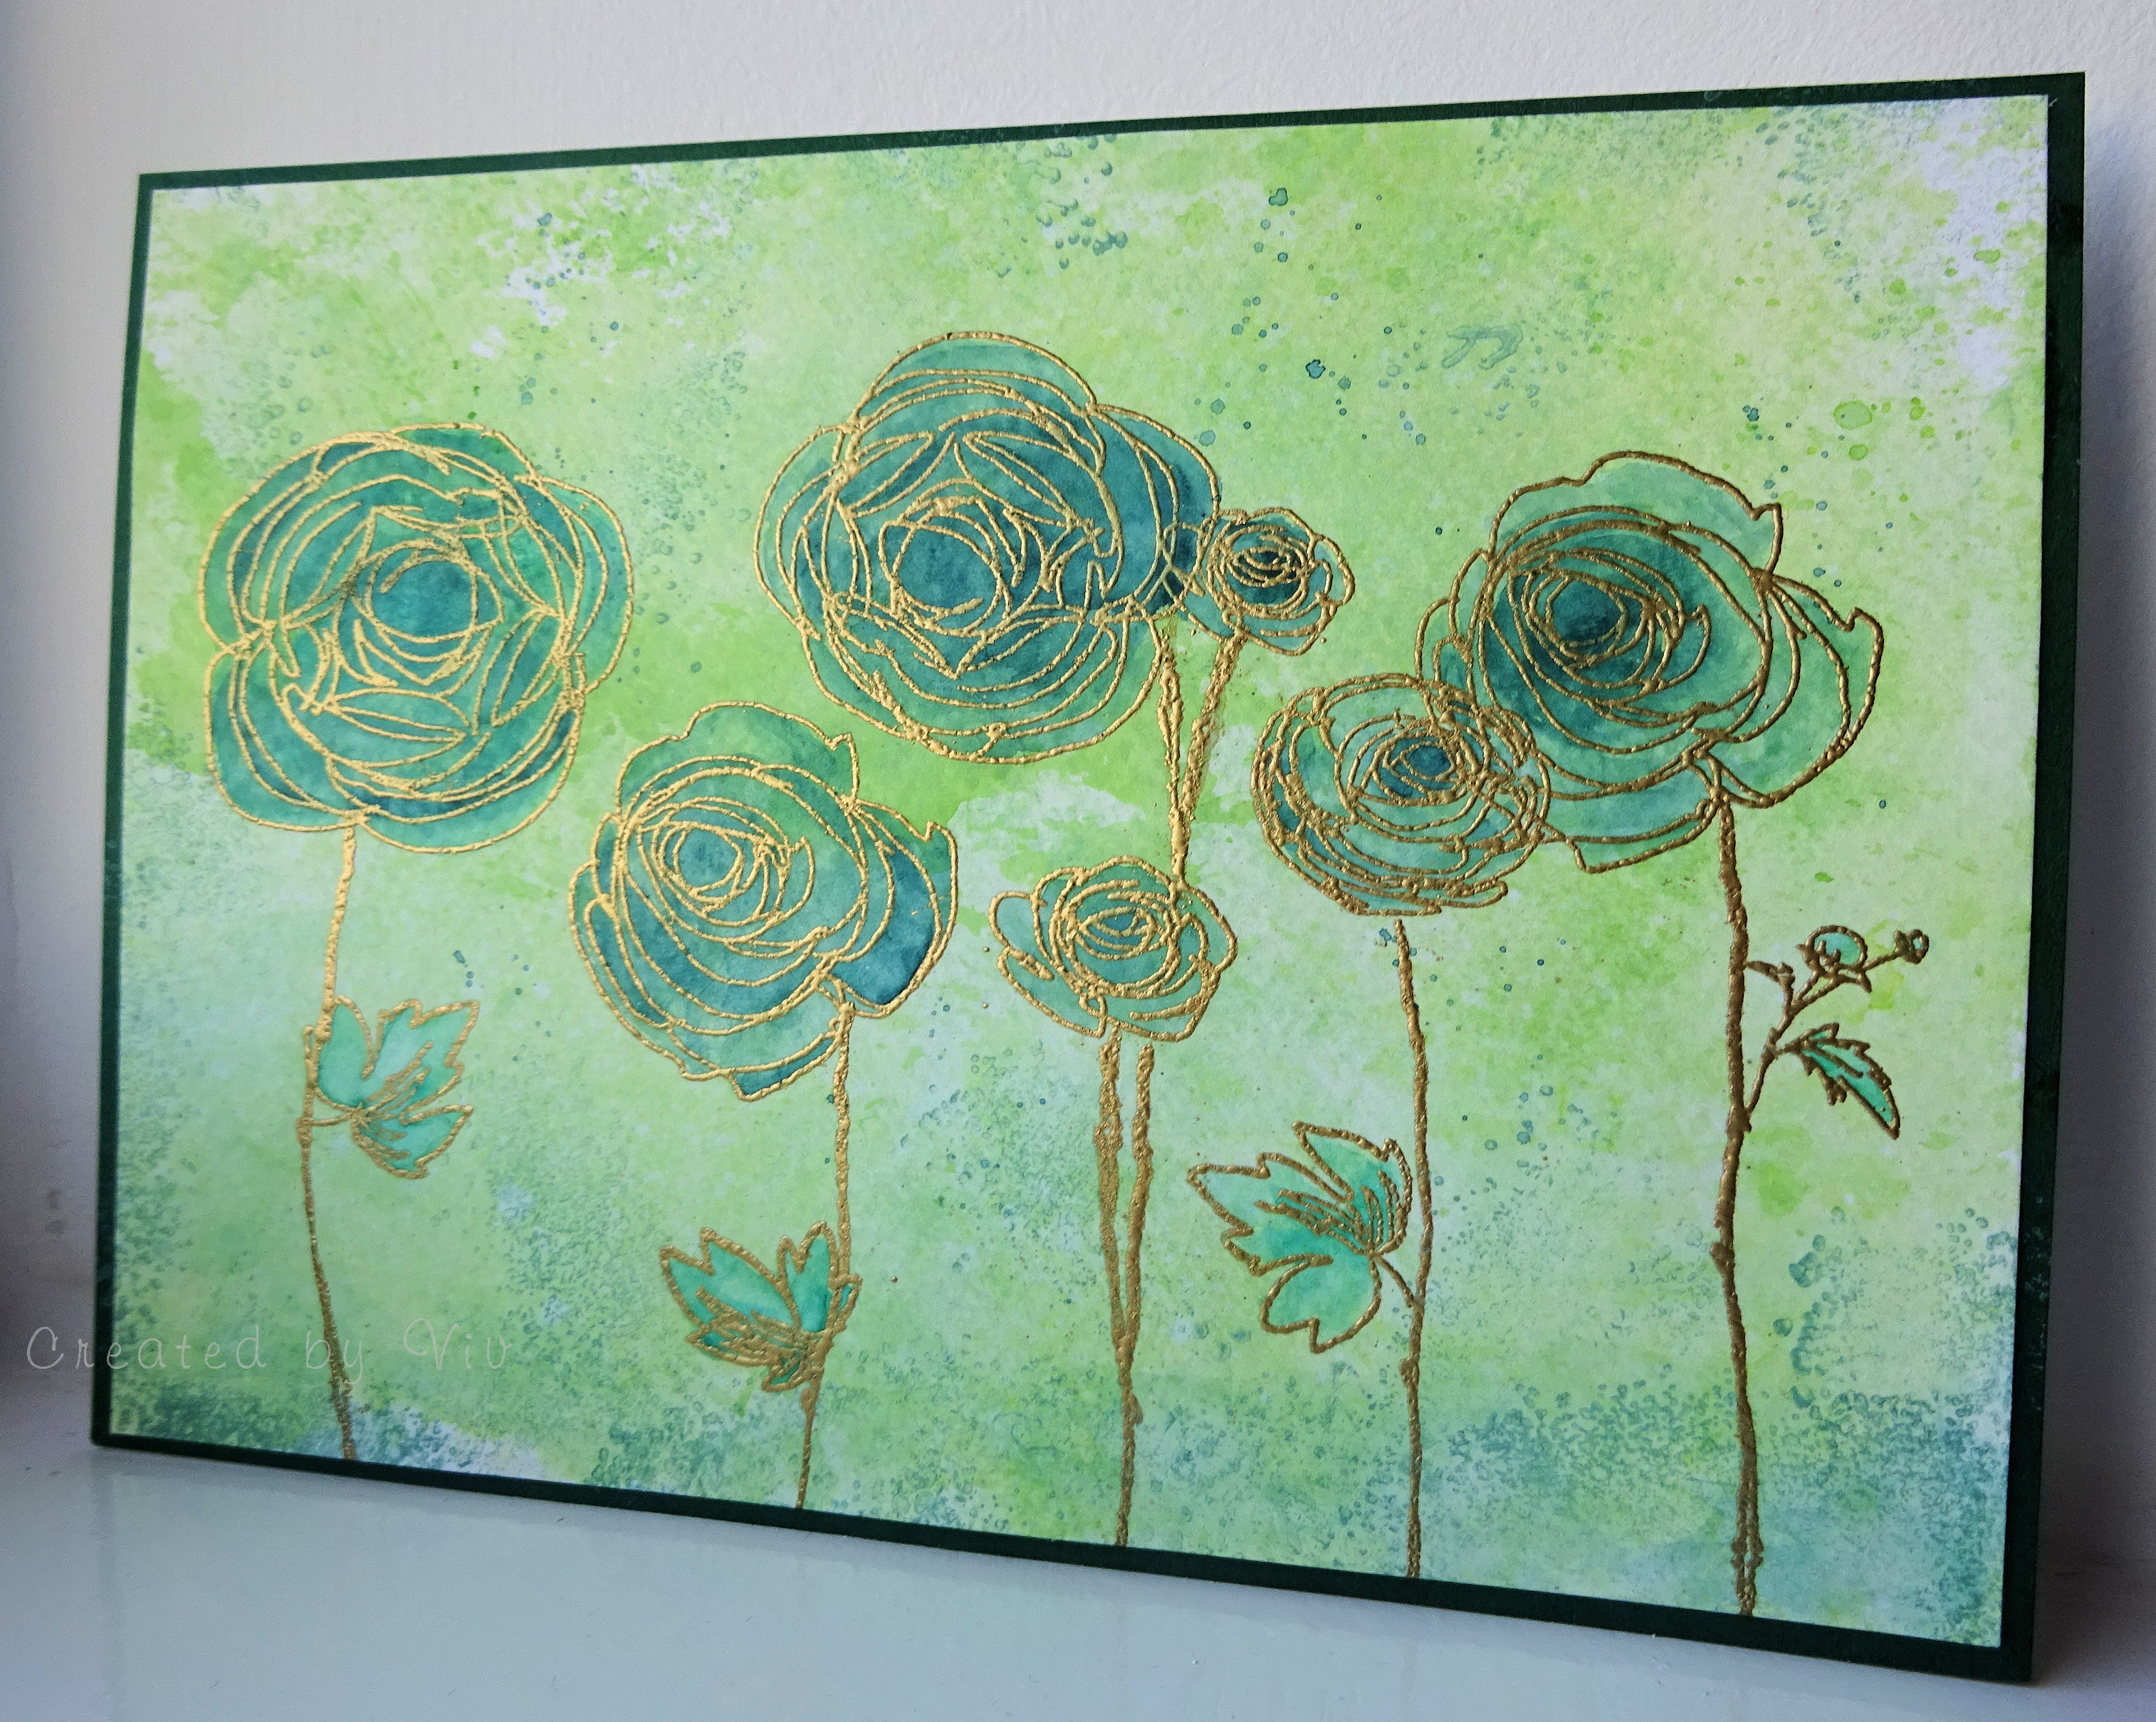
Try It On Tuesday - Go Green

 Our challenge at Try It On Tuesday this fortnight is - GREEN. So you can either use the colour or recycle something to make your project!


I chose to simply use different shades of the colour as it's one that I quite neglect as a main colour on my cards.

I smooshed a background using Mowed Lawn and Shabby Shutters.

My stamp set is very very old! But it is one of those 'go to' sets when all else fails! As it's several different stamps and not one complete plate where the design was already done (I think both were available at one time) it took a little while positioning, stamping and gold embossing onto the background.

I used Nuvo watercolour pencils to colour the flowers in a shade called Deep Viridian (love this colour and this was the first time using it!) and the leaves were coloured in Malachite Green.

I used Versamagic Oasis Green chalk ink on a tiny piece of scrunched up dry baby wipe to add a little depth to the bottom before sticking it all onto the dark green base card.

Thanks for looking today. Please pop over to the TIOT blog and have a peep at the makes from the rest of the DT - and I hope to see YOUR make linked up too! x
Am sharing my make over at
Colourful Options - Green
Double D - Everything Coming Up Green
Beyond the Blue - Blooms